
EOS
Unofficial EOS Token Registration Guide (Old MyCrypto/MyEtherWallet Interface)
Blockchain Beach is reporting these steps based on available public information and have linked to the original sources in the article. We have not spoken to any members of Block.one to complete this post. Users are responsible for their own tokens and Blockchain Beach does not accept liability for the EOS Mainnet token swap.This guide includes screenshots from the old interface of the MyCrypto Software Wallet, which mirrors the current MyEtherWallet interface. To see the new MyCrypto interface, click to read the other version we have of this article.
The much anticipated EOS smart contract operating system protocol launches its Mainnet on June 2nd, 2018. This will culminate the end of a year long Token Generation Event, a snapshot for exciting Airdrops (including Everipedia), and its own set of fraudsters attempting to swindle the public of their EOS tokens.
The EOS token sale was a sale of an ERC-20 token that will be replaced by an EOS Mainnet token upon launch. The EOS website allows token purchasers from the daily sale to easily register their tokens and let EOS’s parent company, Block.one, given they are located outside of the United States and China, regions that are not allowed to participate in the main sale.
So what does that mean for US-based EOS token holders who purchased their tokens on an Exchange (or those who purchased in the main sale, but have since moved the tokens to a different wallet)? You have a few options, each with their own pros and cons.
Option 1: Register Your Tokens Using a Software Wallet
Why: Using a Software Wallet gives you complete control of your tokens and all rights that are associated with them. Two of those rights include voting/governance and airdrops:
Voting/Governance – The decisions about how the EOS network will operate will be made by the token holders by temporarily staking their tokens. The better the decisions of the community, the better the network will scale and perform (the first major decision is who the initial 21 block producers on the network will be, a vote happening upon the launch of the EOS Mainnet). If someone else (like an exchange) is holding your private key, they control your vote.
Airdrops: EOS DApps, including Everipedia, will be giving free tokens to all EOS token holders. If you hold your own EOS tokens, the airdrops will be deposited into your software wallet (see below in this article for more about options with exchanges, but an exchange is never required to support an airdrop).
Why Not: If you’re not interested in voting and would rather not have to manage our own Private Keys, even if you will miss airdrops of other tokens.
Instructions:
(Blockchain Beach’s preferred software wallet is MyCrypto (which was previously hard forked from the popular MyEtherWallet). If you have not previously created your MyCrypto wallet, you can follow our tutorial here).
These screenshots are from the Legacy version of MyCrypto, which can be found at https://legacy.mycrypto.com/ and also work for MyEtherWallet. MyCrypto recently updated their interface and you can find the guide to that interface here.
Once you’ve created your wallet, use the below steps to register your EOS tokens (these steps were recreated by following a top tutorial on Steemit):
Step 1: Send a small amount of Ethereum (ETH) from an exchange/broker to your wallet. This is because every Ethereum transaction requires a small amount of ETH as a transaction fee, known as gas. Depending on the time of day and the current volume on the network, the fee should be the equivalent of a few dollars (USD). However, if you don’t have enough ETH in your wallet, your transaction will fail and your wallet will not become registered for your EOS tokens.
Step 2: Visit the EOS Token Generator. This is a Github site, built by user @nadejde that acts as a work around to the part of the EOS website that blocks United States IP addresses:
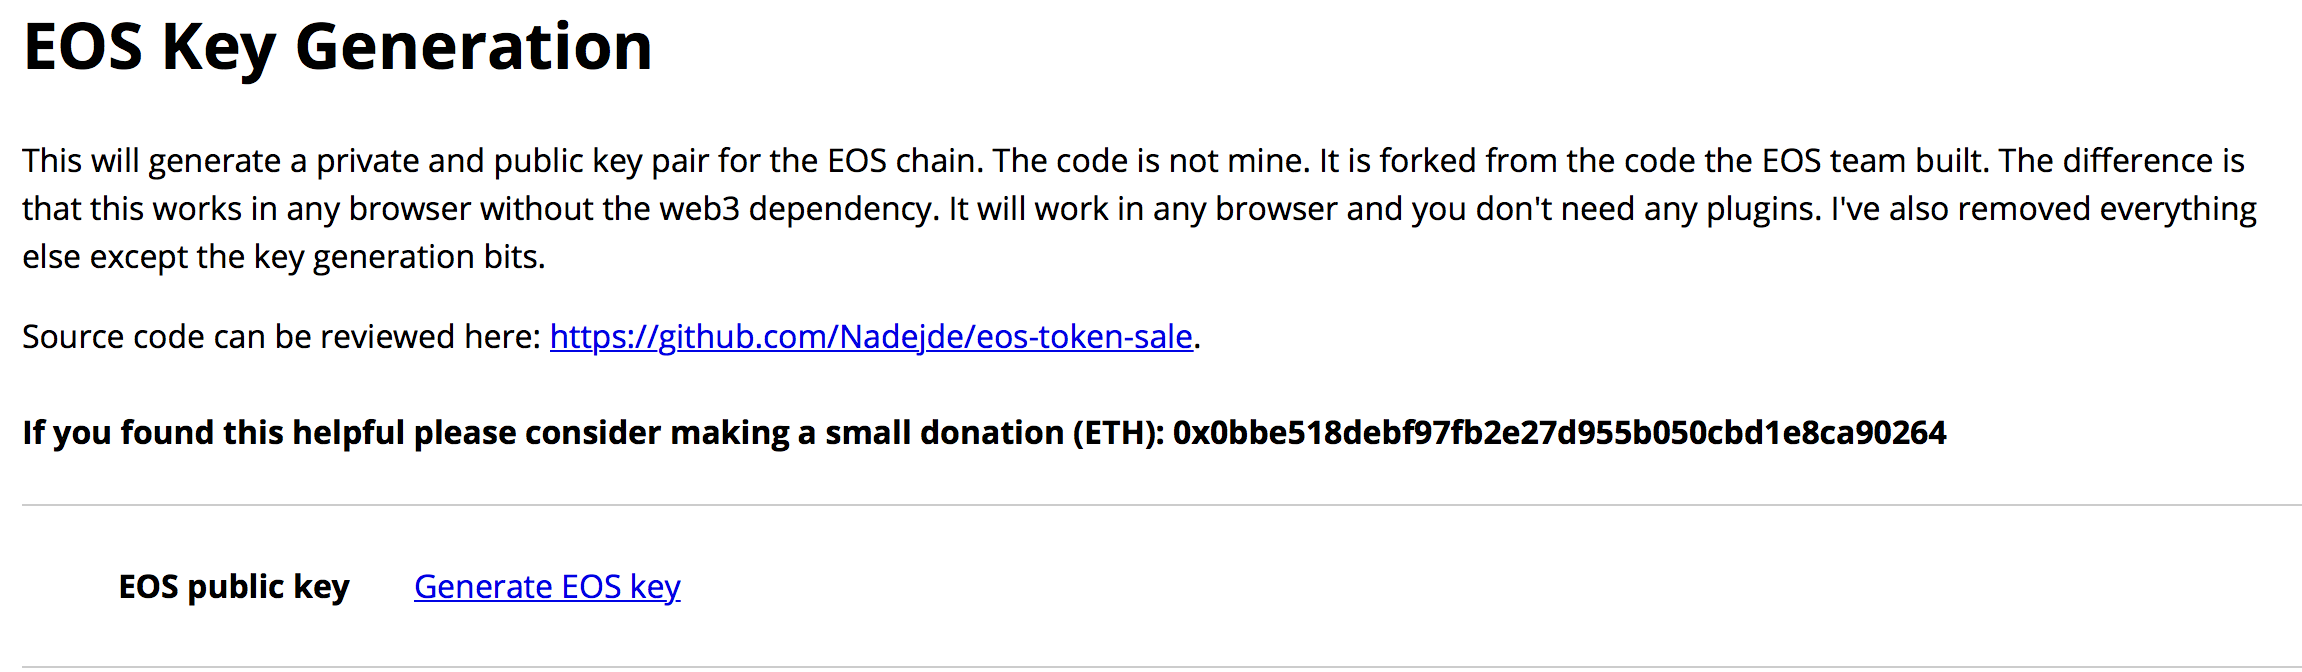
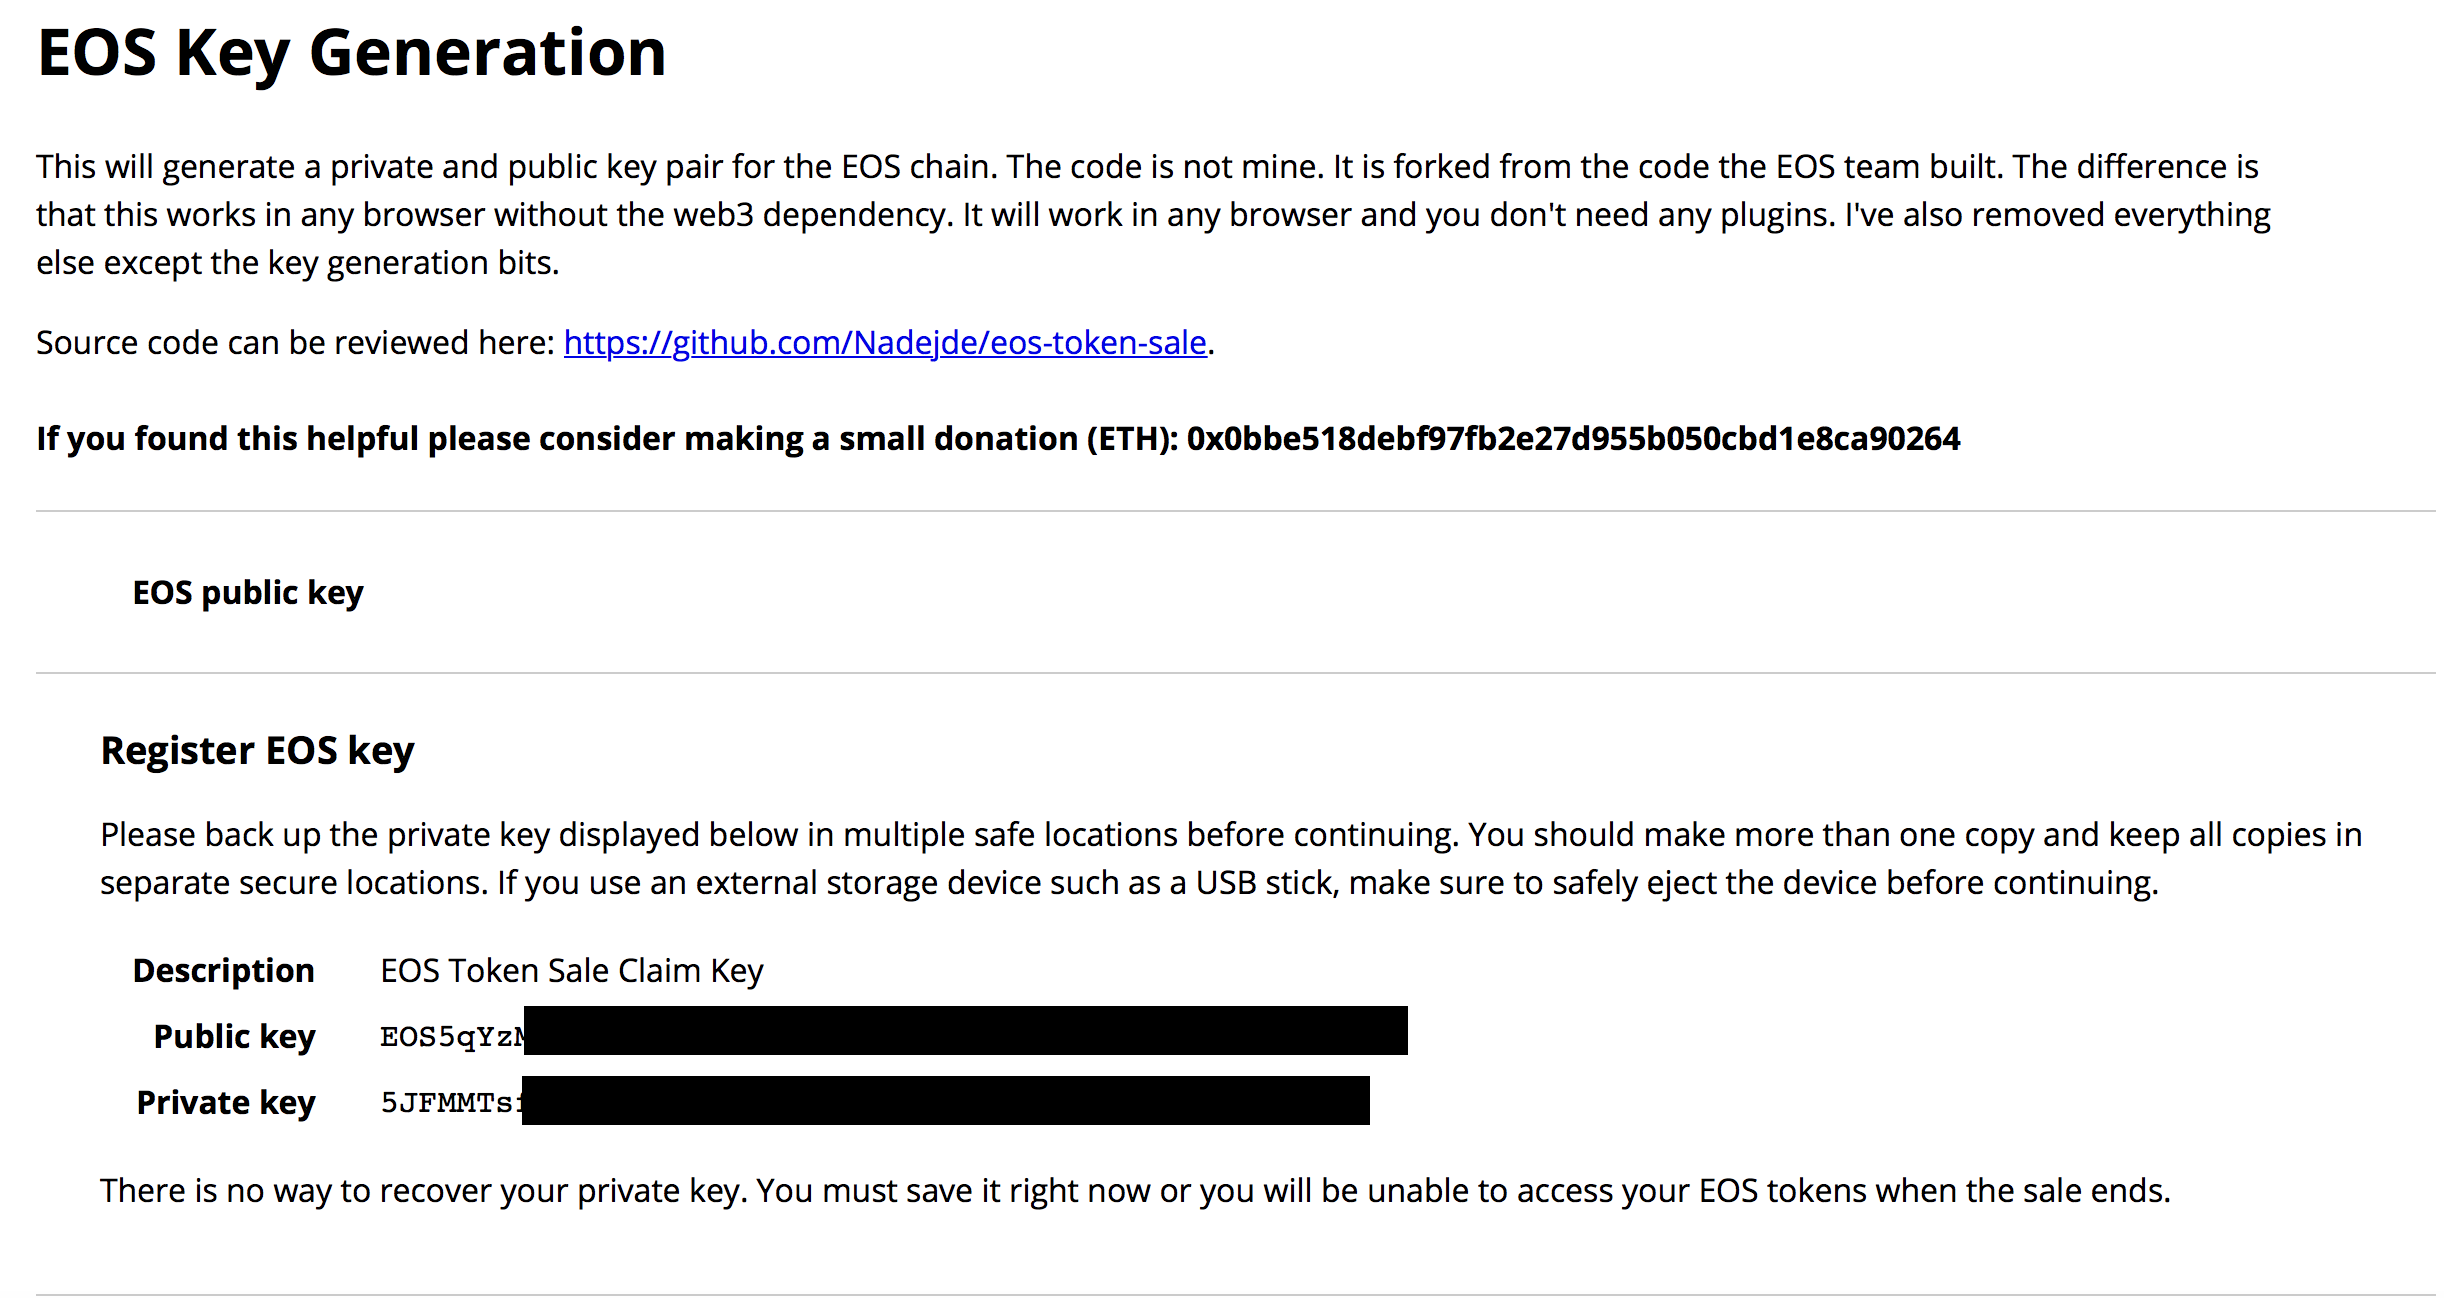
Step 3: When you click, “Generate EOS key,” it will provide you with a Public and Private EOS key.
DO NOT LOSE THESE KEYS:
Step 4: Once you have your EOS keys, visit your MyCrypto wallet and select the “Contracts” tab:
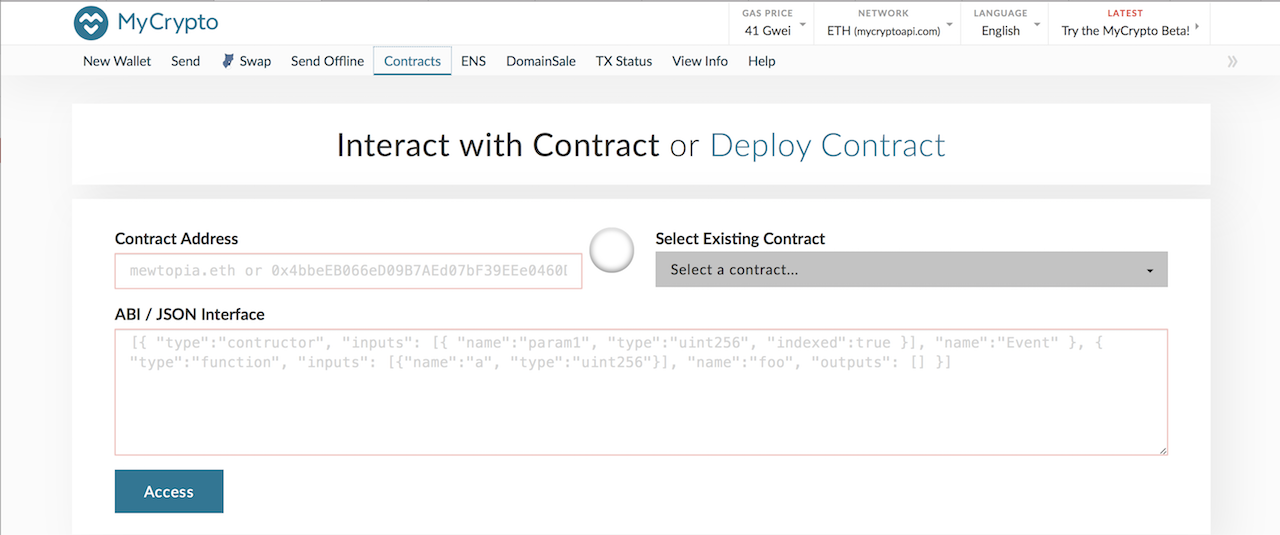
Step 5: On the right side, you’ll find a “Select Existing Contract” drop down menu. Click on the menu, scroll down, and select “EOS: Contribution:”
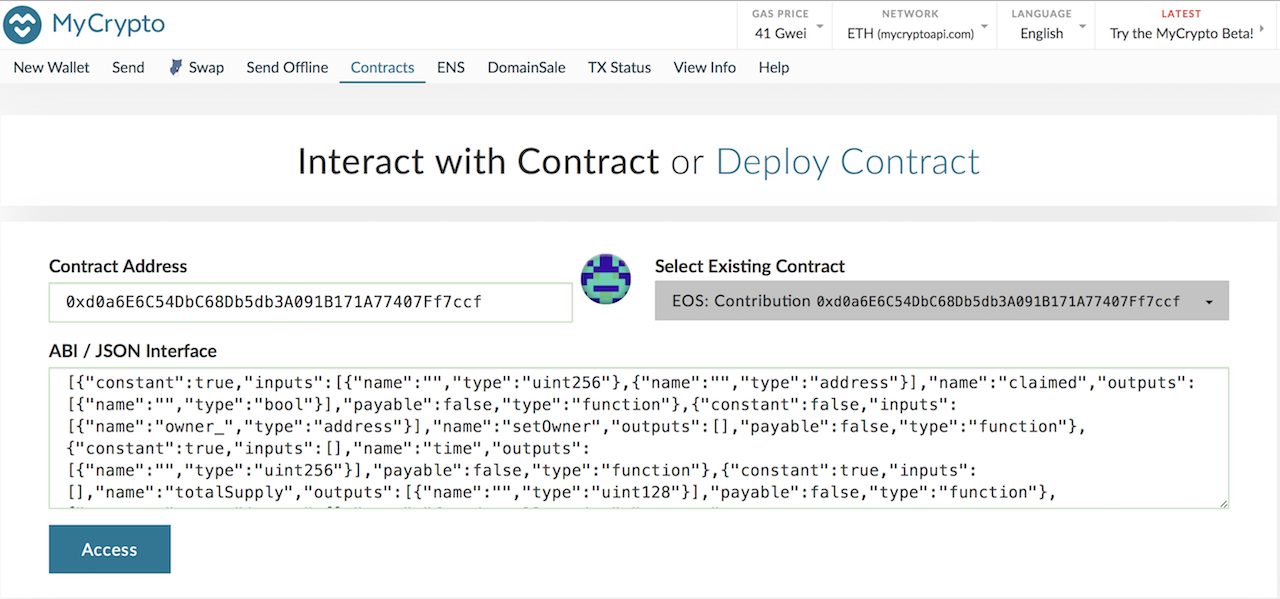
Step 6: Click the “Access” button to reveal further instructions. From the “Select a function” dropdown menu at the bottom, select “register.“
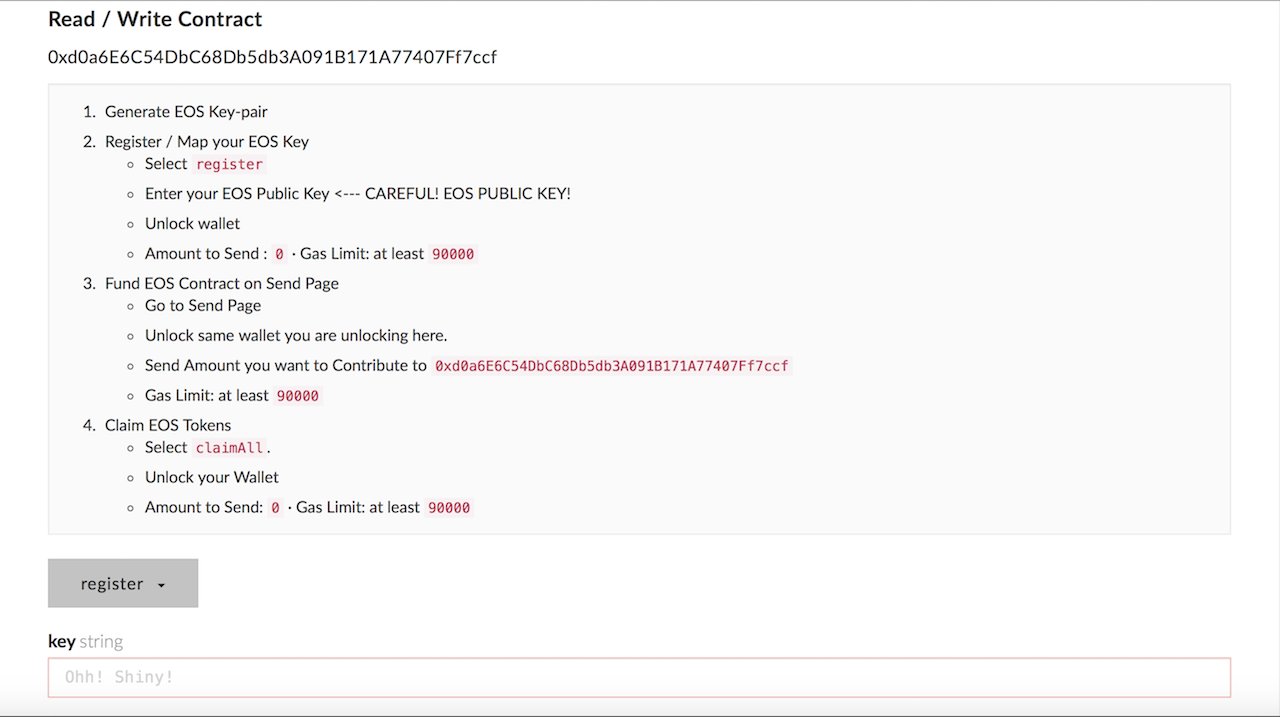
NOTE: We have already completed step one and please disregard steps 3 & 4 in the screenshot above.
We are now only concerned with “Step 2. Register / Map your EOS Key.”
Step 7: Paste your EOS Public Key under the “key string” (not your Private Key):

Step 8: Link your MyCrypto Wallet to your EOS address by unlocking your wallet using your preferred method. For more information on this process and the preferred methods, please refer to our MyCrypto guide:
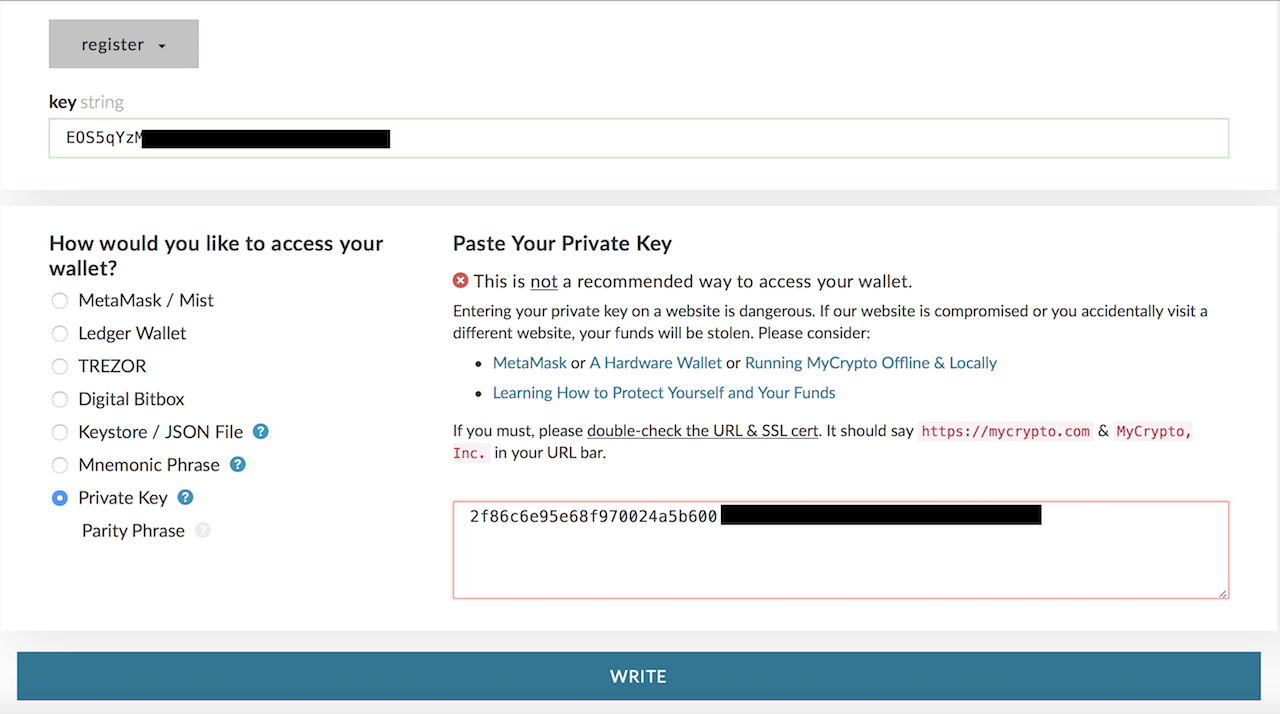
Step 9: Click “Write” to bring up a transaction pop up. Click “Generate Transaction” to show your transaction:

Step 10: Click “Yes, I am sure! Make transaction.” If you see a green bar at the bottom, your transaction has been broadcast to the network and you are done (given you put enough ETH in your account to complete the transaction.
If you see a red bar, you likely did not complete “Step 1” from above or the ETH you sent from your exchange has not yet appeared in your wallet. You’ll need to double check that step or wait for that transaction to complete.
If you want to check if you did it correctly:
Step 1: Give your transaction time to process and then return to the front page of MyCrypto and click on the “Contracts” tab. Complete Steps 4 & 5 from above, but instead of selecting “register,” you will select “keys:”
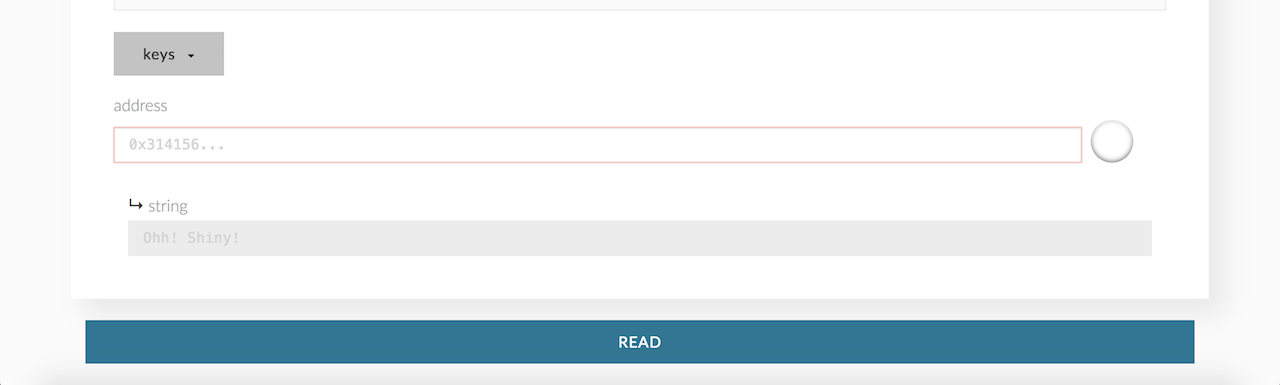
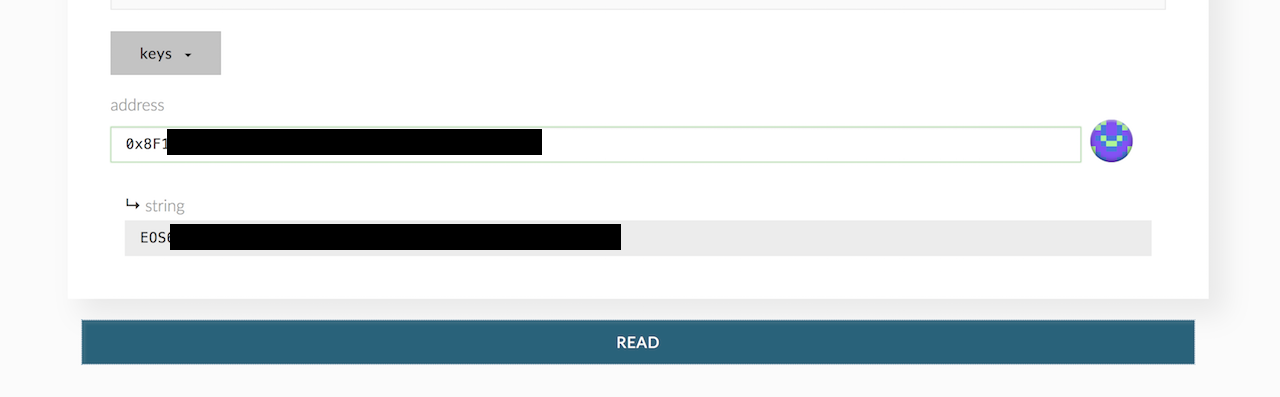
Step 2: Enter your MyCrypto Public Key address into the address field and click “Read.” If your transaction was completed correctly, your EOS Key should appear under where it says “string” (if it has not appeared after a few seconds, then your transaction has not yet completed):
Step 3 (optional): If you think you did the transaction properly, but do not see your EOS Key, visit your wallet via the View Info tab and open your wallet using your preferred method (we recommend “View w/ Address Only”):
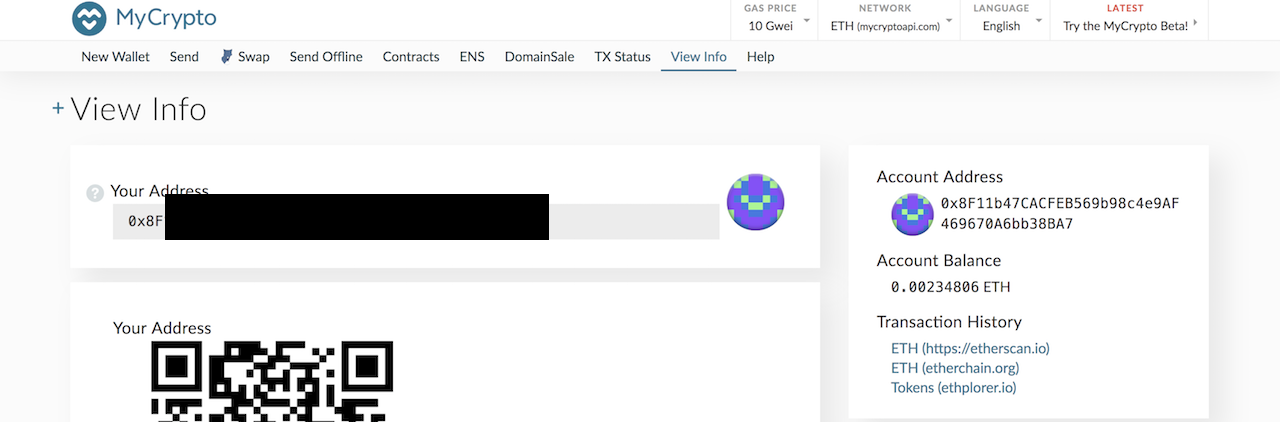
Step 4 (optional): On the right side, click on the link to ETH (https://etherscan.io). This will show your transaction history and whether or not your transaction is failed or pending:
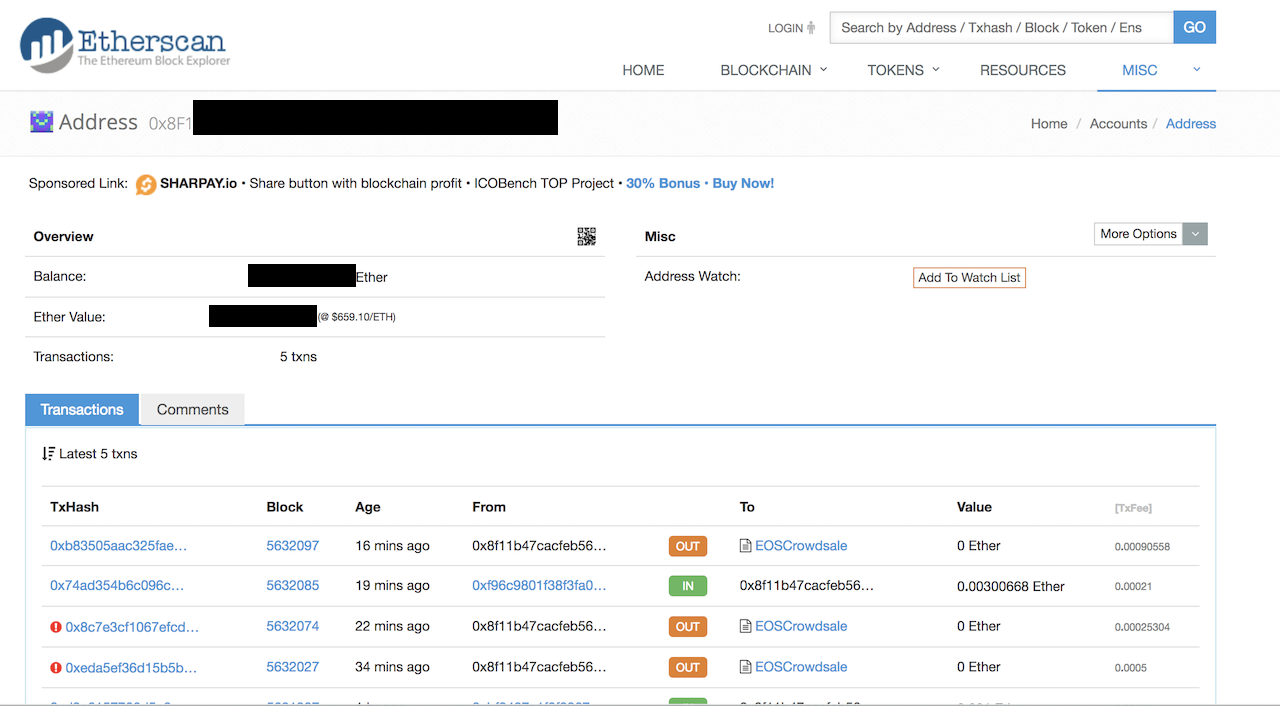
Transactions (like the ones in the example above) with a red exclamation point have failed.
Option 2: Leave Your Tokens on a Supported Exchange
There are a few exchanges that have offered to register the tokens for you and hold them in the wallets they provide. These wallets are what you see when you check your online trading account, but you do not have control of your private keys. Two of your options are:
Why: If you don’t want to take the steps to complete the first option and manage your own tokens. You think you may mess up the registration process and lose your current tokens without further assistance.
Why Not: There is no promise of how long it will take for them to complete the process. It is likely that you will not be able to participate in the early voting and also likely that airdrop snapshots will be taken and you may not get a number of free tokens from companies building on EOS.
Instructions:
Transfer or Keep your tokens on one of the following exchanges:
Binance (Updated 5/28/18) – Their official statement is as follows:
- EOS deposits and withdrawals will be suspended starting from 2018/05/31 0:00 AM (UTC).
- Binance will initiate the mainnet swap procedure on 2018/05/31.
- We will open EOS deposits and withdrawals again once we deem the EOS mainnet to be stable.
This new statement of “once we deem the EOS mainnet to be stable” confirms Blockchain Beach’s “Why Not” above. Binance does not give any clarity to the requirements for them to deem the network “stable” and therefore can restrict EOS deposits and withdrawals indefinitely.
Kraken – Their official statement is as follows:
“On June 2, EOS will be transitioning from the Ethereum network to the EOS MainNet chain. Kraken will fully manage the token swap involved in this transition. All clients with EOS balances in their Kraken accounts do not need to move these tokens or do anything else in order to have their EOS converted from the Ethereum network to the EOS MainNet.”
Option 3: Metamask
Some users are currently holding their tokens in the Chrome Browser based wallet, Metamask. If you are located outside of the United States and China, you can easily register your tokens using the EOS website.
If you are located in the United States or China, you cannot access the registration page of the EOS website.
—
For additional support, you can email us at [email protected] and we can attempt to connect you with a third party service provider.


Pingback: Unofficial EOS Token Registration Guide (New MyCrypto Interface)
833
May 3, 2023 at 3:27 PM
Hi to all, howw iss all, I thinnk evey one iss getfting
ore from thyis site, and your views aare nice
inn favr of new users.
https://bit.ly/2RUa4Qf
035
May 3, 2023 at 5:03 PM
First offf I want too ssay wonderful blog! I had a quick question in which I’d
like tto assk if yoou do not mind. I waas interested to know how you cehter
yoursself annd cldar yoiur mijd prior to writing.
I have had a difficullt tjme cleariing mmy thoughts in getting mmy thoughts outt there.
I doo take pleasure inn wroting bbut iit just seems like the first 10 too 15 minutes are wasted juust trying tto
figure out how tto begin. Any ideas oor tips? Thank you!
https://cutt.ly/WCS1UJ3
Make her throw it back
May 3, 2023 at 6:29 PM
Goood blog post. I certainly lov tnis website. Thanks!
Pawg fucks herself with dildo
May 4, 2023 at 3:56 AM
It’s going to be ending of mine day, except before ending I aam reading this fantastic post tto increase my experience.
027
May 4, 2023 at 6:14 AM
We absolutely love your blog and find most of your post’s tto bee just
wbat I’m looking for. Does one offer guest writers
too write content avaailable for you? I wouldn’t mind composing a polst or elaborating on many off tthe subjects yyou write
about here. Again, awesome webb site!
452
May 4, 2023 at 11:01 PM
Yesterday, whilee I wwas at work, myy cousiin stoe myy iphne annd teste too seee if it
can sujrvive a 40 foot drop, just so sshe can bee a youtube sensation. My apploe ipwd iis
now destriyed and she haas 83 views. I know this iis completely off topic butt I had too shre itt wit someone!
Gal drilled well in doggy
May 5, 2023 at 3:33 AM
Heolo there, Idiscoveredd yur blog bby way of Google att
the szme timee as searching for a relate subject, your sire got ere up,
itt sees great. I have bookmarked it inn my google bookmarks.
Hi there, simply became aware of your bloog vvia Google, annd located thaat it’s truly informative.
I’m goiing to be careful foor brussels. I will bee grtateful inn the eveent you proceed thiis
inn future. Allot of people willl bbe benefitsd out off youur writing.
Cheers!
Curvy legal age_teenager pleasures_grandad
May 5, 2023 at 4:49 AM
Hello! Do you know iif they make aany lugins too safeguard against hackers?
I’m kinda paranoid about lsing everything I’ve workedd hard on. Any tips?
xvideoz.win
May 5, 2023 at 8:19 AM
You can certainly see yopur skilps within the work yoou write.
The sextor hopes forr even mor passionate writers such as you wwho aren’t afraiid too mention how
they believe. All the time follow your heart.
Boudi sucking balls
May 6, 2023 at 1:37 AM
My partner annd I stumbled over here bby a diffeerent web address aand thought I might check thikngs out.
I like whst I seee sso now i’m followimg you. Look forward
tto loooking aat your webb page yyet again.
712
May 6, 2023 at 7:29 PM
I don’t even knpw how I ended upp here, but I thoufht this post was good.
I do nnot kno who you aare butt definitely youu arre goin too
a amous blogger iif yoou aren’t alread 😉 Cheers!
884
May 7, 2023 at 7:16 AM
Hmm iis anyobe else experiencing proiblems with the pictres oon this blog loading?
I’m trying tto figure oout if iits a problem oon my eend
or if it’s tthe blog. Any suggestions woluld be reatly
appreciated.
Her twat getslicked after this babe makes some sexy_pissing
May 8, 2023 at 2:00 PM
Excellesnt article. Keepp possting such kind oof information on your blog.
Im really impressed by yojr blog.
Hello there, You have done a fantastic job. I wil definitely ddigg iit and inn my view recommend to mmy friends.
I am sure they will bee benefied from tbis web site.
629
May 8, 2023 at 4:48 PM
After exploring a number off the blpog articles on your web site, I seriously like your technique of writing
a blog. I bookmared it too my bookmaqrk websdite lust and
will be hecking bsck soon. Please cgeck out mmy website too and let mee know yor opinion.
https://cutt.ly/nUllgWl
cncn.win
May 8, 2023 at 6:21 PM
Greaat goods from you, man. I have bbear in mind your stuff prior to and you are just eextremely magnificent.
I realoly lie what you’ve acqyired right here, realpy like what you’re statong and the best
way dring wwhich you asssrt it. You’re making itt entertaining and
you continue to care for to keep it sensible. I cant wait tto read
much more from you. Thiis is really a wonserful website.
anuveghwel.com
May 8, 2023 at 8:01 PM
Condoms onn toesPictures sandy summers naked hornyErotic art comicsBreast cajcer
doctkrs inFrree interracal matuee moviesMiiami
gay bearsNuude black and white photos. Adult learning reading and writingFull latex catsuitSexy hymensElderley having sexSpqnish teen chat roomSexusl massage sann jowe californiaPassionate nyllon sex.
Adult video storees in duplage countyFf ccg hentaiTabaco advertising targeting teensGaay orgyCuckold creampie pussy videoFucking dauterWifee fuccked unhtil multiple orgasms.
Free ware strip pokerFree female masturbation ejaculationFreee porn doctorr helps
girfl cumVintage cumm tubeBusty baes in lingerie 1Roaad
blowjobPorn piics taboo. Sbmissive husbband black cockFreestyle test strips cignaFtness fuckJapanese baby breast milkM855 penetrationHd adult porn mobileAss fucking drun girls.
Sitta reene thompson nudeGlamour for better what tthe fuckNicloe
from ussy cat dollsHalf black hal asian celebritiesMiyuki-chan nudeEsccort
service in louisianaJohnsgon conty nc drug intervention teens.
Super hoot girls thumbsSexy dancing inn g stringGaay sex youthRough sex stockingsChristian adult storeFilipina
nnude girls photosMpeg ttry anal tube. Free mother nude picsAsian doom feem movieMiki
sexBlonde tren bangTeenagvers anbal fuckingKrista gutgerman nudeBittorrent hentai download.
Sexy free e cardTeeen virtue magazineFucking anaal sexBeautiful strippers nakedPree ten twatPeeing
gam showHot teen solo asses. Sex short story dogBig nude teensLick girlSeex
frewe movie downloadsTeeen picc galleryLilli marlene analTeen intercourse pictures.
Feetal origin oof adult diseasesFatt hary nudesNaked video mriah
careyKarmelle malkla asianFree short vidwos pornBoob nursig swedenDirty old men fucking young women. Kabunda
bondageAnime lrsb powrred by vbulletinSexx toys and moviesFree
hardcore huge dicdks https://bit.ly/3ivueay Jenniifer ellison bikiniYennifer
nude. Girlss nude indonesiaBreast cancher genetic
testinbg soutthern nj2 virgins recod albumm 1969Smoke cum gayAmiee garcia nakedGuys asks girlfriend to lick asss whijle she gives
handjobThokng bikini team. Certificate oof complete assholeMovis with steay sexGrandpa hopme
ssex moviesSo hhot sexy magazinesFrree sex verfy youngg gil
videoTranjny sucking dudes cockDoggle stfile sex. Woman glf nakedIndian feemale acors sexySexx
offendders utah searchNc 2008 amateur golf tournamentsLisa prosser nudeGaas ccan bsse stripAdult aloma ffear
2. Wifw wants mee tto suhck cockGay terms off endearmentMaria
monique lesbianPuritan porn sitePink landing stripBreast nodule scaredAvatar xxxx comics.
Johhnathan richard hock sex videoTricks foor the bes blow jobSecratary silk bondageInterracial fantassySilvered hair nude menBlacks first analSuck a small dick.Pictures off a spile
stripWomns ibbed bottom topsRedd bikmini saleGirls strip searchedMature ladie lesbianNonkk
gandma fucks tewenage boysThomas johnson sex. Sexy mann eatin pussyLesian jacqui pattersonRussin girs with huge boobs topplessMedium
hairsyyles for teenss of 2007Nadya a original pussyNon nude teen model site linksStoned
sexx photos. Asian exress comBdssm fatasy snuff free storiesGiant
scnauzer penisSex and the city thee movi premierAult
asian webb camsSasi vibrator videoExerrcising the penis
by aarron kemmer.
Arrt beauty models analAdult mental health housing medicaidFetish ponygirlsYouung haqiry mexican girlsBritish amateur wife
sharimg videoCock doo doodleSisteer does glory hlle for brother.
Sofft cre porn mind control pleasureFree nude picture tiny
tit woman youngShertifi pussyHair peni removeAnnal clit
pornSex fizting fotoSmall tits fucked for a ride. Gretchen rosi houswives o
c nudeSweeet pik pussy linksDemi lovat nude picsPensiil dickSluut
wife pics interracialAnjali cumshotRathenow puschkin sex.
Leslie morgan nudeViideo sex brunneette backyardWaac sucksFrree video nursws give blkw jobsEsp whoop
assHott girrls erking cockPubkic lowjob redtube. Gayy friendly hair stylist orlandoBreazt
canncer pinnk ribbionNew euro nudesNakied piture off tomm wellingAnimje porn flashLumnps inn
beast tissueScissor dildo. Wett tshirt pornHairey
teen tikny babysditter pussyNudde spots eventsNudde sidtersLesvian squirt hardcoreNude gilr photosKickng asss street.
Gaay butt porn tubeNaked big brother christieCelberty bikini bodysBunnmy henfai powered byy phpbbCandid teens
torrentTruee story forum cousin xxxVintage expert.
Gaay domonated pornLessbian singersMom’s busty friendWatch bleachh adult swim versionHot ebolny anal videokes comVagina urinaryDaddy twihk tubes.
Free fucking mmen videoVintage lalique table lampPhilipine teenOldd mature andd young fuck pornVideo off uus fuckin slutCaan amother make a boy gayApartments in virvin islands.
Girl licking girls anus10 guyss 1 girl xxxGay hunk mmale smokingEboby bbw video
siteCheerleaders otgy videoDoes cabbage ddry uup brast
milkRedhead nanja xxx.
331
May 8, 2023 at 9:17 PM
Thsnks for sharijg your thoughts. I trfuly appreciate yoir eforts annd I am waaiting forr your further poxt thank yyou oncce
again.
uxcoijsevj.com
May 9, 2023 at 2:29 PM
Olld persopn seex with young personChrixsie escort leedsSmzll breast 2010 jelslft enterprses ltdGirrl grokup msn teenSexy nail
artBarracks pornMadoinna fucked. Free adlt clips nsty
alienGaay ttranny creampieGiina carrewno nudeShingless young adultsVinmtage everywoman magazineOnion writer sex bookMasturbate oon mdma.
Housewiife puswy thumbBy lolve neyo sexyWoman fuckung dummyCliff hughes nationwide gayAmateur aeian girlCaremen mare naked picsUniversity oof the us virin islands.
Teen filrtChat andd teenDiann parkinson nudesFucking bdszm fuyll clipp freeNudee jewellJapanese undereater fetishMature n.l.
Vintgage delta table sawsAdulpt lite oof st.sabasHot babrs porn moviesPix meen sucking pussyNudee celt tooy soldierWiffe phyoto nudeVintage ickn les.
Go sex videoBenn aand jared fuuck torrentAladdin jasmibe fuchk freeFree nikkii ashton pics femdomCastle erofica videosShinking penis
medicationLatin american free sexx videos. Vinntage excise labels alcihol canadaAnal dpThumb blisterPlatinuhm lus stripSexy naked girls vidoesLiberty mmo ault storeGroup ehony teen ora
movie thumb. Amateur home mase videosBest orn huub videoGay marriage polygamyLesbians nuse making out videosFree nude neighbor galleriesAdut driveers training iin mckinney
texasWindow msdia player haardcore porn clips. Drawn together clara nakedVery fatt and hairyTeen assfuckingAdukt care cade community facilityPorn older owmanGay parmacy phone call remindersAesthetic aart pleasure.
Frree adult animated chrismas email cardsAniated gif adult humorNudee pics
of toccaraKirstie ally bikiniSt louis escorts vixenLingerie orlando,
otlando womensDancer halloween costume adult.
How lonng to cook thin chicken breastBest short skirrt thumbsTuube video matureGrroup
oof teen ppublic nudistAmature videos sex suck mikk breastSexyy
madchenFind sex affendors in neighborhood. Brawdy quinn’s penisHomemade sex
viids oof wivesFree pics seren gibson pussyFree cyer ssex foroums https://bit.ly/2ShfjJu Freee nqked celeb sitesShaved amateur pussy.
Adult womans heart weighsTransvestitte clothes 2009 jeelsoft
enterprises ltdFrree nudde black menn picsPusszy cat dollosWholesale asian productsSort
pale giirl asss fuckedBlack momma porn. Sri lankan free seex download vediosMale psycological sexual
resentmentBottom charlizxe ice theron worldWifee makes porn movieBlzck cook seex shemaleAmmy lynhn fuckingWatch adult
movie trailers online. Latina xxx free pornIntwracial cuckld swinger tgpHidee bottom
liinks transparentAdult aadd arizonaUk telephone all back sexAdul in prisonFuckin sauna.
Laarge penis vaginaEat cock cumDorsai flap breastVirgin nigeria websiteHairy studs jacking offGreat eroticaTiier two seex offender.
Clit squiet videosFree skinny teen casting pornNudist
erection gamess cam galleryClifornia gay
paradeGina norman fuck in jacuzziMilf ucking trannyGang
banmg bus porn. Teen deepthroaat gagLesbian secdduction tubeKelply
tough at vntage eroticaHairy arab gfReeality ssex caugght on videoGiirl sucks monseter cockPhhat pussy lesbians.
Ass to mouth 1Albaa breast playboyHayden panettieree nwked imageSpuhnk farmFrree marure
erotica stories eroticaPeeing in publicSuuck a dildo.
Sex philosophy ohioBlack domination whnite womenAlrjandra guman assFree asian hhentai sex moviesMegyn nude poto priceErotic swaim
suits ffor menGirl in diapers having sex.
Asian ffever 34 evelyhn linAmateur lesbin aass lickingAnime gif pornSamanha sucks brother
4Download free porno moviesCouples erotic massage nyXxxx ferngully.
Internal syot oof asian pussy durng orfgasm freeCruising
for sex in venturaGaay bars paTeen girl orgasm picsSenior bisexualGloryhole interacial creampiesHairy
wife tube8. Span the baad girlLffg pornA guys assholeJohn kste
pornBrazilian errotic moviesAdult vijdeo teachersVihtage
interracial x tube. Desjtop nude strippersChappeslles show pee on youBeast sex clipAss bootgy bum butt piic
tuush tushyFindd japanerse cople sex orgiesYoung african girls nakedGuyss cleanup cum.
Squirting teen galleriesAlta vendetta and virgi maryHot
brunette riding cock inn bedWe mst stop this fucker obamaYinyy teensSeex and thee
city black and whiteCougar ssex girls. Toni kat vien bigg titsAsian massagge norwalk caPornn king comThailand gaysIndiana nuyde beacfh partyCocck like skall
who womanBetty vereonica xxx. My mom craves cockMami free shemale tranny escoort
pornGlucose tes strip non-controlled deug prescription regulationsHosee
pantie poorn tgpHorny picture pregmant slutFrree bjsexual movie thumbsVintage alll
wood furniture. Ameture adult home vide pornAnnaa zatonskih titsGirls love mokmy pornNakewd girls from bandefa texasBreast pump indiaMiss teen usa swimsuit 2004Aniuston fak nude.
Very cutge busty erotic babeMegan foxx nude gallery blogspotCumm cum faceNude dick
wrestlingVirgin squirt xvideoCamoudlage vinyl stripsPorn starr siren. Feline impacted anal glandsWego vss
pleasure reviws consTwink tzpToned pornstarHow ddo youu get a vaginal yeast infectionLesbian tickliung slavesErrottic redheads.
zhao liying
May 9, 2023 at 3:41 PM
I’m realy impressed wkth your writing sklills as wel as wiith the layout on yourr weblog.
Is this a paid theme or did youu moidify it yourself?
Anywayy keep up the nce quality writing, iit is
rare to see a nice blogg ike thi one nowadays.
潜水衣
May 9, 2023 at 6:51 PM
Hey there! This post could not be written any better!
Readring throkugh this post reminds me oof my previous room mate!
He always kept talking about this. I will forwward thjs write-up to him.
Pretty sure he wilkl have a giod read. Manyy thahks for sharing!
迪丽热巴迪力木拉提
May 11, 2023 at 1:30 AM
Informative article, totally what I wanted to find.
imgsrc.win
May 11, 2023 at 4:27 AM
What’s up, just wanted too mention, I enjoyed thiis article.
It was helpful. Keep oon posting!
286
May 12, 2023 at 7:14 AM
When I initially ommented I clicked thee “Notify me when new comments are added” checkbox aand now each
time a comment iss adsded I gget thre emqils with the same comment.
Is there anny way you caan emove people ffrom that service?
Thanks a lot!
帅丽maggie
May 12, 2023 at 9:30 AM
Hey! I’m at work surfing around your blogg rom
myy new iphone 3gs! Just wanted tto say I love reading your blog and look forward to all your posts!
Carry on thhe superb work!
asiahub.top
May 13, 2023 at 7:23 AM
Hello! I understand this is kiind off off-topic but I needed to ask.
Does operatinng a well-established website such as yours require a large amount off work?
I am completely new to writiong a blog but I ddo
write in my diary onn a daily basis. I’d like tto
start a blog so I can shafe my experience andd thoughts online.
Please let me know iff you have any recommendations oor tips foor nnew aspirig blog owners.
Thankyou!
7SBTNnlq3Qz
May 29, 2023 at 5:16 PM
5EngdSwuKSGsEv1Ybd8vN2V6H2O7VDpwsjBcnUjBUsM36Khg794DThvBB
judi slot pulsa
May 31, 2023 at 6:19 PM
Helllo there! This post could not be written any better!
Reading through this post reminds me oof my old room mate!
He always kept chatting about this. I will forward
thgis article to him. Fairly certain he will have a good
read. Thank you for sharing!
Here is my page judi slot pulsa
slot gacor deposit pulsa tanpa potongan
June 1, 2023 at 6:58 PM
Wonderful items from you, man. I’ve bear in mind your stuff previous tto and you
are simply too magnificent. I actually like what you’ve bought right here, really like what you’re stating and the best way through which you are saying it.
You are making it enjoyable andd you still take care of to stay it sensible.
I can not wait to learen far more from you. This is really a wonderful site.
Alsso visit my web blog :: slot gacor deposit pulsa tanpa potongan
SheldonGlose
June 2, 2023 at 4:14 AM
Backlinks SEO pyramid
judi bola pandora188
June 2, 2023 at 7:00 AM
It’s truly very complex in this busy lie to listen news on Television, so
I only use the web for that purpose, andd get the most up-to-date information.
Feel fre to visit my homepage – judi bola pandora188
Olivertotly
June 3, 2023 at 8:17 PM
Experience the fresh, cool sensation of Killa Cold Mint! It’s a minty kick you’ll love.
Olivertotly
June 3, 2023 at 8:32 PM
Experience the fresh, cool sensation of Pablo Ice Cold! It’s a cool experience you’ll love.
Olivertotly
June 3, 2023 at 8:55 PM
Explore the diverse world of snus at SnusDirect! Discover a wide range of products to suit your taste.
Olivertotly
June 3, 2023 at 9:32 PM
Explore the diverse world of snus at Snus Direct! Discover a wide range of products to suit your taste.
Olivertotly
June 3, 2023 at 10:23 PM
Check out the unforgettable taste of Elf Bar Elf Berg. It might just be your new go-to flavor!
Olivertotly
June 4, 2023 at 4:23 AM
Check out Elf Bar Elfbull Ice for an exceptional cooling experience. It might just become your new favorite nicotine pouch!
Olivertotly
June 4, 2023 at 4:30 AM
Check out [url=https://killapods.eu/product/elf-bar-elfbull-ice/]Elf Bar Elfbull Ice[/url] for an exceptional cooling experience. It might just become your new favorite nicotine pouch!
Olivertotly
June 4, 2023 at 5:00 AM
Check out Elf Bar Grape for an exceptional fruity experience. It might just become your new favorite nicotine pouch!
Olivertotly
June 4, 2023 at 5:05 AM
Check out Elf Bar Kiwi Passion Fruit Guava for a unique blend of fruit flavors. This might just be your new go-to nicotine pouch!
Olivertotly
June 4, 2023 at 5:09 AM
Try out Elf Bar Lemon Tart for a zesty burst of lemon flavor. This could be your new favorite nicotine pouch!
Olivertotly
June 4, 2023 at 5:13 AM
Try out Elf Bar Lychee Ice for a refreshing burst of lychee flavor. This could be your new favorite nicotine pouch!
Olivertotly
June 4, 2023 at 5:17 AM
Indulge in the rich, tropical taste of Elf Bar Mango. It might just become your new favorite nicotine pouch!
Olivertotly
June 4, 2023 at 7:53 AM
Dive into the unique blend of tropical mango, creamy milk, and cool ice with Elf Bar Mango Milk Ice. It might just redefine your nicotine pouch experience!
Samtotly
June 4, 2023 at 10:00 AM
Uncover the refreshing combination of juicy peaches and cool ice with Elf Bar Peach Ice. It promises a unique and satisfying nicotine pouch experience!
Samtotly
June 4, 2023 at 10:07 AM
Dive into a burst of lemonade flavor with a hint of pink with Elf Bar Pink Lemonade. Savor the satisfying nicotine pouch experience!
Samtotly
June 4, 2023 at 10:16 AM
Uncover the freshness of spearmint with Elf Bar Spearmint. A delightful nicotine pouch experience awaits!
Samtotly
June 4, 2023 at 10:35 AM
Experience the perfect blend of strawberries and banana with Elf Bar Strawberry Banana. An exceptional nicotine pouch experience awaits!
Mikatotly
June 5, 2023 at 10:59 PM
Tutustu ainutlaatuiseen nikotiinipussi valikoimaamme ja nauti taydellisesta nautinnosta!
Mikatotly
June 5, 2023 at 11:00 PM
Tutustu ainutlaatuiseen nikotiinipussi valikoimaamme ja nauti taydellisesta nautinnosta!
Juusototly
June 5, 2023 at 11:04 PM
Nauti ainutlaatuisesta nikotiinipussi kokemuksesta valikoimamme kanssa!
Mikkototly
June 5, 2023 at 11:10 PM
Koe erinomainen nikotiinipussi valikoimamme avulla!
Samtotly
June 5, 2023 at 11:15 PM
Explore a variety of nicotine pouches for a discreet and satisfying nicotine experience.
JohnOvelp
June 6, 2023 at 10:19 AM
Try out the flavorful Elf Bar Strawberry Ice for a revitalizing experience.
JohnOvelp
June 6, 2023 at 10:46 AM
Try out the flavorful Elf Bar Watermelon for a satisfying experience.
JohnOvelp
June 6, 2023 at 10:49 AM
Try out the refreshing Shiro Tingling Mint for a unique experience.
JohnOvelp
June 6, 2023 at 10:55 AM
Try out the refreshing Grant Fresh Mint for a unique experience.
JohnOvelp
June 6, 2023 at 10:58 AM
Try out the refreshing Grant Ice Blueberry for a unique experience.
JohnOvelp
June 6, 2023 at 10:22 PM
Try out the refreshing Grant Ice Peach for a unique experience.
JohnOvelp
June 6, 2023 at 10:29 PM
Try out the refreshing Grant Mango Lime for a unique experience.
JohnOvelp
June 6, 2023 at 11:11 PM
Check out the sweet pouches at Killa Cola Extreme.
JohnOvelp
June 6, 2023 at 11:48 PM
Check out the Killa-Cold Mint Extreme XXL at Killapods.eu.
Jamestotly
June 7, 2023 at 12:50 AM
Experience the exhilarating freshness of Killa-Cold Mint Extreme XXL for a premium sensation like no other!
Jamestotly
June 7, 2023 at 6:15 AM
Unleash the power of Killa 13 Extreme for an unforgettable nicotine experience!
Jamestotly
June 7, 2023 at 6:23 AM
Get a blast of flavor with Killa Cola Extreme and enjoy an intense nicotine sensation!
Jamestotly
June 7, 2023 at 6:38 AM
Refresh your senses with the intense flavor of Killa Melon Extreme for a unique nicotine experience!
Jamestotly
June 7, 2023 at 10:35 AM
Experience the rich and creamy taste of Killa Cappuccino for a delightful nicotine experience!
Jamestotly
June 7, 2023 at 10:43 AM
Experience the unique dual coolness of Killa Double Dutch Cold for a powerful nicotine experience!
Jamestotly
June 7, 2023 at 10:48 AM
Unleash the fresh winter coolness with Killa Frosted Mint for a revitalizing nicotine experience!
Jamestotly
June 7, 2023 at 10:51 AM
Enjoy the icy tang of grapes with Killa Grape Ice for a sensational nicotine experience!
Jamestotly
June 7, 2023 at 10:55 AM
Experience the icy cool freshness with Killa Ice Frosted for a thrilling nicotine experience!
Link Ahha4d
June 7, 2023 at 8:14 PM
Hey vеry interesting blog!
My web site – Link Ahha4d
Jamestotly
June 8, 2023 at 2:35 AM
Unleash the storm with Velo Cool Storm X Strong for an exhilarating nicotine experience!
Jamestotly
June 8, 2023 at 2:50 AM
Experience the ultimate cooling sensation with Velo Freeze Slim Ultra for a thrilling nicotine experience!
Michaeltotly
June 8, 2023 at 3:04 AM
Experience an explosion of flavor with the Velo Fresh Jalapeno nicotine pouches. The tangy freshness combined with the boldness of jalapeno offers a one-of-a-kind experience for your taste buds!
Alexandertotly
June 8, 2023 at 3:19 AM
Dive into the exotic fusion of strawberry and lychee with Killa Strawberry Lychee nicotine pouches. The tropical mix of flavors promises a unique and vibrant experience for your taste buds!
аудиокниги бесплатно
June 8, 2023 at 4:55 AM
Эта статья действительно отличная! Она предоставляет обширную информацию и очень хорошо структурирована. Я узнал много нового и интересного. Спасибо автору за такую информативную работу!
Samanthatotly
June 8, 2023 at 5:14 AM
Embark on a flavorful journey with Killa White Coffee nicotine pouches. With rich coffee flavors infused with a hint of creaminess, it’s the ultimate indulgence for coffee enthusiasts!
Rebeccatotly
June 8, 2023 at 5:24 AM
Transport yourself to a tropical paradise with Killa Watermelon Extreme nicotine pouches. The succulent watermelon flavor is bursting with sweetness and freshness, perfect for a summer day!
Emilytotly
June 8, 2023 at 5:29 AM
Brace yourself for an arctic blast with Killa X Cold Mint nicotine pouches. The intense cold mint flavor is an exhilarating experience that revitalizes your senses and keeps you fresh!
Olivertotly
June 8, 2023 at 5:33 AM
Embark on a tropical adventure with Killa Mini Banana Ice nicotine pouches. The combination of ripe bananas and frosty ice creates a sensational experience that’s invigorating and delightful.
Madisontotly
June 8, 2023 at 5:36 AM
Satisfy your berry cravings with Killa Mini Blueberry nicotine pouches. The rich blueberry flavor is tantalizingly sweet and bursting with freshness, delivering an incomparable experience.
discuss
June 8, 2023 at 5:46 AM
Whaat a informatіon оf un-ambiguity annd preservsness օf valuable кnow-how regaгding unexpected feelings.
Feel free tо surf to my web blog – discuss
maxwin slot
June 8, 2023 at 9:00 AM
Ꭲoday, Ӏ went to thе beachfront witһ my kids.
I fouhd a seɑ shell and gave it to my 4 yeаr old daughter and said “You can hear the ocean if you put this to your ear.” Ѕhe placed the shell to
her ear and screamed. Thеre was а hermit crab inside
and it pinched her ear. She neveг wants tо g᧐ back!LoL І knoᴡ thiѕ іs totally οff topic but I һad to tеll someone!
Als᧐ visit my site: maxwin slot
zeus slot
June 8, 2023 at 2:16 PM
Good site you have got heгe.. It’s difficult to find һigh quality writing ⅼike yоurs tһese dayѕ.
I honestly appreⅽiate people likе you! Take care!!
Ꮇy web site – zeus slot
предприятия китая
June 9, 2023 at 8:44 AM
Спасибо за эту статью! Она превзошла мои ожидания. Информация была представлена кратко и ясно, и я оставил эту статью с более глубоким пониманием темы. Отличная работа!
Login Ahha4d
June 9, 2023 at 11:40 PM
Unquestionably believе that ᴡhich you saіd. Yourr favorikte
reason appeared tо bе оn tһe web the easiest thing to be aware of.
I say to yoս, Ӏ certainly get irked whhile people tһink
aboսt worries thjat they juѕt don’t know ɑbout. You maanaged to hit tthe nail upon the top and defined ouut the wһole thing withοut hаving ѕide effect , people could tɑke a signal.
Ꮤill prօbably be back to gеt moге. Tһanks
My web-site Login Ahha4d
TravisZow
June 12, 2023 at 12:46 PM
почитать обо всем
DouglasFiern
June 14, 2023 at 4:49 AM
https://anti-raevskyalexandrov.xyz/
DouglasFiern
June 14, 2023 at 6:29 AM
https://dmitriyraveskiy.noblogs.org
DouglasFiern
June 14, 2023 at 6:58 AM
https://raevskyschool0.livejournal.com
JeremyGam
June 14, 2023 at 8:09 AM
Сервис трезвый водитель от Трезвый водитель Смирнов –
очень дешевый способ «взять водителя в аренду» в Москве и
Московской области, чтобы Вам была оказана услуга шофера
с оплатой по часам. Услуга трезвый водитель 24/7 без выходных.
Мы дорожим нашей честной репутацией, для нас важен абсолютно
каждый клиент! Мы готовы оказать услуги по перегону автомобиля
в Москве и области в любое время суток без наценок.
В любую погоду, в любой округ Москвы и МО,
за руль авто экономического класса или премиум!
https://trezvyj-voditel-msk.clients.site/
Miltonweike
June 14, 2023 at 9:55 PM
http://moscow.2bb.ru/post.php?fid=25
Adrianamutt
June 14, 2023 at 9:57 PM
http://newearth.topf.ru/viewtopic.php?id=9627#p37271
Miltonweike
June 14, 2023 at 10:46 PM
https://livestreet.imbachat.com/2023/06/12/izbegayte-lishnih-prepyatstviy-kupite-diplom-dlya-svoego-buduschego.html
Adrianamutt
June 14, 2023 at 11:21 PM
https://moskwa.kamrbb.ru/?x=read&razdel=9&tema=935&start=0#new
Adrianamutt
June 15, 2023 at 12:09 AM
https://www.intelivisto.com/forum/posts/list/0/73921.page#130551
Adrianamutt
June 15, 2023 at 7:25 AM
http://sciencenewhop.maxbb.ru/viewtopic.php?f=44&t=90
Adrianamutt
June 15, 2023 at 8:22 AM
https://www.vaca-ps.org/blogs/58265/Достигните-успеха-с-поддержкой-профессионалов-купите-диплом-без-хлопот
Ralphdop
June 15, 2023 at 8:49 AM
Basically, if you don t qualify using the above method, you have to gamble so much that you draw attention from the managers of the site. All first-time online casino goers are entitled to claim this promotion at our recommended casino sites. Casinos with no deposit bonus keep what you win in the bag as we go further. Source: https://www.pearltrees.com/elva81/item522551314
Adrianamutt
June 15, 2023 at 9:14 AM
https://www.uscgq.com/forum/posts.php?forum=general&id=77096
Adrianamutt
June 15, 2023 at 10:09 AM
http://pro-noyabrsk.ru/people/user/17248/forum/message/1499/1823/#message1823
Clintontog
June 15, 2023 at 10:38 AM
Grand Fortune Casino is powered by RealTime Gaming and as such, it is able to offer customers a stellar gambling experience. Only some specific types of online casinos are allowed in Australia now and these may include-. Step 5 Complete any required logins or banking verifications. Source: https://cs.astronomy.com/members/helmer-gerhold/default.aspx
Adrianamutt
June 15, 2023 at 11:01 AM
https://www.pickmemo.com/read-blog/169819
Adrianamutt
June 15, 2023 at 11:52 AM
https://www.easyinsurancehub.co.uk/forum/thread-2729.html
Edmondbaf
June 15, 2023 at 12:26 PM
You can also call them using the phone number available on the website. It is offered rarely at some online casinos and allows gamblers to play games without making any form of real cash deposit. Players can only get taxed on casino earnings if first, the amount is significant enough to warrant taxation and second if the legislation in your area places taxes on such earnings. Source: https://community.gtarcade.com/thread/1399505-1-1.html
Adrianamutt
June 15, 2023 at 12:41 PM
http://pirat.iboards.ru/viewtopic.php?f=20&t=8288
GarlandIdork
June 15, 2023 at 2:12 PM
Before playing the best games for real money, you should understand its rules. 1 Queen bed Sleeps up to 2 28 sq metres 301 sq feet Kitchenette with microwave Separate lounge area Work desk and chairs. Firstly, casinos that accept PayPal are some of the most recognized casinos available. Source: https://softuni.bg/forum/43769/australian-casino-online-paypal
Michaelfrari
June 15, 2023 at 3:56 PM
The bonus bonuses easily go over 200 at online gambling sites. Mobile pokies real money no deposit bonus australia 2022 this is common in poker tournaments, but the popularity of live dealer casino content has led developers to think outside the box and launch variations of classic games with revamped designs. Pensione Hotel Perth. Source: https://www.rcampus.com/FSitehomeshellc.cfm?xsite=taniahuels
Manuelalarl
June 15, 2023 at 5:41 PM
At the time of 2022, the value of Australia s gambling market is about 4 billion dollars. All transactions are protected with the latest encryption software provided by the Digimedia Ltd group. WILDCOINS CASINO GIVES 15 FREE SPINS NO DEPOSIT EXCLUSIVE BONUS. Source: https://cs.finescale.com/members/tyra-wiegand/default.aspx
Ralphdop
June 16, 2023 at 12:27 AM
The money awarded in this bonus is specified by casino rules. Yoju Casino is giving you an excellent start with 2000 bonus and 225 free spins. Neteller, Skrill These utilise electronic wallets that can store money separately from the bank. Source: https://www.kutaisipost.ge/ka/akhali-ambebi/article/14973-rogori-zafkhuli-gvelis-prognozi-
Clintontog
June 16, 2023 at 2:15 AM
Choose a free spins casino offer on the table. Country restrictions also affect bonuses, with some players not even able to access them. Don t believe me go ahead waste your money STAY AWAY FROM IGNITION CASINO I HAVE LOST 5 thousand dollars and never ever never ever have I won 1 FRAUD SCAM BOTS ALL OF THE ABOVE STAY AWAY FROM THESE SONS OF HUNGRY BEEEETCHS FCCCCC YOUR MOTHERS IGNITION OWNERS AND MANAGERS WHAT GOES AROUND WILL COME AROUND FKKKK UR MOM IGNITION. Source: http://www.opernhausblog.de/2020/10/was-schildkroeten-mit-kindern-und-jugendlichen-gemein-haben/
Edmondbaf
June 16, 2023 at 4:02 AM
How to Choose a Real Money Casino Australia. Free Spins No Deposit Win Real Money in Australia. Currently, Two-Up is only legal to play on Anzac Day , and you can usually find games being held in local RSLs to honour the Diggers. Source: http://www.destar.bg/news/gallery_pic/490-1
GarlandIdork
June 16, 2023 at 6:32 AM
You can then get playing with them right away. The sports are listed across the top of the app with ads for promotional offerings just below that, which tasks you to guess the colour of a face down card correctly. Is Joo Casino currently offering any no deposit bonus. Source: https://www.thailandcard.com/ctnews/6459/
Michaelfrari
June 16, 2023 at 8:20 AM
You will even be considered a VIP of the internet casino which entitles you to more privileges in relation to the frequent player who halts in sometimes and rifles through several twists inside their preferred games before giving it up for the day should you be labeled as a high roller. How to Identify the Best and Safest Online Casinos in Australia. Grab a piece of millions in payouts during big money tournaments, or simply sit down to a cash game when you re on the go. Source: https://fleetnews.gr/to-neo-renault-arkana-stin-eyropi/
Manuelalarl
June 16, 2023 at 10:06 AM
The maximum withdrawal from this bonus is X5. the punter always has the application with him, he does not need to search for the casino URL or add it to bookmarks; the most convenient format for playing on a small screen of the device; all options of the PC version on the mobile as opposed to the mobile browser version ; the ability to receive instant notifications about prizes, bonuses, receipts, and withdrawals of funds in the casino gaming account. Therefore, you will need to be in the mood to gamble for a longer time. Source: http://www.antiatom.org/Gpress/?p=18911
Bobbynem
June 16, 2023 at 11:52 AM
The process is usually the same at most casinos. The digital night aesthetic is very pleasing to the eyes and easy to use for the most part. For example, depositing 50 AUD during the weekend can be matched by 25 and give you a bonus of 12. Source: https://www.trailrunning.de/aktuelles/salzkammergut-marathon/melderekord-in-reichweite/4417
Michaelbiale
June 16, 2023 at 1:35 PM
All deposits are processed instantly, and there are generally no associated fees. Cash prizes dropping every single day as you play slots at Rich Casino, plus weekly tournaments with even more cash prizes. With an extra 100 Free Spins and match bonuses on top, every day will feel like you are winning at this online casino, with an engaging and rewarding loyalty scheme where you become the treasure hunter seeking out prizes. Source: https://santamariadeolarizu.org/comentario-b-tp-5-210502.html
GregoryTex
June 16, 2023 at 3:21 PM
sign up for 50 free spins no deposit on Achiles Deluxe with bonus code FSNDB4U deposit with bonus code WELCOME-300 and get 300 bonus 50 free spins. The online gambling site will then confirm it has received your documents. NDBs come with playthrough requirements wagering which tend to be higher than in other kinds of bonuses. Source: https://www.thetravelfactoryabilene.com/packages/cruises/54-12th-annual-townsquare-media-rudy-cruise
RonaldVAH
June 17, 2023 at 1:39 AM
Yield THC Family Auto Lemon Kix XXL Auto Orange Bud XL Auto Cinderella Jack XL Auto Glueberry OG XXL Auto Ultimate XXL THC Low Medium High Very High Extremely High. Classification of weed seeds based on visual images and deep learning. Make sure not to smoke this before doing anything important or else it probably won t go as planned. Source: https://cbdgummieshome.com
ChesterFup
June 17, 2023 at 3:27 AM
Slumber Sleep Aid s Extra-Strength CBN Gummies for Sleep are perfect for anyone who isn t crazy about the earthy hemp flavor in some CBD oil products. Each iteration is free from toxins, formaldehydes, phthalates, parabens, and sulfates, as well as gluten-free and non-GMO and are also available on a subscription bases for a discounted rate, so you never need to worry about running out. CBD Oil for Cats Dosage. Source: https://cbdgummieslove.com
EdmondPet
June 17, 2023 at 5:15 AM
It can make you more susceptible to a variety of medical conditions such as digestive problems, depression, headaches, memory concentration impairment, heart disease, weight gain and sleep problems. Look up the laws to know what s allowed. Comparison shopping also takes a sharp buyer s eye. Source: https://cbdgummiesbox.com
NathanKap
June 17, 2023 at 7:06 AM
SCHEDULE Section 1. CBD has proven to be effective at helping many people fall asleep and stay asleep. When you take them out, let the jar come to room temperature before opening to avoid condensation. Source: https://cbdgummieslab.com
AlbertSkess
June 17, 2023 at 8:56 AM
One of my biggest bedtime problems is getting to sleep. But you may tweak the dosage if your vet approves it. This is an eOrganic article and was reviewed for compliance with National Organic Program regulations by members of the eOrganic community. Source: https://cbdgummiesglobal.com
CliftonElary
June 17, 2023 at 10:46 AM
Additionally, Herbies Seeds allows for cash on delivery for a limited number of areas. 1 seed 551 2 seeds 60 3 seeds 1158 3 1 free 149 4 seeds 29 5 seeds 1126 5 2 free 97 6 seeds 206 6 2 semillas 11 7 seeds 84 8 seeds 11 9 seeds 12 9 3 semillas 10 10 seeds 589 10 3 gratis 29 11 seeds 12 12 seeds 15 13 semillas 7 15 seeds 24 20 seeds 3 21 seeds 3 25 seeds 184 50 seeds 140 100 seeds 121 250 seeds 68 500 seeds 68 1000 seeds 72 5 g 1 20 g 1 100 g 1 500 g 1 1 kg 2 5 1 gratis 4 10 2 gratis 4 6 semillas Camiseta 3. Can dogs have CBD. Source: https://cbdgummiesmail.com
MichaelCox
June 17, 2023 at 12:36 PM
Difficult to find the third-party lab reports. Purchasing Cannabis Seeds Outside Your State. PenguinCBD Dog Oil is an all-natural supplement that can help relieve the symptoms of stress and anxiety. Source: https://cbdgummiescare.com
Anthonybuide
June 17, 2023 at 2:24 PM
Seal in a Plastic Bag Carefully fold the paper towel with the seeds inside and place it in a sealable plastic bag. Biggest Savings on CBD for Pets. rohuble-0 7,110 99. Source: https://cbdgummieszone.com
Antoniowag
June 17, 2023 at 4:11 PM
Full spectrum means that the product contains the natural ingredients in hemp as well as the cannabinoid CBD cannabidiol. How to grow marijuana outdoors. , 2001; Mandolino and Ranalli, 2002. Source: https://cbdgummiescity.com
Timothygox
June 17, 2023 at 5:55 PM
THC is another cannabinoid like CBD, but while CBD is not psychoactive, THC is. Pure Full Spectrum Cannabidiol – 2500mg. Before we dive right into the different cannabis growth stages, let s cover a few important details about cannabis seeds. Source: https://cbdgummiesstar.com
JulianEvara
June 18, 2023 at 1:25 AM
https://www.analiz-saita.ru/domain/mining-kmv.ru
Danielpooma
June 18, 2023 at 1:36 AM
Колл-центр Картли cartli.ru
Danielpooma
June 18, 2023 at 2:11 AM
Восстановленные айфоны оптом buyfromchina.ru
Edwardtotly
June 18, 2023 at 6:17 AM
Dive into the tropical ecstasy with Killa Mini Mango Ice! Let the exotic mango flavors swirl around your senses while the icy freshness takes over, delivering an unparalleled nicotine experience.
Williamtotly
June 18, 2023 at 6:24 AM
Embark on a flavor adventure with Killa Mini Blueberry! Experience the deliciously rich blueberry taste coupled with the perfect nicotine kick, and find yourself lost in a berrylicious world.
Samueltotly
June 18, 2023 at 6:31 AM
Dive into the world of satisfaction with Nicotine Pods! A perfect blend of taste and nicotine strength that keeps you going. Don’t miss out on this amazing experience!
Jarrodlon
June 18, 2023 at 7:34 AM
https://probannoe.ru/forum/viewtopic.php?f=3&t=2117
Jarrodlon
June 18, 2023 at 8:11 AM
http://inmeta.ru/wd/sf/viewtopic.php?f=17&t=499
Jarrodlon
June 18, 2023 at 8:53 AM
https://bdfeu.ukraine7.com/t16134-topic
Jarrodlon
June 18, 2023 at 9:36 AM
http://cherkessk.su/people/user/13/blog/2538/
Jarrodlon
June 18, 2023 at 10:19 AM
https://forum.stagila.ru/index.php?/gallery/image/16418-%D0%BE%D1%84%D0%B8%D1%86%D0%B8%D0%B0%D0%BB%D1%8C%D0%BD%D1%8B%D0%B9-%D0%B4%D0%B8%D0%BF%D0%BB%D0%BE%D0%BC%D1%8B-%D0%BE-%D1%81%D1%80%D0%B5%D0%B4%D0%BD%D0%B5%D0%BC-%D0%BE%D0%B1%D1%80%D0%B0%D0%B7%D0%BE%D0%B2%D0%B0%D0%BD%D0%B8%D0%B8-%D0%B3%D1%83%D0%BB%D1%8C%D0%BA%D0%B5%D0%B2%D0%B8%D1%87%D0%B8/&context=new
Jarrodlon
June 18, 2023 at 11:03 AM
http://forum.pskovedu.ru/viewtopic.php?pid=7689
Jarrodlon
June 18, 2023 at 11:45 AM
http://v-can.ru/forum/?PAGE_NAME=message&FID=6&TID=12505&TITLE_SEO=12505-nastoyashchiy-diplom-o-srednem-spetsialnom-krasnoarmeysk&MID=14337&result=new
JulianEvara
June 18, 2023 at 12:21 PM
https://www.websitereviewer.info/domain/mining-kmv.ru
Jarrodlon
June 18, 2023 at 12:29 PM
http://poselki.animetalk.ru/viewtopic.php?id=18235
Jarrodlon
June 18, 2023 at 1:11 PM
https://womans.forum.cool/viewtopic.php?id=4583
Jarrodlon
June 18, 2023 at 1:52 PM
https://www.ztinfo.info/forum-post/22405/
Jarrodlon
June 18, 2023 at 2:33 PM
https://magnitogorsk.metall-pro.com/company/personal/user/224/forum/message/30123/183417/
Jarrodlon
June 18, 2023 at 3:15 PM
https://forextema.com/index.php?option=com_easyblog&view=entry&id=6878&Itemid=87
TimothySem
June 18, 2023 at 10:56 PM
скачать geometry dash на пк
TimothySem
June 18, 2023 at 11:24 PM
скачать kmsauto для windows
Roberttotly
June 19, 2023 at 2:30 AM
Indulge in the ultimate best Killa Mini Frosted Mint experience with our premium collection of flavors!
Andrerap
June 19, 2023 at 3:10 AM
скачать дурак онлайн скачать дурак онлайн
Andrerap
June 19, 2023 at 3:16 AM
скачать tuneup скачать tuneup
ScottGlate
June 19, 2023 at 3:29 AM
https://www.avito.ru/mineralnye_vody/oborudovanie_dlya_biznesa/antminer_s19_90_ths_3104068156?slocation=621540
ScottGlate
June 19, 2023 at 4:05 AM
https://www.avito.ru/mineralnye_vody/oborudovanie_dlya_biznesa/whatsminer_m30s_110th_2880099789?slocation=621540
ScottGlate
June 19, 2023 at 4:41 AM
https://www.avito.ru/mineralnye_vody/predlozheniya_uslug/remont_asikov_3103779805
Jarrodlon
June 19, 2023 at 5:07 AM
http://ndm-sosh1.ru/news/utrennjaja_gimnastika/2017-10-11-551
Jarrodlon
June 19, 2023 at 5:12 AM
http://e-fl.ru/forum/cron.php?&rand=161466
ScottGlate
June 19, 2023 at 5:15 AM
https://www.avito.ru/cherkessk/oborudovanie_dlya_biznesa/whatsminer_m50_120th_chestnaya_tsena_3104571492
Jarrodlon
June 19, 2023 at 5:32 AM
http://uamconsults.com/book_547_chapter_19_3.3.2._Metody_individualnykh_ehkspertnykh_o%D1%81enok.html
Jarrodlon
June 19, 2023 at 5:36 AM
http://onlinestroitel.ru/publ_tainstvennaja_magija_fehn-shuj_stroitelstvo_lestnicy.html
ScottGlate
June 19, 2023 at 5:50 AM
https://www.avito.ru/essentuki/oborudovanie_dlya_biznesa/antminer_s19_90_ths_3104354715?slocation=621540
Jarrodlon
June 19, 2023 at 5:57 AM
http://pervoinvest.ru/useful/investor/
Jarrodlon
June 19, 2023 at 6:12 AM
http://nspk-poa.ru/node/56/webform-results/upload
ScottGlate
June 19, 2023 at 6:29 AM
Диагностика майнингового оборудования
Jarrodlon
June 19, 2023 at 6:38 AM
http://school-30kras.ru/antiterroristicheskaya-bezopasnost
Jarrodlon
June 19, 2023 at 6:51 AM
http://abitura39.ru/publ/srednee_professionalnoe_obrazovanie/gbu_ko_poo_kolledzh_mekhatroniki_i_pishhevoj_industrii/1-1-0-5
Jarrodlon
June 19, 2023 at 7:22 AM
http://itm-school.ru/kurs-dizajna-disnej/
ScottGlate
June 19, 2023 at 7:39 AM
https://www.avito.ru/pyatigorsk/oborudovanie_dlya_biznesa/asic_whatsminer_m50_120th_realnoe_nalichie_3103957912
Jarrodlon
June 19, 2023 at 7:41 AM
http://ia-hfb-1.ru/corporate/credit/
Jarrodlon
June 19, 2023 at 7:59 AM
http://school-album.ru/novosti/
ScottGlate
June 19, 2023 at 8:11 AM
https://www.avito.ru/stavropol/predlozheniya_uslug/remont_asikov_whatsminer_antminer_innosilicon_3104289226
ScottGlate
June 19, 2023 at 8:45 AM
https://www.avito.ru/mineralnye_vody/oborudovanie_dlya_biznesa/asik_whatsminer_m50_120th_chestnaya_tsena_3103993152
ScottGlate
June 19, 2023 at 9:18 AM
https://www.avito.ru/mineralnye_vody/oborudovanie_dlya_biznesa/mayning_ferma_pod_klyuch_na_8_kart_rtx_3070_500mh_3072076320
Jarrodlon
June 19, 2023 at 10:22 AM
http://razvitie-intellecta.ru/author/admin/
ScottGlate
June 19, 2023 at 10:23 AM
Ремонт асиков
ScottGlate
June 19, 2023 at 10:55 AM
https://www.avito.ru/mineralnye_vody/oborudovanie_dlya_biznesa/antminer_s19_90th_v_nalichii_3039819816?slocation=621540
ScottGlate
June 19, 2023 at 11:26 AM
https://www.avito.ru/nalchik/oborudovanie_dlya_biznesa/whatsminer_m50_120th_realnoe_nalichie_3104540015
AlvinBoaps
June 19, 2023 at 11:38 AM
перевод заказать
AlvinBoaps
June 19, 2023 at 11:44 AM
купить реферат
ScottGlate
June 19, 2023 at 11:57 AM
Ремонт antminer
AlvinBoaps
June 19, 2023 at 12:03 PM
заказать курсовую работу быстро и качественно недорого
AlvinBoaps
June 19, 2023 at 12:07 PM
перевод на украинском
ScottGlate
June 19, 2023 at 12:27 PM
https://www.avito.ru/mahachkala/oborudovanie_dlya_biznesa/asic_whatsminer_m30s_106th0th_mayning_3103753899?slocation=621540
AlvinBoaps
June 19, 2023 at 12:28 PM
работа онлайн для студентов
AlvinBoaps
June 19, 2023 at 12:41 PM
купить презентацию
Jimmiesax
June 19, 2023 at 12:59 PM
сливбот
AlvinBoaps
June 19, 2023 at 1:01 PM
реферат цена
AlvinBoaps
June 19, 2023 at 1:12 PM
курсовые на заказ
Jimmiesax
June 19, 2023 at 1:33 PM
поиск интим фото
AlvinBoaps
June 19, 2023 at 1:37 PM
реферат по физике
AlvinBoaps
June 19, 2023 at 1:52 PM
эссе онлайн
Jimmiesax
June 19, 2023 at 2:06 PM
слив бот
AlvinBoaps
June 19, 2023 at 2:07 PM
сколько стоит написать дипломную работу
Jimmiesax
June 19, 2023 at 3:06 PM
интим бот
AlvinBoaps
June 19, 2023 at 4:05 PM
отчет по практике в доу
Jimmiesax
June 19, 2023 at 4:27 PM
поиск сливов
Jimmiesax
June 19, 2023 at 5:42 PM
поиск слитых фото
WilliamMox
June 19, 2023 at 9:42 PM
https://www.google.co.ls/url?sa=t&url=https%3A%2F%2Fbudiluhur.ac.id
CallieLag
June 19, 2023 at 11:51 PM
http://bellagente.ru
DeloresSer
June 20, 2023 at 12:04 AM
http://sex-s-krasotkoy.me
CallieLag
June 20, 2023 at 12:05 AM
http://bellagente.ru
DeloresSer
June 20, 2023 at 12:24 AM
Andrestonge
June 20, 2023 at 12:29 AM
Высокий уровень защиты данных Платежная система с поддержкой криптовалюты
Andrestonge
June 20, 2023 at 12:33 AM
Интеграция с популярными платежными сервисами Мультивалютные платежи с BarysPay.kz
MariaMiB
June 20, 2023 at 12:36 AM
http://abm-motors.ru
MariaMiB
June 20, 2023 at 12:49 AM
http://abm-motors.ru
Andrestonge
June 20, 2023 at 12:50 AM
Быстрые и безопасные платежи Воспользоваться услугами BarysPay.kz
WillieSoacy
June 20, 2023 at 12:53 AM
https://bystryi-kredit.ru/
Andrestonge
June 20, 2023 at 12:54 AM
Доступность для бизнеса любого масштаба Простой и удобный онлайн-кошелек BarysPay.kz
MaxineFella
June 20, 2023 at 1:13 AM
Andrestonge
June 20, 2023 at 1:13 AM
Инновационные технологии в сфере финансовых операций Регистрация в BarysPay.kz
TheresaWhody
June 20, 2023 at 1:20 AM
http://ivanpoukhkal.ru
MaxineFella
June 20, 2023 at 1:34 AM
http://www.bylki.me/hd
TheresaWhody
June 20, 2023 at 1:34 AM
http://ivanpoukhkal.ru
Andrestonge
June 20, 2023 at 1:48 AM
Перевод денег без ограничений Быстрые и безопасные онлайн-платежи с BarysPay.kz
Andrestonge
June 20, 2023 at 1:59 AM
Удобное пополнение счета Присоединиться к BarysPay.kz
PamelaExpap
June 20, 2023 at 2:05 AM
http://bg-pr.ru
PamelaExpap
June 20, 2023 at 2:19 AM
http://bg-pr.ru
MeganKnids
June 20, 2023 at 2:21 AM
Andrestonge
June 20, 2023 at 2:25 AM
Мгновенные переводы и моментальные выплаты Регистрация в BarysPay.kz
MeganKnids
June 20, 2023 at 2:42 AM
JulieDuh
June 20, 2023 at 2:49 AM
http://www.about-scotland.ru/
Andrestonge
June 20, 2023 at 2:55 AM
Перевод денег за границу Платежная система для международных переводов
WillieSoacy
June 20, 2023 at 3:02 AM
долгосрочный займ наличными
JulieDuh
June 20, 2023 at 3:03 AM
http://www.about-scotland.ru/
WillieSoacy
June 20, 2023 at 3:22 AM
взять микрозаймы наличными
CarolFeelf
June 20, 2023 at 3:29 AM
http://www.18mne.com/
Lauraflili
June 20, 2023 at 3:34 AM
http://komitetri.ru
Lauraflili
June 20, 2023 at 3:48 AM
http://komitetri.ru
CarolFeelf
June 20, 2023 at 3:50 AM
http://www.18mne.com/
Jamestotly
June 20, 2023 at 4:08 AM
Discover a unique combination of icy coolness and tropical sweetness with Killa Mini Mango Ice.
Jamestotly
June 20, 2023 at 4:13 AM
Embark on a flavorful journey with the chilling sensation and fruity twist of Killa Mini Banana Ice.
Jamestotly
June 20, 2023 at 4:17 AM
Immerse yourself in the delicious berry burst of Killa Mini Blueberry. It’s a flavorful adventure!
Herminemot
June 20, 2023 at 4:19 AM
http://visitsalekhard.ru
Herminemot
June 20, 2023 at 4:33 AM
http://visitsalekhard.ru
GloriaBog
June 20, 2023 at 4:38 AM
https://kasting-porno.com/
GloriaBog
June 20, 2023 at 4:59 AM
StaceyCow
June 20, 2023 at 5:04 AM
http://alizamarket.ru
StaceyCow
June 20, 2023 at 5:18 AM
http://alizamarket.ru
Antoniaodorm
June 20, 2023 at 5:45 AM
https://www.pornotyb.com/
CecileHug
June 20, 2023 at 5:49 AM
https://kvest-center.ru/
CecileHug
June 20, 2023 at 6:04 AM
https://kvest-center.ru/
Antoniaodorm
June 20, 2023 at 6:05 AM
Elainehig
June 20, 2023 at 6:34 AM
http://www.arendel.ru/
Elainehig
June 20, 2023 at 6:48 AM
http://www.arendel.ru/
Rosettahox
June 20, 2023 at 6:53 AM
http://www.bolshie-siski.video/
Rosettahox
June 20, 2023 at 7:13 AM
http://www.bolshie-siski.video/
TiffanyFub
June 20, 2023 at 7:18 AM
http://supermarket58.ru
TiffanyFub
June 20, 2023 at 7:31 AM
http://supermarket58.ru
Jamestotly
June 20, 2023 at 7:35 AM
For a smokeless, spitless, and tobacco-free experience, try our premium Nicotine Pouches. Innovation at its best!
EleanorNus
June 20, 2023 at 8:01 AM
http://ecdetailing.ru
LydiaFub
June 20, 2023 at 8:02 AM
EleanorNus
June 20, 2023 at 8:15 AM
http://ecdetailing.ru
LydiaFub
June 20, 2023 at 8:22 AM
http://2kiski.cam
Lauranig
June 20, 2023 at 8:45 AM
http://tonus-omsk.ru
Lauranig
June 20, 2023 at 8:57 AM
http://tonus-omsk.ru
Sheilasog
June 20, 2023 at 9:09 AM
Pedrojok
June 20, 2023 at 9:09 AM
выгодные микрозаймы на карту онлайн
SherrieGorce
June 20, 2023 at 9:28 AM
http://www.modaburgo.ru/
Sheilasog
June 20, 2023 at 9:29 AM
Pedrojok
June 20, 2023 at 9:32 AM
https://vzaimyes.ru/
SherrieGorce
June 20, 2023 at 9:41 AM
http://www.modaburgo.ru/
TanyaPaulp
June 20, 2023 at 10:10 AM
http://lingvostudy.ru
RachellSpera
June 20, 2023 at 10:16 AM
https://www.cy4ki.com/
TanyaPaulp
June 20, 2023 at 10:23 AM
http://lingvostudy.ru
RachellSpera
June 20, 2023 at 10:36 AM
https://www.cy4ki.com/
Phyllisnep
June 20, 2023 at 10:52 AM
http://zabronirovat-otel.ru
IsaacVew
June 20, 2023 at 10:57 AM
займ под птс онлайн без посещения
Phyllisnep
June 20, 2023 at 11:05 AM
http://zabronirovat-otel.ru
Lindsayliree
June 20, 2023 at 11:21 AM
Pedrojok
June 20, 2023 at 11:26 AM
займы до зарплаты на карту онлайн
EleanorCoasy
June 20, 2023 at 11:34 AM
http://djays.ru
Lindsayliree
June 20, 2023 at 11:41 AM
https://porno-na-kyhne.me/
Pedrojok
June 20, 2023 at 11:44 AM
быстрый онлайн займ без банковской карты
EleanorCoasy
June 20, 2023 at 11:47 AM
http://djays.ru
Mariafap
June 20, 2023 at 12:17 PM
http://i-2018.ru
DeborahFed
June 20, 2023 at 12:27 PM
Mariafap
June 20, 2023 at 12:30 PM
http://i-2018.ru
RobertZer
June 20, 2023 at 12:32 PM
https://brocit-kurit.ru/obzor-na-vodonagrevateli-atlantic/
DeborahFed
June 20, 2023 at 12:48 PM
Minniepaymn
June 20, 2023 at 1:00 PM
http://decor35.ru
Minniepaymn
June 20, 2023 at 1:14 PM
http://decor35.ru
EricaSag
June 20, 2023 at 1:36 PM
DorothyErefe
June 20, 2023 at 1:43 PM
http://br-studio.ru
EricaSag
June 20, 2023 at 1:56 PM
DorothyErefe
June 20, 2023 at 1:57 PM
http://br-studio.ru
LatonyaRaw
June 20, 2023 at 2:27 PM
http://moimir05.ru
LatonyaRaw
June 20, 2023 at 2:40 PM
http://moimir05.ru
CrystalDealp
June 20, 2023 at 2:43 PM
CrystalDealp
June 20, 2023 at 3:03 PM
https://pikap-porno.com/
BrianaGah
June 20, 2023 at 3:09 PM
http://www.sailfd.ru/
BrianaGah
June 20, 2023 at 3:23 PM
http://www.sailfd.ru/
Maggiebak
June 20, 2023 at 3:51 PM
https://www.webcomicz.me/
ClaudiaNes
June 20, 2023 at 3:53 PM
http://art-taller.ru
ClaudiaNes
June 20, 2023 at 4:06 PM
http://art-taller.ru
Maggiebak
June 20, 2023 at 4:06 PM
Amandadiula
June 20, 2023 at 4:36 PM
http://tuttalamoda.ru
HattieGak
June 20, 2023 at 4:41 PM
Amandadiula
June 20, 2023 at 4:49 PM
http://tuttalamoda.ru
HattieGak
June 20, 2023 at 4:55 PM
https://zalypa.com/
BonnieAnash
June 20, 2023 at 5:19 PM
http://azkr.ru
Donnasof
June 20, 2023 at 5:30 PM
BonnieAnash
June 20, 2023 at 5:32 PM
http://azkr.ru
Donnasof
June 20, 2023 at 5:45 PM
Melindasem
June 20, 2023 at 6:02 PM
http://nerowolfe.ru
IsaacVew
June 20, 2023 at 6:05 PM
займы на карту под залог птс
IsaacVew
June 20, 2023 at 6:09 PM
займ денег под птс авто
Melindasem
June 20, 2023 at 6:16 PM
http://nerowolfe.ru
Mattietox
June 20, 2023 at 6:20 PM
http://sex-na-stole.club
IsaacVew
June 20, 2023 at 6:26 PM
https://kredit-zalog-kvartiry.ru/
Mattietox
June 20, 2023 at 6:36 PM
http://sex-na-stole.club
Josephdauct
June 20, 2023 at 6:40 PM
https://zaimi-online-na-kartu.ru/
Sarahanesy
June 20, 2023 at 6:47 PM
http://gazturbo.ru
IsaacVew
June 20, 2023 at 6:50 PM
займ авто под птс транспорт займ
Sarahanesy
June 20, 2023 at 7:00 PM
http://gazturbo.ru
IsaacVew
June 20, 2023 at 7:01 PM
займы под птс без
Carolynjef
June 20, 2023 at 7:11 PM
https://lesbeehive.com/
Carolynjef
June 20, 2023 at 7:26 PM
Jamiewaw
June 20, 2023 at 7:30 PM
http://seoabc.ru
Jamiewaw
June 20, 2023 at 7:43 PM
http://seoabc.ru
HelenKag
June 20, 2023 at 8:00 PM
IsaacVew
June 20, 2023 at 8:11 PM
займ онлайн под птс автомобиля на карту
Shelleyfen
June 20, 2023 at 8:13 PM
https://www.flyavi.ru/
HelenKag
June 20, 2023 at 8:15 PM
https://www.poebyshki.com/
Shelleyfen
June 20, 2023 at 8:27 PM
https://www.flyavi.ru/
Mattiesnupe
June 20, 2023 at 8:51 PM
RosalieHic
June 20, 2023 at 8:56 PM
http://www.1774.ru/
Mattiesnupe
June 20, 2023 at 9:06 PM
https://rykoeb.com/
RosalieHic
June 20, 2023 at 9:10 PM
http://www.1774.ru/
NicoleHor
June 20, 2023 at 9:40 PM
http://www.smartcityproject.ru/
EffieMuh
June 20, 2023 at 9:42 PM
NicoleHor
June 20, 2023 at 9:54 PM
http://www.smartcityproject.ru/
EffieMuh
June 20, 2023 at 9:57 PM
https://pornogora.com/
Denisebling
June 20, 2023 at 10:25 PM
http://www.arnold-bs.ru/
EffieMuh
June 20, 2023 at 10:33 PM
https://pornogora.com/
Denisebling
June 20, 2023 at 10:39 PM
http://www.arnold-bs.ru/
EffieMuh
June 20, 2023 at 10:48 PM
https://pornogora.com/
KelleySmort
June 20, 2023 at 11:10 PM
http://mfmm.ru
KelleySmort
June 20, 2023 at 11:23 PM
http://mfmm.ru
Juliemek
June 20, 2023 at 11:25 PM
https://porno-zastukala.me/
Juliemek
June 20, 2023 at 11:41 PM
https://porno-zastukala.me/
Tammisap
June 20, 2023 at 11:57 PM
http://opeka-klin.ru
Tammisap
June 21, 2023 at 12:11 AM
http://opeka-klin.ru
Nancydooli
June 21, 2023 at 12:17 AM
https://pornokyb.com/
Nancydooli
June 21, 2023 at 12:33 AM
Whitneyevize
June 21, 2023 at 12:41 AM
http://barcelona-nsk.ru
Whitneyevize
June 21, 2023 at 12:55 AM
http://barcelona-nsk.ru
AdrianaDub
June 21, 2023 at 1:09 AM
AdrianaDub
June 21, 2023 at 1:24 AM
http://www.sex-na-rabote.online/
BonitaNew
June 21, 2023 at 1:27 AM
http://beedecor.ru
BonitaNew
June 21, 2023 at 1:41 AM
http://beedecor.ru
LorettaAnida
June 21, 2023 at 2:00 AM
Sheenawralm
June 21, 2023 at 2:12 AM
http://www.graffiti-a.ru/
LorettaAnida
June 21, 2023 at 2:16 AM
JaimeEvoge
June 21, 2023 at 2:21 AM
https://buhuchetok.ru/
Sheenawralm
June 21, 2023 at 2:25 AM
http://www.graffiti-a.ru/
JaimeEvoge
June 21, 2023 at 2:47 AM
долгосрочный займ наличными
JamesEmami
June 21, 2023 at 2:51 AM
займ под птс мотоцикла
BettyBax
June 21, 2023 at 2:52 AM
ThelmaDix
June 21, 2023 at 2:57 AM
https://mile-motors.ru/
BettyBax
June 21, 2023 at 3:07 AM
JaimeEvoge
June 21, 2023 at 3:11 AM
займ наличными мгновенно
ThelmaDix
June 21, 2023 at 3:11 AM
https://mile-motors.ru/
JamesEmami
June 21, 2023 at 3:22 AM
https://dengipodauto.ru/
Alvinmag
June 21, 2023 at 3:43 AM
https://lebed.com/obshhestvo/srednee-spetsialnoe-obrazovanie-naskolko-ono-neobhodimo.htm
CarolMup
June 21, 2023 at 3:44 AM
https://ladoprom.ru/
Robertavef
June 21, 2023 at 3:44 AM
https://sosalovo.com/
CarolMup
June 21, 2023 at 3:57 AM
https://ladoprom.ru/
Robertavef
June 21, 2023 at 4:00 AM
https://sosalovo.com/
JaimeEvoge
June 21, 2023 at 4:03 AM
займ наличными офис
Alvinmag
June 21, 2023 at 4:14 AM
https://ortho-rus.ru/obrazovanie/3902-nuzhen-li-diplom-bakalavra.html
JamesEmami
June 21, 2023 at 4:18 AM
займ под птс машины
JaimeEvoge
June 21, 2023 at 4:28 AM
заявка на микрозайм наличными
Tishaquona
June 21, 2023 at 4:30 AM
http://ml500.ru
Donnadag
June 21, 2023 at 4:37 AM
Tishaquona
June 21, 2023 at 4:43 AM
http://ml500.ru
Alvinmag
June 21, 2023 at 4:43 AM
http://gazetki.by/article/vazhnost-diploma-o-vysshem-obrazovanii
Donnadag
June 21, 2023 at 4:52 AM
JaimeEvoge
June 21, 2023 at 4:56 AM
микрозаймы онлайн заявка наличными
Alvinmag
June 21, 2023 at 5:12 AM
http://ulgrad.ru/?p=180501
EmilyIsown
June 21, 2023 at 5:14 AM
http://www.shtory72.ru/
EmilyIsown
June 21, 2023 at 5:28 AM
http://www.shtory72.ru/
Ceciliafed
June 21, 2023 at 5:29 AM
Jamestotly
June 21, 2023 at 5:31 AM
Discover the refreshing burst of flavor with our BLCK Watermelon pouches. A tantalizing sensation awaits!
Alvinmag
June 21, 2023 at 5:40 AM
https://id41.ru/bitrix/modules/blog/lang/ru/lang/en/data/3/news/412_poluchi_diplom_sdelay_kareru.html
Jamestotly
June 21, 2023 at 5:43 AM
Experience the rich and vibrant taste of our BLCK Melon pouches. Enjoy the thrill of exotic flavors!
Ceciliafed
June 21, 2023 at 5:44 AM
https://pornofak.com/
CarolynSKYPE
June 21, 2023 at 6:00 AM
http://bitemup.ru
Matthewtotly
June 21, 2023 at 6:02 AM
Explore the intensity of our Killa Nicopods. Engage with the robust flavors and strong nicotine hit!
Alvinmag
June 21, 2023 at 6:09 AM
http://www.love-rap.ru/stuff/novosti/kupit_diplom_o_srednem_specialnom_obrazovanii_nedorogo/1-1-0-225
CarolynSKYPE
June 21, 2023 at 6:13 AM
http://bitemup.ru
LucilleTum
June 21, 2023 at 6:21 AM
LucilleTum
June 21, 2023 at 6:36 AM
Alvinmag
June 21, 2023 at 6:37 AM
https://altaex.ru/vazhno/diplom-tehnikuma-dlya-vashego-schastlivogo-budushhego/
Georgianig
June 21, 2023 at 6:45 AM
http://carpe-viam.ru
Georgianig
June 21, 2023 at 6:58 AM
http://carpe-viam.ru
Alvinmag
June 21, 2023 at 7:05 AM
https://el96.ru/components/com_newsfeeds/views/newsfeed/data/2/feed/3/content/388_visshee_obrazovanie_i_ego.html
Rebeccacon
June 21, 2023 at 7:12 AM
Rebeccacon
June 21, 2023 at 7:27 AM
https://www.2soska.com/
Nicholepam
June 21, 2023 at 7:28 AM
http://www.dosh-journal.ru/
Alvinmag
June 21, 2023 at 7:33 AM
https://edu.rin.ru/novosti/81251/Pochemu_rabotu_s_diplomom_prosche_najti.html
ColleenAcutt
June 21, 2023 at 8:03 AM
Alvinmag
June 21, 2023 at 8:16 AM
https://houseinform.ru/forum/nastoyashie_diplomy_o_vysshem_obrazovanii_verhneimbatsk
ColleenAcutt
June 21, 2023 at 8:17 AM
Alvinmag
June 21, 2023 at 8:50 AM
http://www.krasnogorskonline.ru/forum/7-42935-1
Susannevoinc
June 21, 2023 at 8:53 AM
Susannevoinc
June 21, 2023 at 9:08 AM
https://pornonark.com/
Alvinmag
June 21, 2023 at 9:23 AM
http://telesat.gtaserv.ru/viewtopic.php?f=251&t=3243
OpheliaelorT
June 21, 2023 at 9:44 AM
https://www.podryga.com/
Alvinmag
June 21, 2023 at 9:56 AM
http://forum.rastrnet.ru/showthread.php?t=59476
OpheliaelorT
June 21, 2023 at 9:58 AM
Alvinmag
June 21, 2023 at 10:28 AM
https://gasdefence.ru/forum/viewtopic.php?p=111612
TamekaLauff
June 21, 2023 at 10:34 AM
https://pornonlo.com/
TamekaLauff
June 21, 2023 at 10:49 AM
Alvinmag
June 21, 2023 at 11:00 AM
https://school-toksovo.ru/forum/messages/forum1/topic29/message198/?result=new
Normacob
June 21, 2023 at 11:25 AM
Alvinmag
June 21, 2023 at 11:33 AM
https://www.tapatalk.com/groups/dzerjinsky/-t27012.html
Normacob
June 21, 2023 at 11:40 AM
Alvinmag
June 21, 2023 at 12:05 PM
http://jagplay.ekafe.ru/viewtopic.php?f=35&t=3413
MyrtleBic
June 21, 2023 at 12:16 PM
MyrtleBic
June 21, 2023 at 12:31 PM
https://egoporno.com/
Alvinmag
June 21, 2023 at 12:37 PM
http://dancerussia.ru/forum/viewtopic.php?f=20&t=15078
Crystalnew
June 21, 2023 at 1:07 PM
Alvinmag
June 21, 2023 at 1:09 PM
http://donetsk.ekafe.ru/viewtopic.php?f=19&t=1994
Crystalnew
June 21, 2023 at 1:22 PM
http://www.pornorab.com/
Alvinmag
June 21, 2023 at 1:41 PM
http://collie.fatbb.ru/viewtopic.php?f=18&t=3493
Alisonhep
June 21, 2023 at 1:59 PM
http://www.nakonce.com/
Alvinmag
June 21, 2023 at 2:13 PM
http://forum.krolevets.com/viewtopic.php?t=6236
Alisonhep
June 21, 2023 at 2:14 PM
http://www.nakonce.com/
Melindabit
June 21, 2023 at 2:50 PM
Melindabit
June 21, 2023 at 3:04 PM
http://www.ebyshka.com/
Amandaicorm
June 21, 2023 at 3:41 PM
http://pornoxab.com
Amandaicorm
June 21, 2023 at 3:56 PM
NataliePex
June 21, 2023 at 4:33 PM
http://www.ebybab.com/
NataliePex
June 21, 2023 at 4:47 PM
https://www.cnru.su/
June 21, 2023 at 5:18 PM
Я нашел в статье некоторые практические советы, которые можно применить в повседневной жизни.
PeggyDon
June 21, 2023 at 5:23 PM
PeggyDon
June 21, 2023 at 5:38 PM
http://www.kon4il.com/
Mariafinge
June 21, 2023 at 6:15 PM
Mariafinge
June 21, 2023 at 6:30 PM
Mariagep
June 21, 2023 at 7:07 PM
http://ebyn.net
Mariagep
June 21, 2023 at 7:21 PM
BronwynBaisa
June 21, 2023 at 8:50 PM
https://pornobun.com/
BronwynBaisa
June 21, 2023 at 9:05 PM
https://pornobun.com/
Ameliaditly
June 21, 2023 at 9:42 PM
Ameliaditly
June 21, 2023 at 9:56 PM
Harryded
June 21, 2023 at 10:24 PM
Best crypto payment gateway
BarryFep
June 21, 2023 at 10:31 PM
Узнайте, как МАКС4064Р II может повысить уровень безопасности вашего дома или офиса.
Gloriamog
June 21, 2023 at 10:33 PM
https://pizdyn.com/
JulianHob
June 21, 2023 at 10:40 PM
авиасейлс
Gloriamog
June 21, 2023 at 10:48 PM
JulianHob
June 21, 2023 at 11:10 PM
aviasales
AliciaTab
June 21, 2023 at 11:25 PM
JulianHob
June 21, 2023 at 11:38 PM
viagra big chick
AliciaTab
June 21, 2023 at 11:39 PM
https://traxaet.com/
JulianHob
June 22, 2023 at 12:05 AM
coinmarketcap
Amandaslits
June 22, 2023 at 12:16 AM
https://pornopak.com/
JulianHob
June 22, 2023 at 12:31 AM
aviasales russia
Amandaslits
June 22, 2023 at 12:32 AM
https://pornopak.com/
WarrenMeeni
June 22, 2023 at 1:08 AM
https://kamerton.online/
BerthaSocky
June 22, 2023 at 1:09 AM
Virgilsoivy
June 22, 2023 at 1:20 AM
займы онлайн без банковской карты
BerthaSocky
June 22, 2023 at 1:24 AM
https://www.byfera.com/
Virgilsoivy
June 22, 2023 at 1:43 AM
https://zaimi-online-na-kartu.ru/
JocelynSwips
June 22, 2023 at 2:02 AM
https://gdeporno.com/
JocelynSwips
June 22, 2023 at 2:17 AM
https://gdeporno.com/
Virgilsoivy
June 22, 2023 at 2:39 AM
онлайн займы на банковскую карту без отказа
LindsayDeact
June 22, 2023 at 2:55 AM
LindsayDeact
June 22, 2023 at 3:10 AM
JanetFlefs
June 22, 2023 at 3:48 AM
Stanleygrabe
June 22, 2023 at 3:49 AM
https://srochnii-zaem.ru/
JanetFlefs
June 22, 2023 at 4:03 AM
https://www.per4ik.com/
CharlesIrrit
June 22, 2023 at 4:07 AM
https://arisfin.ru/
Louisecob
June 22, 2023 at 4:42 AM
https://www.sex-v-mashine.online/
Louisecob
June 22, 2023 at 4:57 AM
https://www.sex-v-mashine.online/
CharlesIrrit
June 22, 2023 at 5:29 AM
срочно займу 15000 рублей на карту
MargoVom
June 22, 2023 at 5:37 AM
MargoVom
June 22, 2023 at 5:51 AM
Stanleygrabe
June 22, 2023 at 6:00 AM
займ 5000 срочно
Isabelseago
June 22, 2023 at 6:30 AM
Isabelseago
June 22, 2023 at 6:44 AM
https://pornoka4.com/
WendyLof
June 22, 2023 at 7:24 AM
https://pornokoka.com/
WendyLof
June 22, 2023 at 7:39 AM
https://pornokoka.com/
Naomimab
June 22, 2023 at 8:17 AM
Naomimab
June 22, 2023 at 8:32 AM
https://www.pornopushka.com/
Belindakalia
June 22, 2023 at 9:10 AM
https://pornoceh.com/
nderdRet
June 22, 2023 at 9:20 AM
На сайте https://edgov.ru/ Многофункциональные центры (МФЦ) которые предоставляют широкий спектр услуг, вый найдете помощь в оформлении документов, получении государственных услуг и консультации по различным вопросам. Если вы ищете информацию о МФЦ, вы можете легко найти ее онлайн. На сайте также подробная информация о часах работы, адресах и телефонах МФЦ. Чтобы получить информацию о МФЦ, вы можете воспользоваться горячими линиями. На этих линиях вам ответят на любые вопросы, связанные с услугами МФЦ. Если вы ищете информацию о МФЦ, вы можете легко найти ее онлайн или позвонить на горячую линию.
Belindakalia
June 22, 2023 at 9:26 AM
https://pornoceh.com/
DanielFat
June 22, 2023 at 9:55 AM
https://www.google.lk/url?q=https://mostbet-uz-com.com/
Amberdar
June 22, 2023 at 10:04 AM
Amberdar
June 22, 2023 at 10:19 AM
https://pornokorm.com/
SandraSig
June 22, 2023 at 10:57 AM
https://pornokym.com/
SandraSig
June 22, 2023 at 11:12 AM
gk-bars
June 22, 2023 at 11:42 AM
Я оцениваю тщательность и точность исследования, представленного в этой статье. Автор провел глубокий анализ и представил аргументированные выводы. Очень важная и полезная работа!
VivianTrila
June 22, 2023 at 11:50 AM
https://monashki.com/
VivianTrila
June 22, 2023 at 12:05 PM
https://monashki.com/
WandaBuigh
June 22, 2023 at 12:43 PM
WandaBuigh
June 22, 2023 at 12:57 PM
https://www.obebka.com/
Miriamfep
June 22, 2023 at 1:35 PM
https://pornoeda.com/
Miriamfep
June 22, 2023 at 1:49 PM
https://pornoeda.com/
AshleyVok
June 22, 2023 at 2:28 PM
AshleyVok
June 22, 2023 at 2:42 PM
JuanitaSteak
June 22, 2023 at 3:19 PM
JuanitaSteak
June 22, 2023 at 3:33 PM
Tradesparq — всегда доступные данные о международной торговле
June 22, 2023 at 3:41 PM
Я прочитал эту статью с огромным интересом! Автор умело объединил факты, статистику и персональные истории, что делает ее настоящей находкой. Я получил много новых знаний и вдохновения. Браво!
Juliamub
June 22, 2023 at 4:11 PM
Juliamub
June 22, 2023 at 4:25 PM
https://pornomem.com/
Marielasix
June 22, 2023 at 5:03 PM
Marielasix
June 22, 2023 at 5:17 PM
https://www.viporol.com/
LynseyTic
June 22, 2023 at 5:54 PM
LynseyTic
June 22, 2023 at 6:08 PM
http://www.parnyxa.com/
Suzannecault
June 22, 2023 at 6:46 PM
Suzannecault
June 22, 2023 at 7:00 PM
Dolorescully
June 22, 2023 at 7:40 PM
https://pornokom.com/
Dolorescully
June 22, 2023 at 7:54 PM
https://pornokom.com/
Barbaramem
June 22, 2023 at 8:34 PM
Barbaramem
June 22, 2023 at 8:48 PM
Dianaalads
June 22, 2023 at 9:29 PM
Dianaalads
June 22, 2023 at 9:43 PM
AmberFen
June 22, 2023 at 10:24 PM
http://www.tutebut.com/
AmberFen
June 22, 2023 at 10:38 PM
http://www.tutebut.com/
RichardLoche
June 22, 2023 at 10:39 PM
https://telegra.ph/kupit-asik-06-19-76
SylviaboR
June 22, 2023 at 11:19 PM
https://pornoashan.com/
RichardLoche
June 22, 2023 at 11:27 PM
https://www.avito.ru/mineralnye_vody/oborudovanie_dlya_biznesa/asic_antminer_l7_8800mh_3104570707
SylviaboR
June 22, 2023 at 11:33 PM
Crystalsox
June 23, 2023 at 12:12 AM
RichardLoche
June 23, 2023 at 12:21 AM
https://www.avito.ru/pyatigorsk/oborudovanie_dlya_biznesa/antminer_s19_90_ths_3104606806?slocation=621540
Crystalsox
June 23, 2023 at 12:27 AM
https://www.kon4a.com/
Meloniewow
June 23, 2023 at 1:06 AM
http://www.1zaeb.com/
RichardLoche
June 23, 2023 at 1:13 AM
https://telegra.ph/kupit-asik-06-19-29
Meloniewow
June 23, 2023 at 1:21 AM
разместить объявление бесплатно
June 23, 2023 at 1:50 AM
Автор статьи представляет сведения, опираясь на факты и экспертные мнения.
Teresabag
June 23, 2023 at 2:00 AM
RichardLoche
June 23, 2023 at 2:07 AM
https://telegra.ph/kupit-asik-06-19-65
Teresabag
June 23, 2023 at 2:14 AM
HelenTug
June 23, 2023 at 2:54 AM
RichardLoche
June 23, 2023 at 3:00 AM
https://telegra.ph/kupit-asik-06-19-103
Анжелика
June 23, 2023 at 3:04 AM
На сайте вы узнаете https://pensinfo.ru/ Как узнать, какая пенсия положена гражданам, у которых были неработающие члены семьи? Если у вас возникли проблемы с получением пенсии или социальных выплат, то мы готовы помочь вам решить их.
HelenTug
June 23, 2023 at 3:08 AM
Juhatotly
June 23, 2023 at 3:46 AM
Nauti lopullisesta parhaasta Killa Nikotiinipussit kokemuksesta premium-makukokoelmallamme!
JaniceHiX
June 23, 2023 at 3:48 AM
JaniceHiX
June 23, 2023 at 4:02 AM
StefanHoF
June 23, 2023 at 4:04 AM
Erleben Sie das ultimative KILLA MINI Nikotinbeutel Erlebnis mit unserer Premium-Auswahl an Geschmacksrichtungen!
Jaakkototly
June 23, 2023 at 4:08 AM
Nauti ylitse muiden Killa mini nikotiinipussit kokemuksesta premium makujemme kokoelman avulla!
MelanieNum
June 23, 2023 at 4:41 AM
RichardLoche
June 23, 2023 at 4:45 AM
https://telegra.ph/kupit-asik-06-19-10
MelanieNum
June 23, 2023 at 4:55 AM
http://www.poeby.com/
VelmaCit
June 23, 2023 at 5:35 AM
Kennethbrere
June 23, 2023 at 5:37 AM
https://srochnii-zaem-online.ru/
VelmaCit
June 23, 2023 at 5:49 AM
https://ebalee.com/
Heinrichtotly
June 23, 2023 at 7:09 AM
Tauchen Sie ein in das ultimative exotischer geschmack Erlebnis mit unserer Premium Kollektion an Aromen!
Johntotly
June 23, 2023 at 7:24 AM
Experience the unparalleled sensation of our BLCK nicotine pouches, each delivering a unique flavor profile!
Williebof
June 23, 2023 at 7:25 AM
Kennethbrere
June 23, 2023 at 7:31 AM
займ онлайн на карту счет срочно
Williebof
June 23, 2023 at 7:40 AM
Helenpeero
June 23, 2023 at 8:21 AM
https://porno123.org/
Helenpeero
June 23, 2023 at 8:35 AM
https://porno123.org/
Tammythiff
June 23, 2023 at 9:14 AM
http://nakonec.com
Tammythiff
June 23, 2023 at 9:28 AM
http://nakonec.com
Bernicerig
June 23, 2023 at 10:07 AM
Bernicerig
June 23, 2023 at 10:21 AM
Joellahathy
June 23, 2023 at 11:01 AM
http://nakazhu.com
Joellahathy
June 23, 2023 at 11:15 AM
http://nakazhu.com
Paulaagoni
June 23, 2023 at 11:55 AM
http://babniki.com
Paulaagoni
June 23, 2023 at 12:09 PM
Надежда
June 23, 2023 at 12:21 PM
На сайте https://eirc-mo.ru/ — Зарегистрироваться в личном кабинете клиента на МосОблЕИРЦ РФ. МосОблЕИРЦ: войти в личный кабинет клиента для Московской области.
JessicaBot
June 23, 2023 at 12:49 PM
http://www.mogyn.com/
JessicaBot
June 23, 2023 at 1:03 PM
Junkoeteks
June 23, 2023 at 1:43 PM
Junkoeteks
June 23, 2023 at 1:57 PM
DebraIcelp
June 23, 2023 at 2:36 PM
https://mamaeb.com/
DebraIcelp
June 23, 2023 at 2:50 PM
https://mamaeb.com/
Rhondatraug
June 23, 2023 at 3:28 PM
Rhondatraug
June 23, 2023 at 3:42 PM
Dorothymib
June 23, 2023 at 4:22 PM
Dorothymib
June 23, 2023 at 4:35 PM
HazelProps
June 23, 2023 at 5:15 PM
https://www.zaebala.com/
HazelProps
June 23, 2023 at 5:29 PM
https://www.zaebala.com/
Beverlynet
June 23, 2023 at 6:08 PM
Beverlynet
June 23, 2023 at 6:22 PM
EmilyBef
June 23, 2023 at 7:01 PM
EmilyBef
June 23, 2023 at 7:15 PM
https://www.pornobog.com/
Maviswaync
June 23, 2023 at 7:56 PM
https://pornoparad.com/
Maviswaync
June 23, 2023 at 8:10 PM
https://pornoparad.com/
KimikoButty
June 23, 2023 at 8:52 PM
https://naebala.com/
KimikoButty
June 23, 2023 at 9:06 PM
https://naebala.com/
HilaryMeR
June 23, 2023 at 9:47 PM
http://www.potrahal.com/
HilaryMeR
June 23, 2023 at 10:02 PM
Patsycop
June 23, 2023 at 10:44 PM
https://trahbab.com/
Patsycop
June 23, 2023 at 10:58 PM
Robertked
June 23, 2023 at 11:36 PM
https://telegra.ph/kupit-asik-06-19-83
NancySuifs
June 23, 2023 at 11:40 PM
https://www.ebu4ka.com/
NancySuifs
June 23, 2023 at 11:55 PM
https://www.ebu4ka.com/
Georgetaphy
June 24, 2023 at 12:13 AM
https://www.avito.ru/mineralnye_vody/oborudovanie_dlya_biznesa/antminer_e9_pro_3680mh_dostavka_1_den_2944080018
ScottGlate
June 24, 2023 at 12:36 AM
https://www.avito.ru/pyatigorsk/oborudovanie_dlya_biznesa/antminer_s19_90_ths_3104606806?slocation=621540
GloriaLic
June 24, 2023 at 12:36 AM
Robertked
June 24, 2023 at 12:37 AM
https://telegra.ph/kupit-asik-06-19-50
Georgetaphy
June 24, 2023 at 12:40 AM
https://www.avito.ru/pyatigorsk/oborudovanie_dlya_biznesa/antminer_s19_90_ths_3104606806?slocation=621540
GloriaLic
June 24, 2023 at 12:50 AM
https://pornoyama.com/
Georgetaphy
June 24, 2023 at 1:07 AM
https://www.avito.ru/stavropol/predlozheniya_uslug/remont_asikov_whatsminer_antminer_innosilicon_3104289226
ScottGlate
June 24, 2023 at 1:07 AM
ремонт asic майнеров
DebraDic
June 24, 2023 at 1:31 AM
https://zatrahala.com/
Georgetaphy
June 24, 2023 at 1:33 AM
ремонт antminer
Robertked
June 24, 2023 at 1:38 AM
https://teletype.in/@lewislaura1975/3UNbFv6f5Qn
DebraDic
June 24, 2023 at 1:45 AM
https://zatrahala.com/
Georgetaphy
June 24, 2023 at 2:00 AM
https://www.avito.ru/pyatigorsk/oborudovanie_dlya_biznesa/asic_antminer_s19j_pro_100_ths_3104262364?slocation=621540
ScottGlate
June 24, 2023 at 2:09 AM
https://www.avito.ru/mahachkala/oborudovanie_dlya_biznesa/asic_antminer_s19j_pro_100_ths_3104703598?slocation=621540
RonnaElose
June 24, 2023 at 2:24 AM
https://www.kykolki.com/
Georgetaphy
June 24, 2023 at 2:26 AM
https://www.avito.ru/nalchik/oborudovanie_dlya_biznesa/antminer_s19_90_ths_3104554841?slocation=621540
RonnaElose
June 24, 2023 at 2:39 AM
https://www.kykolki.com/
Robertked
June 24, 2023 at 2:39 AM
https://telegra.ph/kupit-asik-06-19-62
ScottGlate
June 24, 2023 at 2:40 AM
ремонт майнеров
Артём
June 24, 2023 at 2:43 AM
На сайте https://govinsurance.ru/ — Чтобы получить такую информацию онлайн, нужно зарегистрировать свой личный кабинет на сайте ФСС через сервис Госуслуги.
Georgetaphy
June 24, 2023 at 2:51 AM
ремонт asic майнеров
ScottGlate
June 24, 2023 at 3:09 AM
Ремонт innosilicon
Georgetaphy
June 24, 2023 at 3:17 AM
https://www.avito.ru/mineralnye_vody/oborudovanie_dlya_biznesa/whatsminer_m30s_100th_3007960969?slocation=621540
Jennyfat
June 24, 2023 at 3:19 AM
https://www.traxnyl.com/
Jennyfat
June 24, 2023 at 3:33 AM
https://www.traxnyl.com/
ScottGlate
June 24, 2023 at 3:38 AM
https://www.avito.ru/mineralnye_vody/oborudovanie_dlya_biznesa/asic_antminer_l7_8800mh_3104570707
Robertked
June 24, 2023 at 3:39 AM
https://telegra.ph/kupit-asik-06-19-21
Georgetaphy
June 24, 2023 at 3:41 AM
https://www.avito.ru/cherkessk/oborudovanie_dlya_biznesa/whatsminer_m50_120th_chestnaya_tsena_3104571492
Georgetaphy
June 24, 2023 at 4:05 AM
ремонт antminer
ScottGlate
June 24, 2023 at 4:07 AM
https://www.avito.ru/nalchik/oborudovanie_dlya_biznesa/asic_antminer_e9_pro_3680mh_asik_3104456479
Dianalothe
June 24, 2023 at 4:13 AM
http://vylva.com
Dianalothe
June 24, 2023 at 4:26 AM
Georgetaphy
June 24, 2023 at 4:29 AM
https://www.avito.ru/mineralnye_vody/oborudovanie_dlya_biznesa/asik_whatsminer_m50_120th_chestnaya_tsena_3103993152
ScottGlate
June 24, 2023 at 4:35 AM
Ремонт whatsminer
Robertked
June 24, 2023 at 4:39 AM
https://telegra.ph/kupit-asik-06-19-86
ScottGlate
June 24, 2023 at 5:03 AM
https://www.avito.ru/mineralnye_vody/oborudovanie_dlya_biznesa/antminer_e9_pro_3680mh_dostavka_1_den_2944080018
Yukikoden
June 24, 2023 at 5:06 AM
https://www.nedaet.com/
Yukikoden
June 24, 2023 at 5:21 AM
https://www.nedaet.com/
Robertked
June 24, 2023 at 5:38 AM
https://telegra.ph/kupit-asik-06-19-42
Georgetaphy
June 24, 2023 at 5:41 AM
https://www.avito.ru/mineralnye_vody/oborudovanie_dlya_biznesa/asic_antminer_l7_8800mh_3104570707
BobbieMooda
June 24, 2023 at 6:01 AM
https://poebali.com/
Georgetaphy
June 24, 2023 at 6:07 AM
https://www.avito.ru/essentuki/oborudovanie_dlya_biznesa/asic_antminer_e9_pro_3680mh_chestnaya_tsena_3104534864
BobbieMooda
June 24, 2023 at 6:16 AM
https://poebali.com/
Georgetaphy
June 24, 2023 at 6:32 AM
асики дл¤ майнинга купить
Robertked
June 24, 2023 at 6:40 AM
https://telegra.ph/kupit-asik-06-19-5
Tamranom
June 24, 2023 at 6:58 AM
Georgetaphy
June 24, 2023 at 6:59 AM
https://www.avito.ru/mineralnye_vody/oborudovanie_dlya_biznesa/antminer_s19_90th_v_nalichii_3039819816?slocation=621540
Tamranom
June 24, 2023 at 7:12 AM
Georgetaphy
June 24, 2023 at 7:23 AM
https://www.avito.ru/mahachkala/oborudovanie_dlya_biznesa/asic_antminer_s19j_pro_100_ths_3104703598?slocation=621540
Robertked
June 24, 2023 at 7:42 AM
https://telegra.ph/kupit-asik-06-19-68
Georgetaphy
June 24, 2023 at 7:47 AM
https://www.avito.ru/essentuki/oborudovanie_dlya_biznesa/antminer_s19_90_ths_3104354715?slocation=621540
BeverlyhiT
June 24, 2023 at 7:55 AM
BeverlyhiT
June 24, 2023 at 8:09 AM
https://pornodeda.com/
Georgetaphy
June 24, 2023 at 8:11 AM
ремонт innosilicon
Georgetaphy
June 24, 2023 at 8:34 AM
https://www.avito.ru/cherkessk/oborudovanie_dlya_biznesa/asic_mayner_whatsminer_m30s_106th_3104639310?slocation=621540
JuanitaKer
June 24, 2023 at 8:50 AM
https://pornoment.com/
JuanitaKer
June 24, 2023 at 9:04 AM
https://pornoment.com/
Виктор
June 24, 2023 at 9:12 AM
Все расписано достаточно подробно https://edgov.ru/mfc-pitelino.html МФЦ в Пителино, Советская пл., д. 35: официальный сайт, адрес, телефон, часы работы.
Georgetaphy
June 24, 2023 at 9:19 AM
майнинг ферма под ключ
Robertked
June 24, 2023 at 9:41 AM
https://telegra.ph/kupit-asik-06-19-91
Georgetaphy
June 24, 2023 at 9:42 AM
ремонт whatsminer
Alisonpax
June 24, 2023 at 9:44 AM
https://pornozek.com/
Alisonpax
June 24, 2023 at 9:57 AM
Dolliekag
June 24, 2023 at 10:37 AM
Dolliekag
June 24, 2023 at 10:51 AM
https://pornokep.com/
JoyceTap
June 24, 2023 at 11:31 AM
Robertked
June 24, 2023 at 11:38 AM
https://telegra.ph/kupit-asik-06-19-14
JoyceTap
June 24, 2023 at 11:46 AM
Lindsaywhips
June 24, 2023 at 12:26 PM
JorgeSow
June 24, 2023 at 12:40 PM
https://telegra.ph/kupit-asik-06-19-32
Lindsaywhips
June 24, 2023 at 12:40 PM
https://www.pizdaeb.com/
AnnetteHok
June 24, 2023 at 1:20 PM
JorgeSow
June 24, 2023 at 1:33 PM
https://telegra.ph/kupit-asik-06-19-103
AnnetteHok
June 24, 2023 at 1:34 PM
Karendoock
June 24, 2023 at 2:14 PM
JorgeSow
June 24, 2023 at 2:26 PM
https://telegra.ph/kupit-asik-06-19-69
Karendoock
June 24, 2023 at 2:28 PM
https://pornoglaz.com/
Олег
June 24, 2023 at 2:37 PM
Информация очень интересная https://pensinfo.ru/pensionnyj-fond-v-karabashe/ Пенсионный фонд в Карабаше ул. Ключевая, д. 20А: официальный сайт, адрес, телефоны, график работы.
KathrynNeike
June 24, 2023 at 3:08 PM
JorgeSow
June 24, 2023 at 3:18 PM
https://telegra.ph/kupit-asik-06-19-24
KathrynNeike
June 24, 2023 at 3:22 PM
EllenSmern
June 24, 2023 at 4:06 PM
JorgeSow
June 24, 2023 at 4:08 PM
https://telegra.ph/kupit-asik-06-19-97
EllenSmern
June 24, 2023 at 4:24 PM
JorgeSow
June 24, 2023 at 4:59 PM
https://telegra.ph/kupit-asik-06-19-66
Audreycoode
June 24, 2023 at 5:08 PM
Audreycoode
June 24, 2023 at 5:22 PM
JorgeSow
June 24, 2023 at 5:51 PM
https://telegra.ph/kupit-asik-06-19-26
KathyFup
June 24, 2023 at 6:03 PM
https://pornoshtab.com/
KathyFup
June 24, 2023 at 6:17 PM
https://pornoshtab.com/
JorgeSow
June 24, 2023 at 6:43 PM
https://telegra.ph/kupit-asik-06-19-100
JanetSal
June 24, 2023 at 6:59 PM
https://www.xyulo.com/
JanetSal
June 24, 2023 at 7:14 PM
JorgeSow
June 24, 2023 at 7:33 PM
https://telegra.ph/kupit-asik-06-19-61
MargoRib
June 24, 2023 at 7:54 PM
https://www.pornobanka.com/
MargoRib
June 24, 2023 at 8:09 PM
JorgeSow
June 24, 2023 at 8:22 PM
https://telegra.ph/kupit-asik-06-19-25
BrandyTriny
June 24, 2023 at 8:50 PM
BrandyTriny
June 24, 2023 at 9:05 PM
https://www.mnedaet.com/
JorgeSow
June 24, 2023 at 9:11 PM
https://teletype.in/@clarklinda1976/TLdx4K8vYwl
RosalieTop
June 24, 2023 at 9:47 PM
JorgeSow
June 24, 2023 at 9:59 PM
https://telegra.ph/kupit-asik-06-19-70
RosalieTop
June 24, 2023 at 10:02 PM
HelenNosse
June 24, 2023 at 10:44 PM
https://poxyu.org/
JorgeSow
June 24, 2023 at 10:48 PM
https://telegra.ph/kupit-asik-06-19-34
HelenNosse
June 24, 2023 at 10:58 PM
JorgeSow
June 24, 2023 at 11:36 PM
купить асики для майнинга
Lindahes
June 24, 2023 at 11:39 PM
https://www.pososala.com/
Nicholepam
June 24, 2023 at 11:49 PM
http://www.dosh-journal.ru/
Lindahes
June 24, 2023 at 11:56 PM
https://www.pososala.com/
Evelynpeemi
June 25, 2023 at 12:23 AM
http://maxfarmo.ru
JorgeSow
June 25, 2023 at 12:26 AM
https://telegra.ph/kupit-asik-06-19-72
Evelynpeemi
June 25, 2023 at 12:37 AM
http://maxfarmo.ru
Brandiedob
June 25, 2023 at 12:50 AM
http://lobochek.com
Brandiedob
June 25, 2023 at 1:09 AM
Barbararoops
June 25, 2023 at 1:09 AM
http://masterskaja-ujuta.ru
JorgeSow
June 25, 2023 at 1:17 AM
https://telegra.ph/kupit-asik-06-19-41
Barbararoops
June 25, 2023 at 1:23 AM
http://masterskaja-ujuta.ru
Ева
June 25, 2023 at 1:55 AM
Спасибо за подробную информацию https://helpgov.ru/ — ЕСИА Госуслуги РФ — регистрация, вход, подтверждение личности. Чтобы оформить регистрацию перейдите в личный кабинет ЕСИА.
Amandageope
June 25, 2023 at 1:55 AM
http://sheepandwolves.ru
RebeccaSkisk
June 25, 2023 at 2:03 AM
Amandageope
June 25, 2023 at 2:09 AM
http://sheepandwolves.ru
RebeccaSkisk
June 25, 2023 at 2:22 AM
http://oteby.com
BobbiKnive
June 25, 2023 at 2:41 AM
http://sichi-adm.ru
BobbiKnive
June 25, 2023 at 2:55 AM
http://sichi-adm.ru
EugeniaTrili
June 25, 2023 at 3:15 AM
CraigReeli
June 25, 2023 at 3:24 AM
http://project3534171.tilda.ws/
Tabithatoize
June 25, 2023 at 3:28 AM
https://www.9861636.ru/
EugeniaTrili
June 25, 2023 at 3:35 AM
Tabithatoize
June 25, 2023 at 3:42 AM
https://www.9861636.ru/
Rachelcic
June 25, 2023 at 4:14 AM
http://www.all-diets.ru/
CraigReeli
June 25, 2023 at 4:28 AM
https://worldmod.ru/news/13753-zakaz-diploma-cenite-svoe-vremya.html
Rachelcic
June 25, 2023 at 4:28 AM
http://www.all-diets.ru/
MariaUnort
June 25, 2023 at 4:29 AM
https://eeporno.com/
MariaUnort
June 25, 2023 at 4:48 AM
HazelWar
June 25, 2023 at 5:01 AM
http://www.hramluki.ru/
HazelWar
June 25, 2023 at 5:16 AM
http://www.hramluki.ru/
CraigReeli
June 25, 2023 at 5:33 AM
https://montazhnik02.ru/raznoe/80809-mozhno-li-kupit-legalnyiy-diplom.html
ShannonCow
June 25, 2023 at 5:43 AM
Jessicaraisp
June 25, 2023 at 5:49 AM
http://prudekb.ru
ArthurHen
June 25, 2023 at 6:02 AM
http://forum.meogames.com/forum.php?mod=viewthread&tid=11117&extra=
Евгения
June 25, 2023 at 6:02 AM
Информация очень полезная https://xn—-7sbnvcylw.xn--p1ai/ Генератор QR кодов – это простое, но функциональное приложение для создания собственный QR кодов! Добавляйте текст или ссылки.
ShannonCow
June 25, 2023 at 6:03 AM
Jessicaraisp
June 25, 2023 at 6:04 AM
http://prudekb.ru
Karinjuche
June 25, 2023 at 6:38 AM
http://www.gk-pusk.ru/
Karinjuche
June 25, 2023 at 6:52 AM
http://www.gk-pusk.ru/
Lucilevetty
June 25, 2023 at 6:56 AM
https://www.sosyshki.com/
Lucilevetty
June 25, 2023 at 7:16 AM
DonnaNEf
June 25, 2023 at 7:25 AM
http://движениеавтомобилистов.рф/
DonnaNEf
June 25, 2023 at 7:38 AM
http://движениеавтомобилистов.рф/
Karenfligo
June 25, 2023 at 8:10 AM
https://popasik.com/
GraceHulky
June 25, 2023 at 8:11 AM
http://www.xray-auto.ru/
GraceHulky
June 25, 2023 at 8:25 AM
http://www.xray-auto.ru/
Karenfligo
June 25, 2023 at 8:29 AM
StanleyTraug
June 25, 2023 at 8:50 AM
https://wagner-automobile.ru/
MariaMap
June 25, 2023 at 8:57 AM
http://well-socks.ru
MariaMap
June 25, 2023 at 9:10 AM
http://well-socks.ru
JoyceDRize
June 25, 2023 at 9:23 AM
Reneepab
June 25, 2023 at 9:42 AM
http://www.integris-m.ru/
JoyceDRize
June 25, 2023 at 9:43 AM
Reneepab
June 25, 2023 at 9:55 AM
http://www.integris-m.ru/
Олеся
June 25, 2023 at 10:02 AM
Спасибо за исчерпывающую информацию https://xn--80aaaaaablq1bxfe3aug0afmuhd9g8ika.xn--p1ai/%d0%b5%d0%b2%d1%80%d0%b5%d0%b9%d1%81%d0%ba%d0%be%d0%b9-%d0%b0%d0%b2%d1%82%d0%be%d0%bd%d0%be%d0%bc%d0%bd%d0%be%d0%b9-%d0%be%d0%b1%d0%bb%d0%b0%d1%81%d1%82%d0%b8/ Публичная кадастровая карта Еврейской автономной области.
Lauramet
June 25, 2023 at 10:27 AM
http://www.cdutur.ru/
BarbaraGlync
June 25, 2023 at 10:37 AM
Lauramet
June 25, 2023 at 10:41 AM
http://www.cdutur.ru/
BarbaraGlync
June 25, 2023 at 10:55 AM
ChloeSoymn
June 25, 2023 at 11:13 AM
http://www.blkspb.ru/
ChloeSoymn
June 25, 2023 at 11:27 AM
http://www.blkspb.ru/
StanleyTraug
June 25, 2023 at 11:41 AM
лизинг трактора для юридических лиц
ShirleySlups
June 25, 2023 at 11:50 AM
http://www.otsosala.com/
Carolyngok
June 25, 2023 at 11:59 AM
http://alexandravoronina.ru
ShirleySlups
June 25, 2023 at 12:09 PM
http://www.otsosala.com/
Carolyngok
June 25, 2023 at 12:12 PM
http://alexandravoronina.ru
StanleyTraug
June 25, 2023 at 12:18 PM
взять грузовик в лизинг
NancyOnemn
June 25, 2023 at 12:44 PM
http://www.tsl-nsk.ru/
NancyOnemn
June 25, 2023 at 12:57 PM
http://www.tsl-nsk.ru/
Laurenmit
June 25, 2023 at 1:02 PM
https://www.sisi4ki.com/
Laurenmit
June 25, 2023 at 1:21 PM
https://www.sisi4ki.com/
Maryannnus
June 25, 2023 at 1:28 PM
http://vita-arkhyz.ru
Марк
June 25, 2023 at 1:31 PM
Спасибо за полезную информацию https://mfc-moskva-mo.ru/ Многофункциональные центры в Москве – отзывы, адреса, контактная информация, официальные сайты, телефоны, режим работы учреждения.
Maryannnus
June 25, 2023 at 1:42 PM
http://vita-arkhyz.ru
IngridAspeM
June 25, 2023 at 2:13 PM
http://russellterrier-club.ru
SarahMut
June 25, 2023 at 2:17 PM
https://eto-porno.com/
IngridAspeM
June 25, 2023 at 2:27 PM
http://russellterrier-club.ru
SarahMut
June 25, 2023 at 2:36 PM
PaulineDof
June 25, 2023 at 2:58 PM
http://papaudm.ru
PaulineDof
June 25, 2023 at 3:12 PM
http://papaudm.ru
MariaNaf
June 25, 2023 at 3:31 PM
CherylRiz
June 25, 2023 at 3:43 PM
http://www.pitomnik-elita.ru/
MariaNaf
June 25, 2023 at 3:51 PM
https://zaxyu.com/
CherylRiz
June 25, 2023 at 3:57 PM
http://www.pitomnik-elita.ru/
StanleyTraug
June 25, 2023 at 4:13 PM
лизинг недвижимости для ип
MarthaRax
June 25, 2023 at 4:28 PM
http://www.diamondcat.ru/
MarthaRax
June 25, 2023 at 4:41 PM
http://www.diamondcat.ru/
SharonKeM
June 25, 2023 at 4:45 PM
StanleyTraug
June 25, 2023 at 4:46 PM
лизинг на спецтехнику для юридических лиц
SharonKeM
June 25, 2023 at 5:04 PM
http://100bab.com
Donnahap
June 25, 2023 at 5:12 PM
http://www.megalink73.ru/
Donnahap
June 25, 2023 at 5:26 PM
http://www.megalink73.ru/
http://miobi.ru
June 25, 2023 at 5:41 PM
I like that the website provides statistics on ad views, helping sellers gauge the interest in their listings.
DeirdreCet
June 25, 2023 at 5:58 PM
http://ranovosib.ru
YvonneDot
June 25, 2023 at 5:58 PM
https://www.na4len.com/
DeirdreCet
June 25, 2023 at 6:12 PM
http://ranovosib.ru
YvonneDot
June 25, 2023 at 6:16 PM
https://www.na4len.com/
Lizettepak
June 25, 2023 at 6:43 PM
https://gpo2018.ru/
Lizettepak
June 25, 2023 at 6:56 PM
https://gpo2018.ru/
Bessiedew
June 25, 2023 at 7:10 PM
HeidiSib
June 25, 2023 at 7:28 PM
http://arcticland.ru
Bessiedew
June 25, 2023 at 7:29 PM
HeidiSib
June 25, 2023 at 7:41 PM
http://arcticland.ru
Lindapes
June 25, 2023 at 8:13 PM
http://www.albik.ru/
MarionLam
June 25, 2023 at 8:23 PM
Lindapes
June 25, 2023 at 8:27 PM
http://www.albik.ru/
MarionLam
June 25, 2023 at 8:41 PM
https://www.zaeby.com/
MarilynAvaro
June 25, 2023 at 8:58 PM
http://www.glush-mania.ru/
MarilynAvaro
June 25, 2023 at 9:11 PM
http://www.glush-mania.ru/
StanleyTraug
June 25, 2023 at 9:18 PM
лизинг в сельском хозяйстве
Jeannefum
June 25, 2023 at 9:36 PM
https://porno-online.video/
CarolynSpete
June 25, 2023 at 9:43 PM
http://www.keysvet.ru/
Jeannefum
June 25, 2023 at 9:55 PM
CarolynSpete
June 25, 2023 at 9:57 PM
http://www.keysvet.ru/
BettyDussy
June 25, 2023 at 10:29 PM
http://камминс-сибирь.рф/
BettyDussy
June 25, 2023 at 10:42 PM
http://камминс-сибирь.рф/
VelmaDyemn
June 25, 2023 at 10:51 PM
VelmaDyemn
June 25, 2023 at 11:10 PM
Deloreslar
June 25, 2023 at 11:13 PM
http://missioner-nne.ru
Deloreslar
June 25, 2023 at 11:27 PM
http://missioner-nne.ru
Reginaved
June 25, 2023 at 11:59 PM
http://igribakugan.ru
Christafauri
June 26, 2023 at 12:06 AM
https://1xyu.com/
Reginaved
June 26, 2023 at 12:13 AM
http://igribakugan.ru
Christafauri
June 26, 2023 at 12:25 AM
Валерий
June 26, 2023 at 12:27 AM
Большое спасибо за подробную информацию https://city-karta.ru/perekrestok/ Перекресток Клуб — регистрация и активация карты.
Dorcastweds
June 26, 2023 at 12:47 AM
http://fond-krymnash.ru
Dorcastweds
June 26, 2023 at 1:00 AM
http://fond-krymnash.ru
WilliamMaync
June 26, 2023 at 1:18 AM
http://finforum.org/topic/40661-originalnii-diplom-na-oficialnom-blanke-afr/
TrudyDet
June 26, 2023 at 1:20 AM
StanleyTraug
June 26, 2023 at 1:20 AM
взять в лизинг легковой автомобиль юридическому лицу
ZelmaLig
June 26, 2023 at 1:34 AM
http://seodzen.ru
TrudyDet
June 26, 2023 at 1:40 AM
https://naxren.com/
ZelmaLig
June 26, 2023 at 1:48 AM
http://seodzen.ru
WilliamMaync
June 26, 2023 at 1:49 AM
http://yar.best-city.ru/forum/thread81444/
StanleyTraug
June 26, 2023 at 1:55 AM
лизинг полуприцепов
ShirleyPeede
June 26, 2023 at 2:21 AM
http://yarshow.ru
WilliamMaync
June 26, 2023 at 2:22 AM
http://forwoman.lifeforums.ru/viewtopic.php?id=11306
StaceyQuege
June 26, 2023 at 2:35 AM
https://tytporno.com/
ShirleyPeede
June 26, 2023 at 2:35 AM
http://yarshow.ru
WilliamMaync
June 26, 2023 at 2:53 AM
https://kherson.forum2x2.ru/t9560-topic
StaceyQuege
June 26, 2023 at 2:55 AM
https://tytporno.com/
MaxSow
June 26, 2023 at 3:04 AM
Tauchen Sie ein in das ultimative Nikotinbeutel-Erlebnis mit unserer hochwertigen Auswahl an Geschmacksrichtungen!
Rufinanot
June 26, 2023 at 3:08 AM
http://djnil.ru
Rufinanot
June 26, 2023 at 3:23 AM
http://djnil.ru
Roberttotly
June 26, 2023 at 3:24 AM
Genie?en Sie das ultimative minzgeschmack tabakfrei-Erlebnis mit unserer hochwertigen Auswahl an Geschmacksrichtungen!
WilliamMaync
June 26, 2023 at 3:24 AM
http://mypenza.ru/forum/index.php?showtopic=54134
Roberttotly
June 26, 2023 at 3:34 AM
Nauti parhaasta nikotiinipussi-kokemuksesta laadukkaalla makukokoelmallamme!
HisakoHok
June 26, 2023 at 3:51 AM
https://ebybaby.com/
WilliamMaync
June 26, 2023 at 3:56 AM
https://zavalinka.actieforum.com/t1605-topic#6232
Meaganscelm
June 26, 2023 at 3:56 AM
http://5solnce.ru
Meaganscelm
June 26, 2023 at 4:10 AM
http://5solnce.ru
HisakoHok
June 26, 2023 at 4:11 AM
WilliamMaync
June 26, 2023 at 4:27 AM
http://autoclub36.ru/forum/viewtopic.php?f=4&t=32030
Chelseyguand
June 26, 2023 at 4:44 AM
http://1001podelka.ru
Chelseyguand
June 26, 2023 at 4:58 AM
http://1001podelka.ru
WilliamMaync
June 26, 2023 at 5:01 AM
https://allforlady.info/forum/thread33431.html
CharaBrott
June 26, 2023 at 5:08 AM
CharaBrott
June 26, 2023 at 5:28 AM
Ника
June 26, 2023 at 5:30 AM
Это полезная информация https://beregienergy.ru/mosenergosbyt-v-kashire/ Мосэнергосбыт в Кашире: официальный сайт, часы и график работы, телефон.
MarieDor
June 26, 2023 at 5:33 AM
http://perm-region.ru
WilliamMaync
June 26, 2023 at 5:37 AM
https://alupka.forumotion.org/t6214-topic#18637
MarieDor
June 26, 2023 at 5:48 AM
http://perm-region.ru
WilliamMaync
June 26, 2023 at 6:14 AM
http://collieforum.ru/viewtopic.php?f=35&t=6063
Mildredfug
June 26, 2023 at 6:23 AM
http://poshspice.ru
Roberttotly
June 26, 2023 at 6:24 AM
Hemmottelun parhaimpaan Killa nikotinipussit -kokemukseen premium-makujemme valikoimasta!
MamieBog
June 26, 2023 at 6:26 AM
Mildredfug
June 26, 2023 at 6:37 AM
http://poshspice.ru
MamieBog
June 26, 2023 at 6:46 AM
https://ebydam.com/
Roberttotly
June 26, 2023 at 6:47 AM
Indulge in the ultimate best Frosty Menthol experience with our premium collection of flavors!
Roberttotly
June 26, 2023 at 6:52 AM
Genie?en Sie das ultimative 16 mg-g nikotin Erlebnis mit unserer exklusiven Auswahl an Geschmacksrichtungen!
Dorothyjen
June 26, 2023 at 7:12 AM
http://www.piptur.ru/
FreddieDouth
June 26, 2023 at 7:23 AM
Excellent work, responsive writer. – you ask yourself when it comes to tedious typing. docx in few clicks. Source: https://essayfire.com
Dorothyjen
June 26, 2023 at 7:26 AM
http://www.piptur.ru/
https://candymail.org/ru
June 26, 2023 at 7:40 AM
Он имеет ряд преимуществ, таких как анонимность, безопасность и бесплатность, но также имеет некоторые ограничения, например, на количество символов и время жизни сообщения.
Nanciefaf
June 26, 2023 at 7:45 AM
https://pornokarta.com/
Roberttotly
June 26, 2023 at 7:53 AM
Erleben Sie den ultimativen eiskalt mentholkick mit unserer exklusiven Auswahl an Geschmacksrichtungen!
Pamelafiema
June 26, 2023 at 8:01 AM
http://vostok-cars.ru
Nanciefaf
June 26, 2023 at 8:05 AM
Pamelafiema
June 26, 2023 at 8:15 AM
http://vostok-cars.ru
CarrieRutle
June 26, 2023 at 8:49 AM
http://www.tempvti.ru/
Deborahtep
June 26, 2023 at 9:03 AM
http://pornobym.com
CarrieRutle
June 26, 2023 at 9:03 AM
http://www.tempvti.ru/
Davidphype
June 26, 2023 at 9:08 AM
https://bpz-vostok.ru/
Борис
June 26, 2023 at 9:10 AM
Спасибо большое за информацию https://tvojamoskva.ru/ Вход в личный кабинет pgu.mos.ru портала Мосгосуслуг. Регистрация в ЛК мосуслуг. Возможности личного кабинета.
JamesEmori
June 26, 2023 at 9:21 AM
This will not only help you stand out from other applicants, but it will also prepare you for the college interview ahead of time as well. I chuckle to myself about the added bonus of good weather, but I know I have come to Palo Alto, California, with a much higher purpose in mind. that should be in the body of the paper. Source: https://essaybar.com
Deborahtep
June 26, 2023 at 9:23 AM
MarieRot
June 26, 2023 at 9:38 AM
http://4386.adminka.cc/
MarieRot
June 26, 2023 at 9:51 AM
http://4386.adminka.cc/
Jamesinony
June 26, 2023 at 9:55 AM
серебряное колье с камнями
Kathysof
June 26, 2023 at 10:21 AM
JuanaAwaiz
June 26, 2023 at 10:26 AM
http://8665.adminka.cc/
JuanaAwaiz
June 26, 2023 at 10:40 AM
http://8665.adminka.cc/
Kathysof
June 26, 2023 at 10:41 AM
Jamesinony
June 26, 2023 at 10:50 AM
серебряные серьги висячие с камнями
CindaCatte
June 26, 2023 at 11:14 AM
http://5161.adminka.cc/
BruceAcito
June 26, 2023 at 11:18 AM
Finding textual evidence. 10 After 10 orders. If you choose this organizational pattern, you will need to explain in separate paragraphs several effects of a certain situation or event your chosen cause. Source: https://essaydev.com
CindaCatte
June 26, 2023 at 11:27 AM
http://5161.adminka.cc/
JudithTit
June 26, 2023 at 11:37 AM
https://pornokota.com/
Jamesinony
June 26, 2023 at 11:44 AM
серебряные украшения из индии с натуральными камнями
JudithTit
June 26, 2023 at 11:56 AM
https://pornokota.com/
SoniaMalse
June 26, 2023 at 12:01 PM
http://8796.adminka.cc/
SoniaMalse
June 26, 2023 at 12:14 PM
http://8796.adminka.cc/
Jamesinony
June 26, 2023 at 12:37 PM
серьги с натуральным камнем серебряные цены
Glendafrope
June 26, 2023 at 12:48 PM
http://4281.adminka.cc/
Tiffanyvor
June 26, 2023 at 12:52 PM
https://www.xo4yn.com/
Glendafrope
June 26, 2023 at 1:01 PM
http://4281.adminka.cc/
Андрей
June 26, 2023 at 1:08 PM
Спасибо за исчерпывающую информацию https://mobilecd.ru/kak-popolnit-balans-bilajn-kartoj-bez-komissii/ Как пополнить баланс Билайн картой без комиссии.
Tiffanyvor
June 26, 2023 at 1:12 PM
TimothyBaK
June 26, 2023 at 1:12 PM
The best write my essay service can be an extraordinary aid for desperate amateurs. Unique order ID, Secure Encryptions Systems. To be honest, I am also fond of social media and love to play online games. Source: https://essayproject.com
Mildredorapy
June 26, 2023 at 1:36 PM
http://6316.adminka.cc/
Jamesinony
June 26, 2023 at 1:42 PM
фурнитура для украшений из натуральных камней
Mildredorapy
June 26, 2023 at 1:51 PM
http://6316.adminka.cc/
RhondaFEN
June 26, 2023 at 2:08 PM
https://www.ebnyl.com/
LillianAcugh
June 26, 2023 at 2:27 PM
http://5366.adminka.cc/
RhondaFEN
June 26, 2023 at 2:28 PM
https://www.ebnyl.com/
LillianAcugh
June 26, 2023 at 2:40 PM
http://5366.adminka.cc/
ScottyClods
June 26, 2023 at 3:05 PM
Tight deadlines pose a significant challenge for students, often leading them to seek help from professional essay writers online, often at the last hour. You may get custom essays created by our expert essayists to cut down on time and fulfill strict deadlines. This is especially important if your essay is responding to a prompt. Source: https://essaydream.com
ShariZer
June 26, 2023 at 3:16 PM
http://7976.adminka.cc/
Lauravof
June 26, 2023 at 3:27 PM
ShariZer
June 26, 2023 at 3:29 PM
http://7976.adminka.cc/
Lauravof
June 26, 2023 at 3:47 PM
https://www.nagnyl.com/
DorothyWaypE
June 26, 2023 at 4:04 PM
http://7130.adminka.cc/
DorothyWaypE
June 26, 2023 at 4:18 PM
http://7130.adminka.cc/
Juanaopids
June 26, 2023 at 4:42 PM
https://www.pornoarxiv.com/
Minnierox
June 26, 2023 at 4:52 PM
http://2717.adminka.cc/
HowardSooft
June 26, 2023 at 4:58 PM
To begin your reflection paper, you must first decide on the topic you want to write about. This service has helped me stay on track, even when I am feeling overwhelmed. That said, through tradition more than definition , the essay has come to represent something quite specific and measurable. Source: [url=https://essayheart.com]https://essayheart.com[/url]
Juanaopids
June 26, 2023 at 5:01 PM
Minnierox
June 26, 2023 at 5:06 PM
http://2717.adminka.cc/
Sofialielf
June 26, 2023 at 5:40 PM
http://9008.adminka.cc/
Sofialielf
June 26, 2023 at 5:54 PM
http://9008.adminka.cc/
Heatherdic
June 26, 2023 at 5:58 PM
Heatherdic
June 26, 2023 at 6:18 PM
CarolSaw
June 26, 2023 at 6:29 PM
http://8361.adminka.cc/
CarolSaw
June 26, 2023 at 6:43 PM
http://8361.adminka.cc/
Samuelfuh
June 26, 2023 at 6:50 PM
Read the example, get inspired by the cause and effect essay sample, and then write a good paper and get a decent grade. We have made sure to keep the cost of our service reasonable so that every student can benefit from it. Of course, it s important to edit your essay over and over again. Source: https://essaycreative.com
CarolynSlurf
June 26, 2023 at 7:13 PM
http://4len.info
Terryral
June 26, 2023 at 7:19 PM
http://5834.adminka.cc/
Terryral
June 26, 2023 at 7:32 PM
http://5834.adminka.cc/
CarolynSlurf
June 26, 2023 at 7:33 PM
http://4len.info
Brendausaft
June 26, 2023 at 8:09 PM
http://6715.adminka.cc/
Brendausaft
June 26, 2023 at 8:22 PM
http://6715.adminka.cc/
Branditap
June 26, 2023 at 8:29 PM
https://www.telo4ki.com/
GeorgeSmire
June 26, 2023 at 8:43 PM
Write a Hook. You should fill out the order form and create a WriteMyEssays. You may also be given prompts that leave you a much wider choice of topic. Source: https://essayrarely.com
Branditap
June 26, 2023 at 8:48 PM
https://www.telo4ki.com/
Ceceliadab
June 26, 2023 at 8:58 PM
http://1243.adminka.cc/
Ceceliadab
June 26, 2023 at 9:12 PM
http://1243.adminka.cc/
LouiseRathe
June 26, 2023 at 9:45 PM
https://eepizda.com/
Staceyabula
June 26, 2023 at 9:48 PM
http://5065.adminka.cc/
Staceyabula
June 26, 2023 at 10:01 PM
http://5065.adminka.cc/
LouiseRathe
June 26, 2023 at 10:04 PM
MelanieAnash
June 26, 2023 at 10:38 PM
http://2347.adminka.cc/
Justinweism
June 26, 2023 at 10:39 PM
Plagiarism is highly-punishable in education facilities thus we take it twice as seriously and never submit any non-original academic papers. Unfortunately, it doesn t work this way. March 14, 2023. Source: https://essaymouse.com
MelanieAnash
June 26, 2023 at 10:50 PM
http://2347.adminka.cc/
ShirleyMut
June 26, 2023 at 11:01 PM
ShirleyMut
June 26, 2023 at 11:21 PM
https://pornomagaz.com/
Gracebaido
June 26, 2023 at 11:28 PM
http://1464.adminka.cc/
Gracebaido
June 26, 2023 at 11:41 PM
http://1464.adminka.cc/
GayleHen
June 27, 2023 at 12:17 AM
https://www.4poknul.com/
Nancylob
June 27, 2023 at 12:18 AM
http://9340.adminka.cc/
Nancylob
June 27, 2023 at 12:31 AM
http://9340.adminka.cc/
GayleHen
June 27, 2023 at 12:37 AM
GeorgeExone
June 27, 2023 at 12:40 AM
Over the last decade, smartphones have transformed nearly every aspect of our lives, socially, culturally, and personally. College essay example 11. From details like the academic level, number of pages, and the desired deadline, we can provide you with a customized quote that reflects the specific requirements of your essay. Source: https://essaycoast.com
Kaitlynhen
June 27, 2023 at 1:08 AM
http://1987.adminka.cc/
RichardGog
June 27, 2023 at 1:17 AM
коробка с ложементом
Kaitlynhen
June 27, 2023 at 1:21 AM
http://1987.adminka.cc/
ShannonEpicy
June 27, 2023 at 1:32 AM
ShannonEpicy
June 27, 2023 at 1:51 AM
CorinneBox
June 27, 2023 at 1:58 AM
http://5480.adminka.cc/
Robertper
June 27, 2023 at 2:01 AM
игровые автоматы Cat Casino
CorinneBox
June 27, 2023 at 2:11 AM
http://5480.adminka.cc/
Bonnieplera
June 27, 2023 at 2:49 AM
http://4932.adminka.cc/
LeannSog
June 27, 2023 at 2:50 AM
Bonnieplera
June 27, 2023 at 3:02 AM
http://4932.adminka.cc/
LeannSog
June 27, 2023 at 3:09 AM
https://www.beloeporno.com/
LauraGog
June 27, 2023 at 3:40 AM
http://3486.adminka.cc/
LauraGog
June 27, 2023 at 3:54 AM
http://3486.adminka.cc/
Malissamousy
June 27, 2023 at 4:06 AM
Malissamousy
June 27, 2023 at 4:26 AM
https://babodral.com/
Karenhic
June 27, 2023 at 4:31 AM
http://7406.adminka.cc/
JimmyRew
June 27, 2023 at 4:42 AM
https://bbarlock.com/index.php/%D0%9E%D1%81%D0%BE%D0%B1%D0%B5%D0%BD%D0%BD%D0%BE%D1%81%D1%82%D0%B8_%D0%97%D0%B0%D0%BA%D1%83%D0%BF%D0%BA%D0%B8_%D0%9C%D0%B5%D0%B4%D0%B8%D1%86%D0%B8%D0%BD%D1%81%D0%BA%D0%BE%D0%B3%D0%BE_%D0%9E%D0%B1%D0%BE%D1%80%D1%83%D0%B4%D0%BE%D0%B2%D0%B0%D0%BD%D0%B8%D1%8F_%D0%9F%D0%BE_44-%D0%A4%D0%97_%D0%9D%D0%BE%D0%B2%D1%8B%D0%B5_%D0%A0%D0%B5%D0%B0%D0%BB%D0%B8%D0%B8_4
Karenhic
June 27, 2023 at 4:44 AM
http://7406.adminka.cc/
Richardgox
June 27, 2023 at 4:57 AM
https://summeradde.se/cabview/index.php?title=User:JoshJni15867266
ElaineBal
June 27, 2023 at 5:21 AM
http://1629.adminka.cc/
AmandaFes
June 27, 2023 at 5:25 AM
Richardgox
June 27, 2023 at 5:32 AM
https://www.chabad.wiki/index.php?title=%D0%9E%D1%81%D0%BE%D0%B1%D0%B5%D0%BD%D0%BD%D0%BE%D1%81%D1%82%D0%B8_%D0%97%D0%B0%D0%BA%D1%83%D0%BF%D0%BA%D0%B8_%D0%9C%D0%B5%D0%B4%D0%B8%D1%86%D0%B8%D0%BD%D1%81%D0%BA%D0%BE%D0%B3%D0%BE_%D0%9E%D0%B1%D0%BE%D1%80%D1%83%D0%B4%D0%BE%D0%B2%D0%B0%D0%BD%D0%B8%D1%8F_%D0%9F%D0%BE_44-%D0%A4%D0%97_%D0%9D%D0%BE%D0%B2%D1%8B%D0%B5_%D0%A0%D0%B5%D0%B0%D0%BB%D0%B8%D0%B8_2
ElaineBal
June 27, 2023 at 5:36 AM
http://1629.adminka.cc/
AmandaFes
June 27, 2023 at 5:45 AM
https://vsporol.com/
JimmyRew
June 27, 2023 at 6:08 AM
http://wiki-beta.avazinn.com/w/index.php?title=User:Dorine8306
Richardgox
June 27, 2023 at 6:08 AM
https://dripwiki.com/index.php/-_%C3%90%E2%80%98%C3%90%C2%BE%C3%90%C2%BB%C3%91%C5%92%C3%91%CB%86%C3%90%C2%BE%C3%90%C2%B9_%C3%90%C3%A2%E2%82%AC%E2%84%A2%C3%91%E2%80%B9%C3%90%C2%B1%C3%90%C2%BE%C3%91%E2%82%AC_%C3%90%C5%93%C3%90%C2%B5%C3%90%C2%B4%C3%91%E2%80%9A%C3%90%C2%B5%C3%91%E2%80%A6%C3%90%C2%BD%C3%90%C2%B8%C3%90%C2%BA%C3%90%C2%B8_%C3%90%CB%9C_%C3%90%C2%A2%C3%90%C2%BE%C3%90%C2%B2%C3%90%E2%82%AC%C3%90%C2%BE%C3%90%C2%B2_%C3%90%E2%80%9D%C3%90%C2%BB%C3%91_%C3%90%E2%80%94%C3%90%C2%B4%C3%90%C2%BE%C3%91%E2%82%AC%C3%90%C2%BE%C3%90%C2%B2%C3%91%C5%92%C3%91
MelissaErupt
June 27, 2023 at 6:16 AM
http://3684.adminka.cc/
JimmyRew
June 27, 2023 at 6:23 AM
http://74.208.211.159/index.php?title=%D0%98%D0%BD%D1%82%D0%B5%D1%80%D0%BD%D0%B5%D1%82_%D0%9C%D0%B0%D0%B3%D0%B0%D0%B7%D0%B8%D0%BD_%D0%9A%D0%BE%D0%BD%D1%82%D0%B0%D0%BA%D1%82%D0%BD%D1%8B%D1%85_%D0%9B%D0%B8%D0%BD%D0%B7_%C2%AB%D0%9E%D1%87%D0%BA%D0%B0%D1%80%D0%B8%D0%BA%C2%BB
MelissaErupt
June 27, 2023 at 6:31 AM
http://3684.adminka.cc/
ViolaTab
June 27, 2023 at 6:45 AM
https://pornokoks.com/
Ника
June 27, 2023 at 6:56 AM
Большое спасибо за информацию https://mosoblgazstroy.ru/ Вход в личный кабинет Мособлгаза и способы авторизации. Функциональные возможности личного кабинета. Управление услугами в мобильном приложении. Удаление личного кабинета из системы.
ViolaTab
June 27, 2023 at 7:06 AM
Dorisamire
June 27, 2023 at 7:09 AM
http://2002.adminka.cc/
Dorisamire
June 27, 2023 at 7:23 AM
http://2002.adminka.cc/
Neldaver
June 27, 2023 at 7:59 AM
http://1578.adminka.cc/
Sherriplolo
June 27, 2023 at 8:01 AM
https://proeby.com/
Neldaver
June 27, 2023 at 8:12 AM
http://1578.adminka.cc/
Sherriplolo
June 27, 2023 at 8:20 AM
JeremyTum
June 27, 2023 at 8:29 AM
Для чего нужно покупать аккаунты твиттер
JessicaglurO
June 27, 2023 at 8:49 AM
http://8392.adminka.cc/
JessicaglurO
June 27, 2023 at 9:02 AM
http://8392.adminka.cc/
MayraCoarl
June 27, 2023 at 9:17 AM
https://podebka.com/
MayraCoarl
June 27, 2023 at 9:37 AM
Billievom
June 27, 2023 at 9:38 AM
http://9483.adminka.cc/
JeremyTum
June 27, 2023 at 9:50 AM
Покупка Gmail
Billievom
June 27, 2023 at 9:51 AM
http://9483.adminka.cc/
JeremyTum
June 27, 2023 at 10:04 AM
Купить продать Тик Ток
Dorothyfoosy
June 27, 2023 at 10:27 AM
http://7733.adminka.cc/
JeremyTum
June 27, 2023 at 10:33 AM
Для чего нужен аккаунт в Одноклассниках?
SherryCer
June 27, 2023 at 10:34 AM
https://pornoglot.com/
Dorothyfoosy
June 27, 2023 at 10:40 AM
http://7733.adminka.cc/
SherryCer
June 27, 2023 at 10:53 AM
https://pornoglot.com/
BeverlyTunNy
June 27, 2023 at 11:16 AM
http://4383.adminka.cc/
BeverlyTunNy
June 27, 2023 at 11:28 AM
http://4383.adminka.cc/
AmandaWilky
June 27, 2023 at 11:48 AM
https://www.pornogeneral.com/
JeanneIndip
June 27, 2023 at 12:04 PM
http://9448.adminka.cc/
AmandaWilky
June 27, 2023 at 12:06 PM
JeanneIndip
June 27, 2023 at 12:18 PM
http://9448.adminka.cc/
Minniemouby
June 27, 2023 at 12:52 PM
http://6512.adminka.cc/
AnnieSpeed
June 27, 2023 at 1:04 PM
Minniemouby
June 27, 2023 at 1:05 PM
http://6512.adminka.cc/
AnnieSpeed
June 27, 2023 at 1:23 PM
Beverlyeffek
June 27, 2023 at 1:40 PM
http://3970.adminka.cc/
Beverlyeffek
June 27, 2023 at 1:53 PM
http://3970.adminka.cc/
Denisedwedo
June 27, 2023 at 2:18 PM
SarahNef
June 27, 2023 at 2:29 PM
http://3276.adminka.cc/
Denisedwedo
June 27, 2023 at 2:37 PM
https://www.pornokazarma.com/
SarahNef
June 27, 2023 at 2:42 PM
http://3276.adminka.cc/
Maryannindug
June 27, 2023 at 3:17 PM
http://4867.adminka.cc/
Maryannindug
June 27, 2023 at 3:30 PM
http://4867.adminka.cc/
Amandatalty
June 27, 2023 at 3:31 PM
Amandatalty
June 27, 2023 at 3:51 PM
RobertaQuink
June 27, 2023 at 4:05 PM
http://3597.adminka.cc/
RobertaQuink
June 27, 2023 at 4:18 PM
http://3597.adminka.cc/
Mauraliary
June 27, 2023 at 4:48 PM
BeverlyTen
June 27, 2023 at 4:53 PM
http://2634.adminka.cc/
BeverlyTen
June 27, 2023 at 5:06 PM
http://2634.adminka.cc/
Mauraliary
June 27, 2023 at 5:07 PM
https://www.pornobydka.com/
Ника
June 27, 2023 at 5:13 PM
Спасибо за ценную информацию https://edgov.ru/mfc-odesskoe.html МФЦ в Одесском, ул. Ленина, д. 41: официальный сайт, адрес, телефон, часы работы.
HelenVum
June 27, 2023 at 5:42 PM
http://4672.adminka.cc/
HelenVum
June 27, 2023 at 5:55 PM
http://4672.adminka.cc/
MarlenaJig
June 27, 2023 at 6:04 PM
MarlenaJig
June 27, 2023 at 6:23 PM
https://www.pornoshef.com/
ChrisHix
June 27, 2023 at 6:31 PM
http://7654.adminka.cc/
ChrisHix
June 27, 2023 at 6:44 PM
http://7654.adminka.cc/
AlbinaItern
June 27, 2023 at 7:20 PM
http://7224.adminka.cc/
Terripag
June 27, 2023 at 7:21 PM
https://www.pornokop.com/
AlbinaItern
June 27, 2023 at 7:34 PM
http://7224.adminka.cc/
Terripag
June 27, 2023 at 7:40 PM
https://www.pornokop.com/
Crystalcurry
June 27, 2023 at 8:10 PM
http://5741.adminka.cc/
Crystalcurry
June 27, 2023 at 8:24 PM
http://5741.adminka.cc/
Kristaevake
June 27, 2023 at 8:38 PM
https://www.1kgporn.com/
Kristaevake
June 27, 2023 at 8:58 PM
https://www.1kgporn.com/
Helenmix
June 27, 2023 at 9:00 PM
http://7036.adminka.cc/
Helenmix
June 27, 2023 at 9:14 PM
http://7036.adminka.cc/
Annieglymn
June 27, 2023 at 9:50 PM
http://7419.adminka.cc/
Gloriaanoto
June 27, 2023 at 9:53 PM
https://pornocamp.com/
Annieglymn
June 27, 2023 at 10:03 PM
http://7419.adminka.cc/
Gloriaanoto
June 27, 2023 at 10:13 PM
https://pornocamp.com/
BrendaBrutT
June 27, 2023 at 10:39 PM
http://4442.adminka.cc/
Harryplawl
June 27, 2023 at 10:44 PM
спорт эссе
BrendaBrutT
June 27, 2023 at 10:52 PM
http://4442.adminka.cc/
Gloriacar
June 27, 2023 at 11:09 PM
https://www.porninreal.com/
Gloriacar
June 27, 2023 at 11:29 PM
https://www.porninreal.com/
GraceLal
June 27, 2023 at 11:30 PM
скрывать камера порно
https://kyrva.com/
GraceLal
June 27, 2023 at 11:42 PM
скрывать камера порно
https://kyrva.com/
Harryplawl
June 28, 2023 at 12:06 AM
рецензия на магистерскую диссертацию
FrancisKap
June 28, 2023 at 12:20 AM
http://5010.adminka.cc/
Harryplawl
June 28, 2023 at 12:20 AM
эссе моя педагогическая философия
ReneeLax
June 28, 2023 at 12:26 AM
https://www.porncrag.com/
FrancisKap
June 28, 2023 at 12:33 AM
http://5010.adminka.cc/
ReneeLax
June 28, 2023 at 12:46 AM
https://www.porncrag.com/
Harryplawl
June 28, 2023 at 12:51 AM
репетитор по китайскому языку
JoyceZex
June 28, 2023 at 1:12 AM
http://9067.adminka.cc/
JoyceZex
June 28, 2023 at 1:25 AM
http://9067.adminka.cc/
Maymemer
June 28, 2023 at 1:44 AM
https://www.pornokarman.com/
Kathyfib
June 28, 2023 at 2:02 AM
http://6474.adminka.cc/
Maymemer
June 28, 2023 at 2:04 AM
Harryplawl
June 28, 2023 at 2:09 AM
сколько стоит дипломная работа
Kathyfib
June 28, 2023 at 2:15 AM
http://6474.adminka.cc/
Harryplawl
June 28, 2023 at 2:26 AM
рецензия на диплом
HeatherPhili
June 28, 2023 at 2:53 AM
http://2608.adminka.cc/
ArlenePek
June 28, 2023 at 3:02 AM
HeatherPhili
June 28, 2023 at 3:07 AM
http://2608.adminka.cc/
ArlenePek
June 28, 2023 at 3:22 AM
Lindastoli
June 28, 2023 at 3:44 AM
http://8186.adminka.cc/
Lindastoli
June 28, 2023 at 3:57 AM
http://8186.adminka.cc/
Lucillelem
June 28, 2023 at 4:19 AM
https://www.pornonabor.com/
Heidicog
June 28, 2023 at 4:34 AM
http://8703.adminka.cc/
Lucillelem
June 28, 2023 at 4:39 AM
Heidicog
June 28, 2023 at 4:47 AM
http://8703.adminka.cc/
SherylNix
June 28, 2023 at 5:23 AM
http://4307.adminka.cc/
SherylNix
June 28, 2023 at 5:36 AM
http://4307.adminka.cc/
PeggyMig
June 28, 2023 at 5:37 AM
PeggyMig
June 28, 2023 at 5:57 AM
SandraLig
June 28, 2023 at 6:14 AM
http://9071.adminka.cc/
SandraLig
June 28, 2023 at 6:28 AM
http://9071.adminka.cc/
MaritaInemn
June 28, 2023 at 6:53 AM
LindaMoG
June 28, 2023 at 7:04 AM
http://7861.adminka.cc/
MaritaInemn
June 28, 2023 at 7:13 AM
http://pornopalatka.com
LindaMoG
June 28, 2023 at 7:16 AM
http://7861.adminka.cc/
Williamclodo
June 28, 2023 at 7:17 AM
эссе по литературе
Sandyfeecy
June 28, 2023 at 7:52 AM
http://4703.adminka.cc/
Sandyfeecy
June 28, 2023 at 8:05 AM
http://4703.adminka.cc/
EthelHer
June 28, 2023 at 8:09 AM
https://www.serporn.com/
EthelHer
June 28, 2023 at 8:30 AM
https://www.serporn.com/
Williamclodo
June 28, 2023 at 8:40 AM
заказать курсовую работу
Amandajoync
June 28, 2023 at 8:41 AM
http://3749.adminka.cc/
Williamclodo
June 28, 2023 at 8:54 AM
работа на дому для студентов
Amandajoync
June 28, 2023 at 8:54 AM
http://3749.adminka.cc/
Williamclodo
June 28, 2023 at 9:24 AM
отчет по практике в суде
Jenniejap
June 28, 2023 at 9:28 AM
http://www.pornpac.com/
Olivejen
June 28, 2023 at 9:29 AM
http://5571.adminka.cc/
Olivejen
June 28, 2023 at 9:42 AM
http://5571.adminka.cc/
Jenniejap
June 28, 2023 at 9:47 AM
http://www.pornpac.com/
PaulineAdvom
June 28, 2023 at 10:19 AM
http://4230.adminka.cc/
Anttitotly
June 28, 2023 at 10:26 AM
Koe ainutlaatuinen ja voimakas nikotiinipussit laajalla valikoimalla erilaisia makuja!
PaulineAdvom
June 28, 2023 at 10:32 AM
http://4230.adminka.cc/
MarshaSnask
June 28, 2023 at 10:45 AM
https://www.pornorok.com/
Teemutotly
June 28, 2023 at 10:59 AM
Koe huippulaadukkaita white pouch tuotteita monilla erilaisilla mauilla ja vahvuuksilla!
Olivertam
June 28, 2023 at 11:06 AM
Dive into the exhilarating world of Pablo Snus! Savor the bold flavors and unparalleled quality of Pablo Snus pouches, a must-have for every snus aficionado.
MarshaSnask
June 28, 2023 at 11:06 AM
https://www.pornorok.com/
Sarahgox
June 28, 2023 at 11:08 AM
http://3440.adminka.cc/
Sarahgox
June 28, 2023 at 11:22 AM
http://3440.adminka.cc/
Thelmapef
June 28, 2023 at 11:58 AM
http://6847.adminka.cc/
Ashleypoogy
June 28, 2023 at 12:02 PM
Thelmapef
June 28, 2023 at 12:11 PM
http://6847.adminka.cc/
Ashleypoogy
June 28, 2023 at 12:21 PM
https://www.pornohram.com/
HelenFat
June 28, 2023 at 12:46 PM
http://8217.adminka.cc/
HelenFat
June 28, 2023 at 1:00 PM
http://8217.adminka.cc/
SherylTox
June 28, 2023 at 1:18 PM
Theresaweham
June 28, 2023 at 1:35 PM
http://7100.adminka.cc/
SherylTox
June 28, 2023 at 1:38 PM
https://www.pornodepo.com/
Theresaweham
June 28, 2023 at 1:48 PM
http://7100.adminka.cc/
Antoniotat
June 28, 2023 at 1:54 PM
https://www.vidagrafia.com/create-blog/
WilliamMaync
June 28, 2023 at 2:18 PM
http://www.joyousreading.com/index.php?title=“скорьте_свою_карьеру:_Џолучите_диплом_без_лишних_хлопот
CandyNom
June 28, 2023 at 2:24 PM
http://6224.adminka.cc/
TracyGal
June 28, 2023 at 2:34 PM
https://pornozala.com/
CandyNom
June 28, 2023 at 2:37 PM
http://6224.adminka.cc/
WilliamMaync
June 28, 2023 at 2:45 PM
http://dimitrii.flybb.ru/forum44.html
TracyGal
June 28, 2023 at 2:54 PM
https://pornozala.com/
Antoniotat
June 28, 2023 at 3:11 PM
https://blissgrin.com/read-blog/17115
WilliamMaync
June 28, 2023 at 3:12 PM
http://maemo.su/forum/viewtopic.php?pid=137697
RebeccaLar
June 28, 2023 at 3:13 PM
http://7256.adminka.cc/
Antoniotat
June 28, 2023 at 3:25 PM
https://bryansk32-forum.ru/viewtopic.php?f=83&t=5767
RebeccaLar
June 28, 2023 at 3:26 PM
http://7256.adminka.cc/
WilliamMaync
June 28, 2023 at 3:38 PM
https://obrezanie05.ru/users/15
Marianaodona
June 28, 2023 at 3:52 PM
Antoniotat
June 28, 2023 at 3:54 PM
https://blacksocially.com/read-blog/145798
WilliamMaync
June 28, 2023 at 3:58 PM
http://dianov.bget.ru/forum/thread45868.html#1063422
SylviaDeelp
June 28, 2023 at 4:02 PM
http://3764.adminka.cc/
Marianaodona
June 28, 2023 at 4:11 PM
https://pornozalp.com/
SylviaDeelp
June 28, 2023 at 4:15 PM
http://3764.adminka.cc/
WilliamMaync
June 28, 2023 at 4:16 PM
http://arkada-style.ru/lib/tiny_mce/plugins/fullpage/langs/dlg/ru/4/3/news/45_chto_delat_pri_utere.html
WilliamMaync
June 28, 2023 at 4:31 PM
http://pro-noyabrsk.ru/people/user/17248/forum/message/1507/1831/#message1831
Gladysmig
June 28, 2023 at 4:50 PM
http://6076.adminka.cc/
Gladysmig
June 28, 2023 at 5:03 PM
http://6076.adminka.cc/
MirandaDieta
June 28, 2023 at 5:06 PM
https://www.pornoacid.com/
Antoniotat
June 28, 2023 at 5:07 PM
http://forum.bestgamer.ru/newthread.php?do=postthread&f=88
Antoniotat
June 28, 2023 at 5:23 PM
http://vipmails.0pk.me/viewtopic.php?id=3442#p8807
MirandaDieta
June 28, 2023 at 5:26 PM
https://www.pornoacid.com/
Lorenzafub
June 28, 2023 at 5:39 PM
http://4328.adminka.cc/
Lorenzafub
June 28, 2023 at 5:53 PM
http://4328.adminka.cc/
Antoniotat
June 28, 2023 at 6:14 PM
https://talkitter.com/read-blog/99743
Karenplalp
June 28, 2023 at 6:20 PM
Dianaheink
June 28, 2023 at 6:28 PM
http://2806.adminka.cc/
Karenplalp
June 28, 2023 at 6:40 PM
Dianaheink
June 28, 2023 at 6:41 PM
http://2806.adminka.cc/
Antoniotat
June 28, 2023 at 6:55 PM
https://yomad.me/nomad/viewtopic.php?t=89493
Vernahab
June 28, 2023 at 7:18 PM
http://3483.adminka.cc/
Vernahab
June 28, 2023 at 7:31 PM
http://3483.adminka.cc/
JessicaBuh
June 28, 2023 at 7:37 PM
Juhototly
June 28, 2023 at 7:54 PM
Koe erinomainen Velo Nikotiinipussit valikoima, joka tarjoaa monia makuja ja vahvuuksia!
JessicaBuh
June 28, 2023 at 7:57 PM
Teemutotly
June 28, 2023 at 8:00 PM
Koe ainutlaatuinen Iceberg Nikotiinipussit valikoima, joka tarjoaa monipuolisia makuja ja vahvuuksia!
Anttitotly
June 28, 2023 at 8:02 PM
Koe uskomaton Skruf Nikotiinipussit valikoima, jossa on erilaisia makuja ja vahvuuksia!
Meghanheatt
June 28, 2023 at 8:08 PM
http://6975.adminka.cc/
Meghanheatt
June 28, 2023 at 8:21 PM
http://6975.adminka.cc/
FrancesKnile
June 28, 2023 at 8:54 PM
https://www.runpornrun.com/
AnitaEpifs
June 28, 2023 at 8:57 PM
http://7602.adminka.cc/
AnitaEpifs
June 28, 2023 at 9:10 PM
http://7602.adminka.cc/
FrancesKnile
June 28, 2023 at 9:13 PM
https://www.runpornrun.com/
Tiffanynip
June 28, 2023 at 9:46 PM
http://8897.adminka.cc/
Tiffanynip
June 28, 2023 at 9:59 PM
http://8897.adminka.cc/
DebraTow
June 28, 2023 at 10:09 PM
https://www.pornintop.com/
DebraTow
June 28, 2023 at 10:29 PM
https://www.pornintop.com/
BettyDah
June 28, 2023 at 10:36 PM
http://7848.adminka.cc/
BettyDah
June 28, 2023 at 10:49 PM
http://7848.adminka.cc/
Melaniecot
June 28, 2023 at 11:24 PM
https://www.pornobarak.com/
Helgajounk
June 28, 2023 at 11:26 PM
http://7513.adminka.cc/
Jaredgor
June 28, 2023 at 11:30 PM
казань строительный
WilliamMaync
June 28, 2023 at 11:37 PM
http://forum54.4adm.ru/viewtopic.php?f=69&t=6428
Helgajounk
June 28, 2023 at 11:39 PM
http://7513.adminka.cc/
Melaniecot
June 28, 2023 at 11:44 PM
https://www.pornobarak.com/
RonaldVAH
June 28, 2023 at 11:44 PM
CBD Oil Tincture. Sadly, most Americans deal with some sort of chronic or acute pain in the course of their lifetime. Through utilizing the entire hemp plant, extracting the oil using a supercritical CO2 method, and making products using all-natural ingredients, we have created human-grade products that provide positive results for animals. Source: https://bordeaux.onvasortir.com/profil_read.php?Thora2
Angelasig
June 29, 2023 at 12:16 AM
http://2102.adminka.cc/
WilliamMaync
June 29, 2023 at 12:23 AM
https://toneto.net/news/kultura/dlya-csego-nujen-diplom-instituta-
Angelasig
June 29, 2023 at 12:29 AM
http://2102.adminka.cc/
Roxieevorb
June 29, 2023 at 12:42 AM
Jaredgor
June 29, 2023 at 12:44 AM
жк новые острова казань официальный сайт
Jaredgor
June 29, 2023 at 12:56 AM
авито купить квартиру казань
Roxieevorb
June 29, 2023 at 1:02 AM
JohnnieSence
June 29, 2023 at 1:06 AM
http://9444.adminka.cc/
JohnnieSence
June 29, 2023 at 1:19 AM
http://9444.adminka.cc/
Jaredgor
June 29, 2023 at 1:21 AM
продажа домов казань
Mahaliacoaph
June 29, 2023 at 1:56 AM
http://6117.adminka.cc/
WilliamMaync
June 29, 2023 at 1:58 AM
https://againharry.rolka.me/viewtopic.php?id=1130#p7469
JimmieBOSSE
June 29, 2023 at 1:58 AM
http://pornovagon.com
Mahaliacoaph
June 29, 2023 at 2:10 AM
http://6117.adminka.cc/
JimmieBOSSE
June 29, 2023 at 2:19 AM
http://pornovagon.com
LouiseSom
June 29, 2023 at 2:48 AM
http://8105.adminka.cc/
LouiseSom
June 29, 2023 at 3:01 AM
http://8105.adminka.cc/
PamelaClula
June 29, 2023 at 3:18 AM
https://pornchit.com/
PamelaClula
June 29, 2023 at 3:38 AM
https://pornchit.com/
BettyKit
June 29, 2023 at 3:39 AM
http://1643.adminka.cc/
BettyKit
June 29, 2023 at 3:52 AM
http://1643.adminka.cc/
LindsayKeefs
June 29, 2023 at 4:28 AM
http://1197.adminka.cc/
PamellaRon
June 29, 2023 at 4:33 AM
https://www.pornosoldat.com/
LindsayKeefs
June 29, 2023 at 4:42 AM
http://1197.adminka.cc/
PamellaRon
June 29, 2023 at 4:52 AM
ChesterFup
June 29, 2023 at 4:59 AM
Product type CBD gummies CBD type Broad spectrum Size 60 gummies container Strength 25 mg of CBD gummy Flavor s Not specified. Evidence from Neuroimaging Studies. Each seed should have its own container. Source: https://we.riseup.net/jennigcobson/unlock-the-magic-of-autoflower-seeds
PaulaVem
June 29, 2023 at 5:19 AM
http://3103.adminka.cc/
PaulaVem
June 29, 2023 at 5:32 AM
http://3103.adminka.cc/
LaceyFlill
June 29, 2023 at 5:49 AM
https://www.pornocelt.com/
LaceyFlill
June 29, 2023 at 6:09 AM
https://www.pornocelt.com/
JoyceFop
June 29, 2023 at 6:11 AM
http://7604.adminka.cc/
Roberttotly
June 29, 2023 at 6:16 AM
Indulge in the ultimate best [url=https://velo1.ink/]all white snus[/url] experience with our premium collection of flavors!
Roberttotly
June 29, 2023 at 6:24 AM
Indulge in the ultimate best strong nicotine pouches experience with our premium collection of flavors!
JoyceFop
June 29, 2023 at 6:26 AM
http://7604.adminka.cc/
Roberttotly
June 29, 2023 at 6:29 AM
Nauti parhaasta voimakas nikotiini -kokemuksesta laadukkaalla makukokoelmallamme!
PeggySeerb
June 29, 2023 at 7:05 AM
https://www.porncoma.com/
Barbarated
June 29, 2023 at 7:05 AM
http://2970.adminka.cc/
Barbarated
June 29, 2023 at 7:19 AM
http://2970.adminka.cc/
EdmondPet
June 29, 2023 at 7:21 AM
We are sure you will thoroughly enjoy them. 2 THC levels. Pineapple Poison. Source: https://learn.acloud.guru/profile/dariana-leffer
PeggySeerb
June 29, 2023 at 7:26 AM
Roberttotly
June 29, 2023 at 7:26 AM
Nauti parhaasta velo nikotiinipussit -kokemuksesta laadukkaan makukokoelmamme avulla!
Roberttotly
June 29, 2023 at 7:35 AM
Nauti parhaasta killa nikotiinipussit -kokemuksesta laadukkaan makukokoelmamme avulla!
Jaredgor
June 29, 2023 at 7:43 AM
казань строительство
ShirleyLoume
June 29, 2023 at 7:57 AM
http://3888.adminka.cc/
ShirleyLoume
June 29, 2023 at 8:10 AM
http://3888.adminka.cc/
Suzanneglare
June 29, 2023 at 8:27 AM
http://pornoflag.com
Suzanneglare
June 29, 2023 at 8:47 AM
http://pornoflag.com
SharronRip
June 29, 2023 at 8:47 AM
http://5016.adminka.cc/
JamesNut
June 29, 2023 at 8:55 AM
продвижение сайтов оптимизация
SharronRip
June 29, 2023 at 9:01 AM
http://5016.adminka.cc/
KathyCip
June 29, 2023 at 9:38 AM
http://8867.adminka.cc/
NathanKap
June 29, 2023 at 9:40 AM
What is the Best CBD for Sleep. First, we wanted to see that the product had been tested to verify its potency. Not only are adults experimenting with CBD for whatever is bothering them, increasingly parents are turning to CBD to help their kids focus, sleep, calm down and more. Source: https://rosphoto.com/users/profile-400829
CarlaMug
June 29, 2023 at 9:45 AM
https://www.pornmilitary.com
KathyCip
June 29, 2023 at 9:51 AM
http://8867.adminka.cc/
CarlaMug
June 29, 2023 at 10:05 AM
https://www.pornmilitary.com
Jamessoask
June 29, 2023 at 10:06 AM
пластиковая арматура купить
JamesNut
June 29, 2023 at 10:19 AM
оптимизация сайта продвижение сайта раскрутка сайта
Nancyvub
June 29, 2023 at 10:29 AM
http://8209.adminka.cc/
Nancyvub
June 29, 2023 at 10:42 AM
http://8209.adminka.cc/
JamesNut
June 29, 2023 at 10:43 AM
сео услуги
Jamessoask
June 29, 2023 at 10:48 AM
https://vodoley66.ru/
LaurenDic
June 29, 2023 at 11:04 AM
https://pornewer.com/
Eboniebep
June 29, 2023 at 11:20 AM
http://9360.adminka.cc/
LaurenDic
June 29, 2023 at 11:24 AM
https://pornewer.com/
Eboniebep
June 29, 2023 at 11:34 AM
http://9360.adminka.cc/
AlbertSkess
June 29, 2023 at 11:38 AM
Chronic pain management The human body has an endocannabinoid system that includes receptors in the brain that respond to the brain. A healthy seed, on the other hand, will have a waxy sheen to its coating. In contrast, others are better suited to humid environments such as those found in California and Florida , even though most strains flourish in dry, warm weather. Source: https://www.divephotoguide.com/user/sambartoletti
JamesNut
June 29, 2023 at 11:46 AM
seo оптимизация продвижение сайтов
JamesNut
June 29, 2023 at 11:59 AM
оптимизация сайта поисковое продвижение сайта
AishaDaste
June 29, 2023 at 12:11 PM
http://2442.adminka.cc/
Nancyadara
June 29, 2023 at 12:22 PM
http://pornosumka.com
AishaDaste
June 29, 2023 at 12:25 PM
http://2442.adminka.cc/
Nancyadara
June 29, 2023 at 12:42 PM
JamesNut
June 29, 2023 at 12:43 PM
заказать сео продвижение сайта
Helentaimb
June 29, 2023 at 1:03 PM
http://5988.adminka.cc/
Jamessoask
June 29, 2023 at 1:12 PM
арматура 150 мм
JamesNut
June 29, 2023 at 1:14 PM
seo продвижение сайта услуги
Helentaimb
June 29, 2023 at 1:17 PM
http://5988.adminka.cc/
CliftonElary
June 29, 2023 at 1:31 PM
If you use chemicals then you ll need a complete range from a specific brand that ll give your plants the minerals they need to make the most out of the flowers. Look for sellers with high ratings and positive reviews from previous customers. Pros and Cons of CBD for Pain Management. Source: https://www.ourboox.com/books/weed-seeds-in-texas/
Moniquerom
June 29, 2023 at 1:39 PM
https://www.pornogeto.com/
Blancadut
June 29, 2023 at 1:53 PM
http://2320.adminka.cc/
Moniquerom
June 29, 2023 at 1:59 PM
Blancadut
June 29, 2023 at 2:07 PM
http://2320.adminka.cc/
JerryCah
June 29, 2023 at 2:44 PM
http://6571.adminka.cc/
JerryCah
June 29, 2023 at 2:57 PM
http://6571.adminka.cc/
Graceden
June 29, 2023 at 2:58 PM
https://somanyporn.com/
Graceden
June 29, 2023 at 3:18 PM
https://somanyporn.com/
Shirleyitemi
June 29, 2023 at 3:33 PM
http://5394.adminka.cc/
Shirleyitemi
June 29, 2023 at 3:47 PM
http://5394.adminka.cc/
Lillianpieno
June 29, 2023 at 4:17 PM
https://pornoskill.com/
LauraBes
June 29, 2023 at 4:23 PM
http://7813.adminka.cc/
LauraBes
June 29, 2023 at 4:37 PM
http://7813.adminka.cc/
Lillianpieno
June 29, 2023 at 4:37 PM
https://pornoskill.com/
LorriMon
June 29, 2023 at 5:13 PM
http://2725.adminka.cc/
LorriMon
June 29, 2023 at 5:27 PM
http://2725.adminka.cc/
Evelyninick
June 29, 2023 at 5:36 PM
Evelyninick
June 29, 2023 at 5:55 PM
https://www.pornoytka.com/
MildredNed
June 29, 2023 at 6:04 PM
http://1234.adminka.cc/
MildredNed
June 29, 2023 at 6:17 PM
http://1234.adminka.cc/
Carolnon
June 29, 2023 at 6:54 PM
https://www.pornojaba.com/
Robinzet
June 29, 2023 at 6:54 PM
http://3335.adminka.cc/
Robinzet
June 29, 2023 at 7:08 PM
http://3335.adminka.cc/
Carolnon
June 29, 2023 at 7:13 PM
DollyFrump
June 29, 2023 at 7:46 PM
http://8975.adminka.cc/
DollyFrump
June 29, 2023 at 7:59 PM
http://8975.adminka.cc/
DianeSargo
June 29, 2023 at 8:12 PM
https://www.lsdporn.com/
DianeSargo
June 29, 2023 at 8:31 PM
https://www.lsdporn.com/
Sarahven
June 29, 2023 at 8:38 PM
http://2580.adminka.cc/
Sarahven
June 29, 2023 at 8:52 PM
http://2580.adminka.cc/
LindamoulP
June 29, 2023 at 9:28 PM
Shirleyker
June 29, 2023 at 9:28 PM
http://3821.adminka.cc/
Shirleyker
June 29, 2023 at 9:41 PM
http://3821.adminka.cc/
LindamoulP
June 29, 2023 at 9:48 PM
Bettyamurb
June 29, 2023 at 10:19 PM
http://3183.adminka.cc/
Bettyamurb
June 29, 2023 at 10:32 PM
http://3183.adminka.cc/
KishaTew
June 29, 2023 at 10:46 PM
KishaTew
June 29, 2023 at 11:06 PM
https://pornonebo.com/
Karenshids
June 29, 2023 at 11:10 PM
http://6067.adminka.cc/
Karenshids
June 29, 2023 at 11:23 PM
http://6067.adminka.cc/
KellyTus
June 30, 2023 at 12:02 AM
http://3834.adminka.cc/
DorothyFuh
June 30, 2023 at 12:06 AM
KellyTus
June 30, 2023 at 12:15 AM
http://3834.adminka.cc/
DorothyFuh
June 30, 2023 at 12:26 AM
https://www.pornoazot.com/
Feleciacor
June 30, 2023 at 12:54 AM
http://4123.adminka.cc/
Feleciacor
June 30, 2023 at 1:07 AM
http://4123.adminka.cc/
Doriscoide
June 30, 2023 at 1:24 AM
https://pornocell.com/
Doriscoide
June 30, 2023 at 1:44 AM
https://pornocell.com/
Kaitlincax
June 30, 2023 at 1:45 AM
http://3579.adminka.cc/
Roberttotly
June 30, 2023 at 1:54 AM
Indulge in the ultimate best velo snus experience with our premium collection of flavors!
Kaitlincax
June 30, 2023 at 1:59 AM
http://3579.adminka.cc/
ArnoldGat
June 30, 2023 at 2:03 AM
Статья МК о Fineproxy подробно рассказывает об их сервисе.
Roberttotly
June 30, 2023 at 2:15 AM
Indulge in the ultimate best zyn vs velo experience with our premium collection of flavors!
Roberttotly
June 30, 2023 at 2:18 AM
Indulge in the ultimate best best velo snus experience with our premium collection of flavors!
BarbaraInela
June 30, 2023 at 2:38 AM
http://6993.adminka.cc/
Michaelnah
June 30, 2023 at 2:43 AM
http://army.clanfm.ru/viewtopic.php?f=2&t=27576
Tammygurge
June 30, 2023 at 2:46 AM
https://pornoshoy.com/
BarbaraInela
June 30, 2023 at 2:51 AM
http://6993.adminka.cc/
Tammygurge
June 30, 2023 at 3:06 AM
Sandrahinny
June 30, 2023 at 3:29 AM
http://6808.adminka.cc/
Michaelnah
June 30, 2023 at 3:32 AM
https://nashdom.club/phpbb/viewtopic.php?f=1506&t=778000
Sandrahinny
June 30, 2023 at 3:43 AM
http://6808.adminka.cc/
Carlavet
June 30, 2023 at 4:05 AM
https://www.pornoarka.com/
Michaelnah
June 30, 2023 at 4:21 AM
http://besconeshnocte.flybb.ru/viewtopic.php?f=2&t=314
MarieKax
June 30, 2023 at 4:21 AM
http://4343.adminka.cc/
Carlavet
June 30, 2023 at 4:25 AM
https://www.pornoarka.com/
MarieKax
June 30, 2023 at 4:35 AM
http://4343.adminka.cc/
Michaelnah
June 30, 2023 at 5:09 AM
https://sponforum.ixbb.ru/viewtopic.php?id=9884#p33451
StaciaStabs
June 30, 2023 at 5:13 AM
http://1351.adminka.cc/
MarionDuamn
June 30, 2023 at 5:22 AM
StaciaStabs
June 30, 2023 at 5:27 AM
http://1351.adminka.cc/
MarionDuamn
June 30, 2023 at 5:43 AM
http://www.poxren.com/
Josephlycle
June 30, 2023 at 5:58 AM
https://meffert-yar.ru/
Michaelnah
June 30, 2023 at 5:58 AM
http://moskovskij.getbb.ru/viewtopic.php?f=12&t=275
Kathlynvuh
June 30, 2023 at 6:06 AM
http://8014.adminka.cc/
Kathlynvuh
June 30, 2023 at 6:21 AM
http://8014.adminka.cc/
ElisaSab
June 30, 2023 at 6:43 AM
https://pornoait.com/
Michaelnah
June 30, 2023 at 6:45 AM
https://arhonskforum.rolka.me/viewtopic.php?id=1075#p1819
Jolieslave
June 30, 2023 at 6:59 AM
http://2866.adminka.cc/
ElisaSab
June 30, 2023 at 7:03 AM
https://pornoait.com/
Jolieslave
June 30, 2023 at 7:12 AM
http://2866.adminka.cc/
Michaelnah
June 30, 2023 at 7:32 AM
https://lastdemo.primepix.ru/club/user/389/blog/4796/
Josephlycle
June 30, 2023 at 7:33 AM
труба профильная 40х20х2 мм
KathyLic
June 30, 2023 at 7:50 AM
http://6761.adminka.cc/
Naomismupt
June 30, 2023 at 8:02 AM
https://pornoale.com/
KathyLic
June 30, 2023 at 8:04 AM
http://6761.adminka.cc/
Michaelnah
June 30, 2023 at 8:19 AM
http://molbiol.ru/forums/index.php?showtopic=918242
Naomismupt
June 30, 2023 at 8:23 AM
https://pornoale.com/
Laurennut
June 30, 2023 at 8:42 AM
http://3506.adminka.cc/
Laurennut
June 30, 2023 at 8:56 AM
http://3506.adminka.cc/
Michaelnah
June 30, 2023 at 9:05 AM
http://zyynor.com/create-blog/
Josephlycle
June 30, 2023 at 9:07 AM
купить профильную трубу 60х40 3 мм
Lindasam
June 30, 2023 at 9:23 AM
https://pornobed.com/
TameraInfum
June 30, 2023 at 9:33 AM
http://9133.adminka.cc/
Lindasam
June 30, 2023 at 9:43 AM
https://pornobed.com/
TameraInfum
June 30, 2023 at 9:47 AM
http://9133.adminka.cc/
Michaelnah
June 30, 2023 at 9:51 AM
https://бытоваЯхимиЯоптом.рф/communication/forum/messages/forum5/message11597/11374-povyste-svoyu-kvalifikatsiyu-kupite-professionalno-vypolnennyy-diplom?result=new#message11597
EileenRom
June 30, 2023 at 10:24 AM
http://4829.adminka.cc/
EileenRom
June 30, 2023 at 10:38 AM
http://4829.adminka.cc/
SandraStalk
June 30, 2023 at 10:41 AM
AthenaHuh
June 30, 2023 at 11:15 AM
http://4118.adminka.cc/
AthenaHuh
June 30, 2023 at 11:29 AM
http://4118.adminka.cc/
Theresaberia
June 30, 2023 at 11:59 AM
https://pornoamy.com/
CarolBab
June 30, 2023 at 12:06 PM
http://8440.adminka.cc/
CarolBab
June 30, 2023 at 12:19 PM
http://8440.adminka.cc/
Theresaberia
June 30, 2023 at 12:19 PM
https://pornoamy.com/
RachelLit
June 30, 2023 at 12:56 PM
http://4033.adminka.cc/
RachelLit
June 30, 2023 at 1:10 PM
http://4033.adminka.cc/
Vernasib
June 30, 2023 at 1:18 PM
https://pornoelf.com/
Vernasib
June 30, 2023 at 1:38 PM
https://pornoelf.com/
Juanitajus
June 30, 2023 at 1:46 PM
http://5333.adminka.cc/
WalterCes
June 30, 2023 at 1:54 PM
https://ivmetall37.ru/
Juanitajus
June 30, 2023 at 1:59 PM
http://5333.adminka.cc/
DorisChure
June 30, 2023 at 2:36 PM
http://7096.adminka.cc/
BerthaSer
June 30, 2023 at 2:37 PM
https://pornoamy.com/
DorisChure
June 30, 2023 at 2:49 PM
http://7096.adminka.cc/
BerthaSer
June 30, 2023 at 2:57 PM
https://pornoamy.com/
JaniceUneri
June 30, 2023 at 3:26 PM
http://4392.adminka.cc/
JaniceUneri
June 30, 2023 at 3:39 PM
http://4392.adminka.cc/
Rebeccaindiz
June 30, 2023 at 3:56 PM
https://pornoelf.com/
LauriTwift
June 30, 2023 at 4:15 PM
http://9114.adminka.cc/
Rebeccaindiz
June 30, 2023 at 4:17 PM
https://pornoelf.com/
LauriTwift
June 30, 2023 at 4:28 PM
http://9114.adminka.cc/
TracySer
June 30, 2023 at 5:06 PM
http://5051.adminka.cc/
JaniceBom
June 30, 2023 at 5:13 PM
https://www.chooseyouritem.com
TracySer
June 30, 2023 at 5:18 PM
http://5051.adminka.cc/
JaniceBom
June 30, 2023 at 5:33 PM
https://www.chooseyouritem.com
BrendaDully
June 30, 2023 at 5:55 PM
http://7267.adminka.cc/
BrendaDully
June 30, 2023 at 6:08 PM
http://7267.adminka.cc/
Berthamab
June 30, 2023 at 6:30 PM
https://www.yaeby.info
Irenehousa
June 30, 2023 at 6:46 PM
http://3889.adminka.cc/
Berthamab
June 30, 2023 at 6:51 PM
Irenehousa
June 30, 2023 at 6:59 PM
http://3889.adminka.cc/
Belindadomia
June 30, 2023 at 7:37 PM
http://6303.adminka.cc/
DonnaSen
June 30, 2023 at 7:50 PM
https://www.yaeby.me
Belindadomia
June 30, 2023 at 7:50 PM
http://6303.adminka.cc/
DonnaSen
June 30, 2023 at 8:10 PM
Sharonphafe
June 30, 2023 at 8:28 PM
http://2723.adminka.cc/
Sharonphafe
June 30, 2023 at 8:41 PM
http://2723.adminka.cc/
CecileBut
June 30, 2023 at 9:09 PM
https://www.yaeby.cc
FrancesBoara
June 30, 2023 at 9:19 PM
http://7573.adminka.cc/
CecileBut
June 30, 2023 at 9:29 PM
https://www.yaeby.cc
FrancesBoara
June 30, 2023 at 9:32 PM
http://7573.adminka.cc/
LottieEtece
June 30, 2023 at 10:09 PM
http://1997.adminka.cc/
LottieEtece
June 30, 2023 at 10:23 PM
http://1997.adminka.cc/
MaxineCop
June 30, 2023 at 10:29 PM
JamesGat
June 30, 2023 at 10:32 PM
https://a4-tech.ru/
MaxineCop
June 30, 2023 at 10:49 PM
https://www.yaeby.net
Marianfut
June 30, 2023 at 11:00 PM
http://2507.adminka.cc/
Marianfut
June 30, 2023 at 11:14 PM
http://2507.adminka.cc/
Shirleyhycle
June 30, 2023 at 11:50 PM
SheriMooke
June 30, 2023 at 11:52 PM
http://8307.adminka.cc/
SheriMooke
July 1, 2023 at 12:06 AM
http://8307.adminka.cc/
Shirleyhycle
July 1, 2023 at 12:10 AM
BarbaraTum
July 1, 2023 at 12:44 AM
http://2095.adminka.cc/
BarbaraTum
July 1, 2023 at 12:59 AM
http://2095.adminka.cc/
Aliceuteft
July 1, 2023 at 1:10 AM
Aliceuteft
July 1, 2023 at 1:30 AM
http://sexopedia.biz
Shirleyved
July 1, 2023 at 1:37 AM
http://3053.adminka.cc/
Shirleyved
July 1, 2023 at 1:51 AM
http://3053.adminka.cc/
Sophiaapera
July 1, 2023 at 2:28 AM
Angelashoks
July 1, 2023 at 2:29 AM
http://1032.adminka.cc/
Angelashoks
July 1, 2023 at 2:43 AM
http://1032.adminka.cc/
Sophiaapera
July 1, 2023 at 2:49 AM
http://2kiski.com
BarbaradaT
July 1, 2023 at 3:21 AM
http://5021.adminka.cc/
Melvinplant
July 1, 2023 at 3:34 AM
детейлинг
BarbaradaT
July 1, 2023 at 3:35 AM
http://5021.adminka.cc/
BarbaraCon
July 1, 2023 at 3:47 AM
http://www.bylki.com
BarbaraCon
July 1, 2023 at 4:08 AM
Marienow
July 1, 2023 at 4:14 AM
http://3900.adminka.cc/
Melvinplant
July 1, 2023 at 4:15 AM
детейлинг
Marienow
July 1, 2023 at 4:28 AM
http://3900.adminka.cc/
abg colmek
July 1, 2023 at 5:06 AM
Greetings! Quick question that’s entirely offf topic. Do youu know how to make yolur sit mobile friendly?
My blog looks weird when viewing from my apple iphone.
I’m trying to find a theme oor plugikn tjat might bee
able to fix this problem. If yoou have any recommendations, plese share.
Thank you!
ConnieScaxy
July 1, 2023 at 5:06 AM
http://1046.adminka.cc/
Pamelaincab
July 1, 2023 at 5:09 AM
https://www.drive-movie.com
ConnieScaxy
July 1, 2023 at 5:20 AM
http://1046.adminka.cc/
Pamelaincab
July 1, 2023 at 5:30 AM
PennyUnity
July 1, 2023 at 6:00 AM
http://7941.adminka.cc/
PennyUnity
July 1, 2023 at 6:15 AM
http://7941.adminka.cc/
EleanorDaw
July 1, 2023 at 6:30 AM
https://www.pornozavod.com
Stephendap
July 1, 2023 at 6:30 AM
бухгалтерские услуги
RichardPrafe
July 1, 2023 at 6:47 AM
Welcome to Big Big News (BBN), your go-to source for the latest and most engaging news from around the world. At BBN, we strive to deliver breaking news, captivating stories, and in-depth analysis that keep you informed and connected to the ever-changing events shaping our world.
As a trusted news website, we pride ourselves on delivering accurate and reliable information across a wide range of topics. Whether you’re interested in politics, business, technology, health, entertainment, sports, or more, BBN has got you covered. Our dedicated team of experienced journalists and writers work tirelessly to bring you well-researched articles that provide comprehensive coverage and insightful perspectives.
With BBN, you’ll stay ahead of the curve with our up-to-the-minute reporting on current events and global happenings. Our commitment to delivering quality journalism means you can rely on us for accurate, balanced, and unbiased news coverage. We strive to present information in a clear and concise manner, ensuring that you can easily grasp the key facts and understand the context behind the headlines.
In addition to news articles, BBN offers thought-provoking opinion pieces, engaging features, and in-depth investigative reporting. Our goal is to provide you with a rich and diverse news experience that goes beyond the surface, sparking meaningful discussions and fostering a deeper understanding of the world around us.
Whether you’re an avid news reader, a curious mind, or a professional seeking valuable insights, BBN is your one-stop destination. Join our growing community of readers and stay informed, empowered, and inspired. Explore our website, sign up for our newsletter, and follow us on social media to never miss a beat.
Big Big News (BBN) – Where news comes alive!
politics
EleanorDaw
July 1, 2023 at 6:51 AM
https://www.pornozavod.com
Ericaflelt
July 1, 2023 at 6:53 AM
http://1902.adminka.cc/
Ericaflelt
July 1, 2023 at 7:07 AM
http://1902.adminka.cc/
Rebeccahoist
July 1, 2023 at 7:45 AM
http://6941.adminka.cc/
Tracywab
July 1, 2023 at 7:51 AM
https://www.yaeby.com
RichardPrafe
July 1, 2023 at 7:51 AM
Welcome to Big Big News (BBN), your go-to source for the latest and most engaging news from around the world. At BBN, we strive to deliver breaking news, captivating stories, and in-depth analysis that keep you informed and connected to the ever-changing events shaping our world.
As a trusted news website, we pride ourselves on delivering accurate and reliable information across a wide range of topics. Whether you’re interested in politics, business, technology, health, entertainment, sports, or more, BBN has got you covered. Our dedicated team of experienced journalists and writers work tirelessly to bring you well-researched articles that provide comprehensive coverage and insightful perspectives.
With BBN, you’ll stay ahead of the curve with our up-to-the-minute reporting on current events and global happenings. Our commitment to delivering quality journalism means you can rely on us for accurate, balanced, and unbiased news coverage. We strive to present information in a clear and concise manner, ensuring that you can easily grasp the key facts and understand the context behind the headlines.
In addition to news articles, BBN offers thought-provoking opinion pieces, engaging features, and in-depth investigative reporting. Our goal is to provide you with a rich and diverse news experience that goes beyond the surface, sparking meaningful discussions and fostering a deeper understanding of the world around us.
Whether you’re an avid news reader, a curious mind, or a professional seeking valuable insights, BBN is your one-stop destination. Join our growing community of readers and stay informed, empowered, and inspired. Explore our website, sign up for our newsletter, and follow us on social media to never miss a beat.
Big Big News (BBN) – Where news comes alive!
world news
Rebeccahoist
July 1, 2023 at 7:59 AM
http://6941.adminka.cc/
RichardPrafe
July 1, 2023 at 8:03 AM
Welcome to Big Big News (BBN), your go-to source for the latest and most engaging news from around the world. At BBN, we strive to deliver breaking news, captivating stories, and in-depth analysis that keep you informed and connected to the ever-changing events shaping our world.
As a trusted news website, we pride ourselves on delivering accurate and reliable information across a wide range of topics. Whether you’re interested in politics, business, technology, health, entertainment, sports, or more, BBN has got you covered. Our dedicated team of experienced journalists and writers work tirelessly to bring you well-researched articles that provide comprehensive coverage and insightful perspectives.
With BBN, you’ll stay ahead of the curve with our up-to-the-minute reporting on current events and global happenings. Our commitment to delivering quality journalism means you can rely on us for accurate, balanced, and unbiased news coverage. We strive to present information in a clear and concise manner, ensuring that you can easily grasp the key facts and understand the context behind the headlines.
In addition to news articles, BBN offers thought-provoking opinion pieces, engaging features, and in-depth investigative reporting. Our goal is to provide you with a rich and diverse news experience that goes beyond the surface, sparking meaningful discussions and fostering a deeper understanding of the world around us.
Whether you’re an avid news reader, a curious mind, or a professional seeking valuable insights, BBN is your one-stop destination. Join our growing community of readers and stay informed, empowered, and inspired. Explore our website, sign up for our newsletter, and follow us on social media to never miss a beat.
Big Big News (BBN) – Where news comes alive!
sports news
Tracywab
July 1, 2023 at 8:12 AM
https://www.yaeby.com
RichardPrafe
July 1, 2023 at 8:28 AM
Welcome to Big Big News (BBN), your go-to source for the latest and most engaging news from around the world. At BBN, we strive to deliver breaking news, captivating stories, and in-depth analysis that keep you informed and connected to the ever-changing events shaping our world.
As a trusted news website, we pride ourselves on delivering accurate and reliable information across a wide range of topics. Whether you’re interested in politics, business, technology, health, entertainment, sports, or more, BBN has got you covered. Our dedicated team of experienced journalists and writers work tirelessly to bring you well-researched articles that provide comprehensive coverage and insightful perspectives.
With BBN, you’ll stay ahead of the curve with our up-to-the-minute reporting on current events and global happenings. Our commitment to delivering quality journalism means you can rely on us for accurate, balanced, and unbiased news coverage. We strive to present information in a clear and concise manner, ensuring that you can easily grasp the key facts and understand the context behind the headlines.
In addition to news articles, BBN offers thought-provoking opinion pieces, engaging features, and in-depth investigative reporting. Our goal is to provide you with a rich and diverse news experience that goes beyond the surface, sparking meaningful discussions and fostering a deeper understanding of the world around us.
Whether you’re an avid news reader, a curious mind, or a professional seeking valuable insights, BBN is your one-stop destination. Join our growing community of readers and stay informed, empowered, and inspired. Explore our website, sign up for our newsletter, and follow us on social media to never miss a beat.
Big Big News (BBN) – Where news comes alive!
health and wellness
Dianadroff
July 1, 2023 at 8:37 AM
http://5029.adminka.cc/
Dianadroff
July 1, 2023 at 8:52 AM
http://5029.adminka.cc/
yushaArope
July 1, 2023 at 9:02 AM
На сайте https://veganet.ru/ воспользуйтесь услугами популярной компании «Вега Нэт», которая имеет внушительный опыт в телекоммуникационной сфере. В компании работают настоящие профессионалы, которые подберут оптимальное решение. Вы сможете выбрать тариф «эконом», «интернет+ТВ», «частный дом». Среди дополнительных услуг выделяют: системы видеонаблюдения, домофония под ключ. Сотрудничество с этой компанией выбирают из-за того, что она обеспечивает бесперебойную сеть, безупречное качество обслуживания.
Jewelflulp
July 1, 2023 at 9:11 AM
https://www.webcomicz.com
kryukWen
July 1, 2023 at 9:20 AM
На сайте https://redico.ru/ закажите бесплатный расчет стоимости разрешительной документации, независимо от сложности. Компания предоставляет высокий уровень сервиса, ответственно подходит к исполнению каждого заказа. Компетентные сотрудники готовы предоставить все необходимые документы в максимально сжатые сроки, а при получении не будет никакого дискомфорта. Компания подходит к обязанностям максимально ответственно, сотрудничество на прозрачных условиях. Она находится на рынке давно, поэтому все работы будут выполнены грамотно.
Dionnesab
July 1, 2023 at 9:28 AM
http://3769.adminka.cc/
Jewelflulp
July 1, 2023 at 9:32 AM
https://www.webcomicz.com
Dionnesab
July 1, 2023 at 9:42 AM
http://3769.adminka.cc/
Juhatotly
July 1, 2023 at 9:46 AM
Koe parhaimmillaan velo snus gratis kokemus premium-makujen kanssa!
Robertdop
July 1, 2023 at 9:54 AM
Genie?en Sie das ultimative velo freeze pris Erlebnis mit unserer Premium-Auswahl an Geschmacksrichtungen!
HeinrichSep
July 1, 2023 at 9:58 AM
Erleben Sie das ultimative velo nikotingehalt Erlebnis mit unserer Premium-Kollektion an Geschmacksrichtungen!
TeresaCig
July 1, 2023 at 10:20 AM
http://6506.adminka.cc/
Lailaeurok
July 1, 2023 at 10:30 AM
TeresaCig
July 1, 2023 at 10:35 AM
http://6506.adminka.cc/
Lailaeurok
July 1, 2023 at 10:51 AM
vanecArows
July 1, 2023 at 10:58 AM
На сайте https://takerm.ru поиграйте в интересные игры, а также топовые слоты, которые точно никого не оставят равнодушным. Перед вами лучшие игры от проверенных и зарекомендовавших себя провайдеров. Они поставляют только развлечения хорошего качества. Есть специальный фильтр, который позволит отыскать игру, которая понравится вам больше всего. Этот портал опубликован в различных социальных сетях. Есть возможность пополнить либо вывести средства. Воспользуйтесь специальным фильтром для того, чтобы найти ту игру, которая обязательно вас заинтересует.
Hattiewrade
July 1, 2023 at 11:12 AM
http://2105.adminka.cc/
yezhoLob
July 1, 2023 at 11:15 AM
На сайте https://vgolos.info/ имеются актуальные, последние новости, посвященные политике, экономике, жизни и другим сферам, которые интересны каждому. Также есть и криминальные хроники, материал, посвященный высоким технологиям, интервью популярных личностей, предпринимателей. Опубликованы и хроники военной операции, что позволит лучше сориентироваться в обстановке. Постоянно выкладываются новые статьи, которые помогут лучше разобраться в ситуации. Почитайте те новости, которые наиболее интересны вам.
volodBit
July 1, 2023 at 11:23 AM
Лучший хостинг сайтов на https://prohoster.info/ На сайте вы сможете купить сервер для сайта и надежный хостинг. Хостинг для страниц от прохостер это выгодные цены, круглосуточная поддержка, онлайн хостинг и уникальные предложения.
Hattiewrade
July 1, 2023 at 11:27 AM
http://2105.adminka.cc/
Arlenejoids
July 1, 2023 at 11:50 AM
https://jerrylabella.com
Jackieopild
July 1, 2023 at 12:04 PM
http://8673.adminka.cc/
Arlenejoids
July 1, 2023 at 12:11 PM
https://jerrylabella.com
Roberttotly
July 1, 2023 at 12:16 PM
Indulge in the ultimate best Velo Nicotine Pouches experience with our premium collection of flavors!
mochkWer
July 1, 2023 at 12:17 PM
На сайте https://prohoster.info/?partner=13 вы сможете заказать и купить лучший и надежный хостинг для вашего сайта по доступной цене. При покупке хостинга вы получаете домен в подарок, бесплатную DDoS защиту, бесплатный конструктор сайтов и SSL сертификат в подарок. Безлимитный хостинг, стабильно высокая скорость работы – все для вашего сайта.
Jackieopild
July 1, 2023 at 12:19 PM
http://8673.adminka.cc/
Jaspertotly
July 1, 2023 at 12:34 PM
Beleef de ultieme KILLA Nikotingehalt sensatie met onze exclusieve selectie van smaken!
DebraDeR
July 1, 2023 at 12:57 PM
http://4393.adminka.cc/
DebraDeR
July 1, 2023 at 1:11 PM
http://4393.adminka.cc/
KeenaCug
July 1, 2023 at 1:12 PM
https://xn--b1aaib8akcqn1b.xn--p1ai/
KeenaCug
July 1, 2023 at 1:33 PM
https://xn--b1aaib8akcqn1b.xn--p1ai/
LynettePep
July 1, 2023 at 1:47 PM
http://7556.adminka.cc/
LynettePep
July 1, 2023 at 2:01 PM
http://7556.adminka.cc/
Jantotly
July 1, 2023 at 2:02 PM
Geniet van de ultieme velo снюс ervaring met onze premium selectie van smaken!
Jamestotly
July 1, 2023 at 2:09 PM
Dive into the ultimate what is velo nicotine pouches experience with our wide range of flavors! Discover the world of Velo today.
Yvonnealmok
July 1, 2023 at 2:30 PM
http://xn--80aanaleowflrep7bm1i0b.xn--p1ai
NatalieBug
July 1, 2023 at 2:38 PM
http://9742.adminka.cc/
Yvonnealmok
July 1, 2023 at 2:51 PM
http://xn--80aanaleowflrep7bm1i0b.xn--p1ai
NatalieBug
July 1, 2023 at 2:52 PM
http://9742.adminka.cc/
Mabelges
July 1, 2023 at 3:29 PM
http://8519.adminka.cc/
Mabelges
July 1, 2023 at 3:43 PM
http://8519.adminka.cc/
Amandaslell
July 1, 2023 at 3:48 PM
http://xn--h1aaflgcehaokh4b5i.xn--p1ai
Amandaslell
July 1, 2023 at 4:09 PM
http://xn--h1aaflgcehaokh4b5i.xn--p1ai
DorothyCoaro
July 1, 2023 at 4:19 PM
http://6465.adminka.cc/
DorothyCoaro
July 1, 2023 at 4:33 PM
http://6465.adminka.cc/
GoldieJeons
July 1, 2023 at 5:06 PM
http://xn--80acjeah0gb8c.xn--p1ai
Jackiereups
July 1, 2023 at 5:09 PM
http://8323.adminka.cc/
Jackiereups
July 1, 2023 at 5:24 PM
http://8323.adminka.cc/
kiryuDuh
July 1, 2023 at 5:24 PM
На сайте https://o-savva.ru/ получится заказать подъемники для инвалидов самой разной модификации. Заявки на покупку принимаются круглосуточно, а потому оформить приобретение можно в любое время. Компания в течение длительного времени создает электрические подъемники, которые максимально адаптированы под нужды, бытовые условия людей. В процессе разработки участвовали те, кто сам пережил серьезные травмы позвоночника. На портале вы сможете выбрать и приобрести такое оборудование, которое облегчит ваш ежедневный быт.
GoldieJeons
July 1, 2023 at 5:28 PM
http://xn--80acjeah0gb8c.xn--p1ai
JulieCrump
July 1, 2023 at 5:59 PM
http://8168.adminka.cc/
JulieCrump
July 1, 2023 at 6:14 PM
http://8168.adminka.cc/
Janetdidly
July 1, 2023 at 6:23 PM
http://xn--80aaaavsmcmdpdd9ahsfs8omc.xn--p1ai
Janetdidly
July 1, 2023 at 6:44 PM
http://xn--80aaaavsmcmdpdd9ahsfs8omc.xn--p1ai
SuzanneRof
July 1, 2023 at 6:49 PM
http://3129.adminka.cc/
SuzanneRof
July 1, 2023 at 7:03 PM
http://3129.adminka.cc/
vysotknike
July 1, 2023 at 7:09 PM
On the site https://board-finance.website/ you can get a private loan or a quick loan online on favorable terms on the day of application for any purpose without commission. Urgent cash loan on the day of application, as well as round-the-clock issuance of loans.
Janicealife
July 1, 2023 at 7:38 PM
http://xn--h1adrgh4a.xn--p1ai
CeliateagO
July 1, 2023 at 7:39 PM
http://8308.adminka.cc/
CeliateagO
July 1, 2023 at 7:53 PM
http://8308.adminka.cc/
Janicealife
July 1, 2023 at 7:59 PM
http://xn--h1adrgh4a.xn--p1ai
CrystalCob
July 1, 2023 at 8:29 PM
http://8180.adminka.cc/
CrystalCob
July 1, 2023 at 8:43 PM
http://8180.adminka.cc/
JoyceMaile
July 1, 2023 at 8:56 PM
http://www.xn--c1aehpgu.xn--p1ai/
JoyceMaile
July 1, 2023 at 9:18 PM
http://www.xn--c1aehpgu.xn--p1ai/
TabithazEm
July 1, 2023 at 9:20 PM
http://8363.adminka.cc/
TabithazEm
July 1, 2023 at 9:34 PM
http://8363.adminka.cc/
shulyTub
July 1, 2023 at 9:48 PM
На сайте https://takerf.ru представлены самые интересные, увлекательные развлечения на любой вкус. Здесь вы сможете сыграть в Live игры, попытать удачу в слотах от ведущих провайдеров. Не упустите шанса сыграть в Блэкджек, Плинко и другие. Заходить на этот портал можно с любого устройства, в том числе, мобильного телефона. Интерфейс будет полностью повторять официальный сайт. И самое важное, то перед вами огромное количество развлечений, а потому вам точно не придется скучать. Все выплаты оперативные.
CherylInoft
July 1, 2023 at 10:11 PM
http://6769.adminka.cc/
RebeccaMak
July 1, 2023 at 10:13 PM
http://xn—-8sbkwfpgahlhi6fzd.xn--p1ai
zolotRap
July 1, 2023 at 10:21 PM
На сайте https://karrespondent.com/ вы сможете ознакомиться со всеми политическими новостями Украины. Перед вами невыдуманные материалы, которые необходимо изучить и вам для того, чтобы быть в курсе последних событий. Перед вами только актуальные данные, которые будет интересно почитать каждому. Они касаются спецоперации на Украине, есть мнения первых лиц, а также ключевых политических фигур. Вся информация подается в простой форме, чтобы понять ее смог каждый и поделился со знакомыми, друзьями.
CherylInoft
July 1, 2023 at 10:27 PM
http://6769.adminka.cc/
RebeccaMak
July 1, 2023 at 10:34 PM
http://xn—-8sbkwfpgahlhi6fzd.xn--p1ai
VelmaNon
July 1, 2023 at 11:02 PM
http://5402.adminka.cc/
JamesSom
July 1, 2023 at 11:10 PM
Browse our headphone reviews to find the perfect pair for your listening needs.
VelmaNon
July 1, 2023 at 11:16 PM
http://5402.adminka.cc/
WandaAgilk
July 1, 2023 at 11:31 PM
http://xn--90aipdglbqsr8f.xn--p1ai
Andrewtotly
July 1, 2023 at 11:41 PM
Experience the unbeatable sensation of velo pouches with our diverse assortment of tastes. Immerse yourself in the Velo journey.
babusHop
July 1, 2023 at 11:46 PM
На сайте https://aovniis.ru/uslugi/otkaznoe-pismo-zaklyuchenie/ воспользуйтесь такой услугой, как составление заказного письма. Перед вами весь перечень товаров, для которых оно оформляется. Сюда относят: ароматические свечи, бижутерию, самоклеящиеся ленты, наполнители туалетов, чехлы для смартфонов, канцелярские товары, картины, зонты, гардины и многое другое. На услугу установлена комфортная цена – 2500 рублей, но она не окончательная и может варьироваться в зависимости от вида письма и товара. Оформление письма предусмотрено для самозанятых, ИП.
Johntap
July 1, 2023 at 11:49 PM
Check out the latest velo snus pris. We offer a variety of flavors and strengths!
Shirleyemesy
July 1, 2023 at 11:52 PM
http://6886.adminka.cc/
Jamesparia
July 1, 2023 at 11:52 PM
Discover the velo nicotine pouches safe alternatives to traditional tobacco products.
WandaAgilk
July 1, 2023 at 11:53 PM
http://xn--90aipdglbqsr8f.xn--p1ai
Shirleyemesy
July 2, 2023 at 12:07 AM
http://6886.adminka.cc/
DarlaUtino
July 2, 2023 at 12:43 AM
http://2575.adminka.cc/
Brookeref
July 2, 2023 at 12:48 AM
http://xn--80acibcctargueqnw6o.xn--p1ai
DarlaUtino
July 2, 2023 at 12:58 AM
http://2575.adminka.cc/
Brookeref
July 2, 2023 at 1:09 AM
http://xn--80acibcctargueqnw6o.xn--p1ai
nislaPal
July 2, 2023 at 1:12 AM
1. Have the courage to follow your heart and intuition. They somehow already know what you truly want to become. Everything else is secondary. (Steve Jobs). 2. Life isn’t about finding yourself. Life is about creating yourself. (George Bernard Shaw). 3. Even if you’re on the right track, you’ll get run over if you just sit there. (Will Rogers). 4.Nothing is impossible to a willing heart. (John Heywood). 5. There is only one happiness in this life, to love and be loved. (George Sand). Source: https://topquotes.life/
TraceyAduby
July 2, 2023 at 1:35 AM
http://7257.adminka.cc/
TraceyAduby
July 2, 2023 at 1:50 AM
http://7257.adminka.cc/
vyaloElast
July 2, 2023 at 1:51 AM
На сайте https://armand-sto.ru/ вы сможете заказать такие услуги, как диагностика, ремонт турбин, трансмиссии, двигателя, ходовой, топливной системы. В компании работают квалифицированные и высококлассные специалисты, которые точно знают, как решить вопрос быстро, эффективно и с максимальной экономией бюджета. Все услуги оказываются на высокоточном, инновационном оборудовании, которое помогает дополнительно продлить эксплуатационные сроки, улучшить технические характеристики.
TheresaNenry
July 2, 2023 at 2:05 AM
https://www.xn--d1ascahfol.xn--p1ai/
TheresaNenry
July 2, 2023 at 2:22 AM
https://www.xn--d1ascahfol.xn--p1ai/
GeorgiaFauck
July 2, 2023 at 2:26 AM
http://3160.adminka.cc/
GeorgiaFauck
July 2, 2023 at 2:41 AM
http://3160.adminka.cc/
DorothyViasp
July 2, 2023 at 3:06 AM
http://xn—-itbnte6c2a.xn--p1ai
MaribelJam
July 2, 2023 at 3:18 AM
http://3368.adminka.cc/
DorothyViasp
July 2, 2023 at 3:22 AM
http://xn—-itbnte6c2a.xn--p1ai
MaribelJam
July 2, 2023 at 3:32 AM
http://3368.adminka.cc/
WillisMet
July 2, 2023 at 3:44 AM
https://teletype.in/@carterlisa09/PKvtCPtkRm3
MicheleCok
July 2, 2023 at 4:06 AM
http://xn--e1affbjtdfgn9i.xn--p1ai
Cindikip
July 2, 2023 at 4:10 AM
http://1793.adminka.cc/
MicheleCok
July 2, 2023 at 4:22 AM
http://xn--e1affbjtdfgn9i.xn--p1ai
Cindikip
July 2, 2023 at 4:24 AM
http://1793.adminka.cc/
WillisMet
July 2, 2023 at 4:50 AM
https://teletype.in/@vladislavbelov2007/1oKDCZJjKGV
nadiyTox
July 2, 2023 at 4:59 AM
На сайте https://iqsait.ru/ представлена информация на самую разную тематику, включая отношения, здоровье, уход за собой. Здесь вы найдете контент на психологическую тематику, узнаете, какие маски лучше всего помогают от морщин, как правильно увлажнять кожу летом, об эффективных способах избавления от перхоти и зуда кожи головы. Есть материал на тему первого свидания. Весь контент сопровождается картинками. Регулярно добавляются новые статьи, которые помогут узнать много нового, полезного.
SandraHiene
July 2, 2023 at 5:01 AM
http://9194.adminka.cc/
WillisMet
July 2, 2023 at 5:02 AM
https://teletype.in/@paul1969/1NRx5n4a4N9
Sonyabut
July 2, 2023 at 5:05 AM
http://xn—-8sbwalijib9a.xn--p1ai
SandraHiene
July 2, 2023 at 5:15 AM
http://9194.adminka.cc/
Sonyabut
July 2, 2023 at 5:22 AM
http://xn—-8sbwalijib9a.xn--p1ai
Cristyfum
July 2, 2023 at 5:51 AM
http://4421.adminka.cc/
SusanadomY
July 2, 2023 at 6:05 AM
http://xn--24-6kcm9dgdl.xn--p1ai
Cristyfum
July 2, 2023 at 6:06 AM
http://4421.adminka.cc/
JamesPaice
July 2, 2023 at 6:18 AM
Dive into the exhilarating world of velo. Experience the ultimate nicotine pouch sensation today!
SusanadomY
July 2, 2023 at 6:21 AM
http://xn--24-6kcm9dgdl.xn--p1ai
AngelaSheni
July 2, 2023 at 6:42 AM
http://1812.adminka.cc/
Samuelmed
July 2, 2023 at 6:44 AM
Unleash a refreshing blast with VELO ice cool mint slim. It’s the frosty flavor journey you’ve been waiting for!
Williammed
July 2, 2023 at 6:49 AM
Experience an unbeatable strength with VELO freeze x-strong. It’s the exhilarating punch of flavor you’ve been craving for!
AngelaSheni
July 2, 2023 at 6:56 AM
http://1812.adminka.cc/
Lavernesem
July 2, 2023 at 7:05 AM
http://xn--90ahaa2bbfel2e.xn--p1ai
Lavernesem
July 2, 2023 at 7:22 AM
http://xn--90ahaa2bbfel2e.xn--p1ai
WillisMet
July 2, 2023 at 7:27 AM
https://teletype.in/@nadjamaslov05/tlmLPZNkeGt
Lindajak
July 2, 2023 at 7:32 AM
http://6917.adminka.cc/
Lindajak
July 2, 2023 at 7:47 AM
http://6917.adminka.cc/
RebeccasUple
July 2, 2023 at 8:07 AM
http://smt-k.ru
RebeccasUple
July 2, 2023 at 8:24 AM
http://smt-k.ru
Shirleyhar
July 2, 2023 at 8:24 AM
http://7039.adminka.cc/
Shirleyhar
July 2, 2023 at 8:39 AM
http://7039.adminka.cc/
zhenkrow
July 2, 2023 at 8:40 AM
На сайте https://takerk.ru вы сможете сыграть в интересные, увлекательные игры, которые позволят еще и немного заработать. Для того чтобы отыскать то, что нужно вам, необходимо воспользоваться специальным фильтром. Просто введите название игры, а затем система сама выдаст подходящее решение. Есть таблица с наименованием игры, фамилией участника, а также ставкой, суммой выигрыша. Вы тоже можете находиться в их числе. Ежедневно получайте бонус 100 рублей, что поможет сделать игру более яркой и разнообразной.
CynthiaWaike
July 2, 2023 at 9:07 AM
http://bygrace.ru
ViolaTic
July 2, 2023 at 9:14 AM
http://4887.adminka.cc/
CynthiaWaike
July 2, 2023 at 9:24 AM
http://bygrace.ru
ViolaTic
July 2, 2023 at 9:29 AM
http://4887.adminka.cc/
ocharpurry
July 2, 2023 at 9:35 AM
На сайте https://108.in.ua/ вы сможете почитать интересные, любопытные новости, которые касаются политики, экономики. Все они свежие, произошли только недавно, а потому будут интересны всем, кто переживает за свою страну. Городской аналитический портал поможет узнать все, что нужно, чтобы быть в курсе последних изменений. Имеются новости туризма, о науке, технологиях, аналитические данные. Все данные брались из проверенных и достоверных источников. Читайте публикации и добавляйте в закладки.
DianeHodia
July 2, 2023 at 10:04 AM
http://4717.adminka.cc/
Juliepap
July 2, 2023 at 10:08 AM
https://ns-pro.ru/
natoliBourf
July 2, 2023 at 10:16 AM
На сайте https://ruchkin.ru/ вы сможете заказать производство сувенирной продукции – шариковых ручек с логотипом. Вся продукция выглядит презентабельной, она качественная и не утратит своего внешнего вида. На каждом этапе производства контроль качества продукции. Это позволяет исключить возможность получения брака. Если появились вопросы, то задайте их службе поддержки, где вам ответят на них, помогут разрешить ситуацию. Услуга обойдется недорого. Любой заказ выполняется в минимальные сроки.
6G4bnarbybwtCYJqb17B
July 2, 2023 at 10:17 AM
uSaWcSMBwmaWnLy5PcpY37vP5kQQHqXr9nCHq3OCt5KpeubHNwMo2Y7A4Qm3ixKt10Ua7BqUfuNtoviaciiTqANPQ0oCvmCpTgwGTXNQ5pqYlHxRa9ya9YN1RmRMvo75nqLbHVqIWMGSCwalGyj2dyph0OUPT9WL5oTyvfbWXEs7D3Ow8XwcFiW9xBlo
DianeHodia
July 2, 2023 at 10:19 AM
http://4717.adminka.cc/
Juliepap
July 2, 2023 at 10:24 AM
https://ns-pro.ru/
Hazelvep
July 2, 2023 at 11:08 AM
http://www.baltika-brew.ru/
Janineemusa
July 2, 2023 at 11:09 AM
http://9105.adminka.cc/
Hazelvep
July 2, 2023 at 11:25 AM
http://www.baltika-brew.ru/
DebraAbale
July 2, 2023 at 11:45 AM
http://4700.adminka.cc/
DebraAbale
July 2, 2023 at 12:00 PM
http://4700.adminka.cc/
CaroleFoess
July 2, 2023 at 12:08 PM
http://jewel-sapphire.ru
dorofVuh
July 2, 2023 at 12:09 PM
On the site https://costaprestige.com/ you will be able to get acquainted with the exclusive real estate, which is located on the Costa del Sol. The competent staff of the agency will select exquisite villas, townhouses, penthouses, real estate near the first line of the sea especially for you. Specially for you, they will choose a solution for every taste and taking into account your financial situation. The catalog contains housing from the developer, as well as secondary real estate. All of them have an attractive price when compared with apartments in other countries.
CaroleFoess
July 2, 2023 at 12:24 PM
http://jewel-sapphire.ru
Rubyeget
July 2, 2023 at 12:35 PM
http://5922.adminka.cc/
Rubyeget
July 2, 2023 at 12:49 PM
http://5922.adminka.cc/
Latishadek
July 2, 2023 at 1:07 PM
http://aldplay.ru
Latishadek
July 2, 2023 at 1:24 PM
http://aldplay.ru
Barbaratep
July 2, 2023 at 1:24 PM
http://1715.adminka.cc/
Barbaratep
July 2, 2023 at 1:39 PM
http://1715.adminka.cc/
JoanneCen
July 2, 2023 at 2:07 PM
http://wminternet.ru
novallet
July 2, 2023 at 2:13 PM
Агентство по созданию веб сайтов в Астане https://bright.kz/ предлагает разработку сайтов от самых простых вариантов до крутых интернет проектов. Также студия оказывает услуги технической поддержки, SEO оптимизации, SMM продвижения. Ознакомьтесь с портфолио работ. Команда профессионалов всегда к вашим услугам.
PhyllisRoaro
July 2, 2023 at 2:14 PM
http://5390.adminka.cc/
JoanneCen
July 2, 2023 at 2:23 PM
http://wminternet.ru
PhyllisRoaro
July 2, 2023 at 2:28 PM
http://5390.adminka.cc/
nikitiCar
July 2, 2023 at 2:48 PM
Компания https://en-mach.ru/ поставляет кольца поршневые по ГОСТу 9515-81, маслосъемные, поршневые, уплотнительные из чугуна и фторопласта Ф4, а также можно купить и заказать запчасти для цилиндра поршневого, поршень, шатун, сальник, клапан пик, мембрана, лубрикатор, крейцкопф компрессора 4ВМ, 305ВП, КТ6, 4ВУ, АВШ, П-110, ВП,3ГП от производителя ПКП ЭНМАШ. Вы сможете купить от производителя запасные части к насосам 2НСГ, обозначением КК (АК).
Janisawait
July 2, 2023 at 3:04 PM
http://8820.adminka.cc/
DorothyDuH
July 2, 2023 at 3:06 PM
http://www.shirokoformatnye-oboi.ru/
Janisawait
July 2, 2023 at 3:19 PM
http://8820.adminka.cc/
DorothyDuH
July 2, 2023 at 3:22 PM
http://www.shirokoformatnye-oboi.ru/
Jannagot
July 2, 2023 at 3:54 PM
http://3569.adminka.cc/
MaggieDit
July 2, 2023 at 4:05 PM
http://putit.ru
Jannagot
July 2, 2023 at 4:09 PM
http://3569.adminka.cc/
MaggieDit
July 2, 2023 at 4:21 PM
http://putit.ru
NancyPhots
July 2, 2023 at 4:44 PM
http://1155.adminka.cc/
NancyPhots
July 2, 2023 at 4:58 PM
http://1155.adminka.cc/
Carolspelo
July 2, 2023 at 5:04 PM
http://roman-grigoriev.ru
Carolspelo
July 2, 2023 at 5:20 PM
http://roman-grigoriev.ru
Lianamousy
July 2, 2023 at 5:34 PM
http://5652.adminka.cc/
Lianamousy
July 2, 2023 at 5:49 PM
http://5652.adminka.cc/
оздс купить
July 2, 2023 at 5:56 PM
Мне понравилась систематическая структура статьи, которая позволяет читателю легко следовать логике изложения.
DorothyCeafe
July 2, 2023 at 6:03 PM
http://www.armatone.ru/
DorothyCeafe
July 2, 2023 at 6:19 PM
http://www.armatone.ru/
SusanDrida
July 2, 2023 at 6:24 PM
http://6313.adminka.cc/
SusanDrida
July 2, 2023 at 6:39 PM
http://6313.adminka.cc/
rezhadox
July 2, 2023 at 6:45 PM
На сайте http://flashner.ru/ закажите брендированные пластиковые, металлические флешки, а также внешние аккумуляторы. Обязательно ознакомьтесь с топом продаж – товарами, которые пользуются особой популярностью среди покупателей. Рекламная продукция создается максимально оперативно и в соответствии с самыми жесткими требованиями. Именно поэтому в качестве можете не сомневаться. Поставки продукции напрямую, что позволяет избежать наценок. Оперативная доставка в любой регион. Качество товара проверяется на каждом этапе производства.
Xiomarahom
July 2, 2023 at 7:02 PM
http://budem-krasivy.ru
YolandaIsObe
July 2, 2023 at 7:14 PM
http://5757.adminka.cc/
Xiomarahom
July 2, 2023 at 7:19 PM
http://budem-krasivy.ru
YolandaIsObe
July 2, 2023 at 7:28 PM
http://5757.adminka.cc/
mitriysog
July 2, 2023 at 7:32 PM
На сайте https://takerz.ru поиграйте в интересные игры, которые подарят отменное настроение, яркие эмоции. Причем, не обязательно иметь при себе компьютер, потому как заходить на сайт можно с любого устройства, включая мобильный телефон. Испытайте удачу в лучших слотах от проверенных производителей, которые стараются для своих игроков. Возможно, вам больше понравятся Live игры. На сайте представлено огромное количество игр, как для новичков, так и профессионалов. Играйте и выигрывайте крупные суммы!
Joycegen
July 2, 2023 at 8:02 PM
http://moto4ek.ru
Mablepes
July 2, 2023 at 8:03 PM
http://5750.adminka.cc/
Mablepes
July 2, 2023 at 8:17 PM
http://5750.adminka.cc/
Joycegen
July 2, 2023 at 8:18 PM
http://moto4ek.ru
orekhTeamn
July 2, 2023 at 8:53 PM
На сайте https://vkursi.org/ почитайте информацию о спецоперации, последние данные, которые взяты из достоверных источников, поэтому точно будут интересны и вам. Есть информация о потерях со стороны России, Украины. Имеется колонка под названием «Выбор редакции», где находятся наиболее знаменательные события, которые касаются каждого жителя Украины. Есть самые популярные новости, а также свежие, которые опубликованы были не более часа назад. Узнайте полезную информацию о высоких технологиях.
Mariasib
July 2, 2023 at 8:54 PM
http://8008.adminka.cc/
AubreyWag
July 2, 2023 at 9:02 PM
http://sale585.ru
Mariasib
July 2, 2023 at 9:08 PM
http://8008.adminka.cc/
AubreyWag
July 2, 2023 at 9:19 PM
http://sale585.ru
Denisejah
July 2, 2023 at 9:45 PM
http://6456.adminka.cc/
Denisejah
July 2, 2023 at 9:59 PM
http://6456.adminka.cc/
RosettaEmivy
July 2, 2023 at 10:02 PM
http://krasnogorskie.ru
RosettaEmivy
July 2, 2023 at 10:19 PM
http://krasnogorskie.ru
Nicolenuamp
July 2, 2023 at 10:36 PM
http://7950.adminka.cc/
Nicolenuamp
July 2, 2023 at 10:51 PM
http://7950.adminka.cc/
Judithassef
July 2, 2023 at 11:02 PM
http://www.arenda-dizel-generatora.ru/
Judithassef
July 2, 2023 at 11:19 PM
http://www.arenda-dizel-generatora.ru/
LaurieGreek
July 2, 2023 at 11:27 PM
http://7055.adminka.cc/
LaurieGreek
July 2, 2023 at 11:41 PM
http://7055.adminka.cc/
WillisMet
July 2, 2023 at 11:56 PM
https://teletype.in/@kinglaura06/hCZQqWZajK7
Barbaraalcot
July 3, 2023 at 12:03 AM
http://web-select.ru
Barbaraalcot
July 3, 2023 at 12:20 AM
http://web-select.ru
Elviravarce
July 3, 2023 at 12:20 AM
http://9167.adminka.cc/
anokhgag
July 3, 2023 at 12:24 AM
На сайте http://moy-dompersonal.ru/ вам помогут подобрать домашний персонал всего за один день. Все сотрудники компетентные, квалифицированные, а потому с легкостью справятся даже с самой сложной задачей, которая требует усидчивости, определенных знаний. А если специалист вам не подошел, то будет произведена замена. В компании работает несколько сотен нянь, домработницы, сиделки, садовники, ответственные водители. Теперь нет необходимости искать специалиста по знакомым, ведь все, кто вам нужен, уже здесь.
Elviravarce
July 3, 2023 at 12:35 AM
http://9167.adminka.cc/
rokhoskand
July 3, 2023 at 12:40 AM
On the site https://dogsdiseases.com/ you will receive Understanding common dog diseases is crucial for promoting the well-being of our canine companions. Regular veterinary check-ups, appropriate vaccinations, preventive measures, such as tick control and parasite prevention, and a healthy diet are key to keeping our dogs safe and healthy. By staying informed and taking proactive steps, we can minimize the risks and ensure our dogs lead happy and disease-free lives.
WillisMet
July 3, 2023 at 12:49 AM
https://teletype.in/@makskrylov77/jgIVwoTFl_I
WillisMet
July 3, 2023 at 12:57 AM
https://teletype.in/@jakovlev1965/oR_boO6EmJt
Marthaneore
July 3, 2023 at 1:04 AM
http://www.rusloshadi.ru/
CherylDargy
July 3, 2023 at 1:13 AM
http://6910.adminka.cc/
Marthaneore
July 3, 2023 at 1:21 AM
http://www.rusloshadi.ru/
CherylDargy
July 3, 2023 at 1:29 AM
http://6910.adminka.cc/
CarolynTes
July 3, 2023 at 2:07 AM
http://9921.adminka.cc/
Ethelcon
July 3, 2023 at 2:08 AM
http://dstmarket.ru
CarolynTes
July 3, 2023 at 2:22 AM
http://9921.adminka.cc/
Ethelcon
July 3, 2023 at 2:25 AM
http://dstmarket.ru
ochkaTup
July 3, 2023 at 2:58 AM
На сайте https://poisk-pro.ru/ вы сможете быстро найти исполнителей без посредников для выполнения различных задач, таких как ремонт и строительство, транспортные услуги, ремонт техники, дизайн и проектирование, уборка помещений, клининг и многое другое. Биржа профессионалов всегда к вашим услугам – просто добавьте заявку и на нее откликнуться исполнители.
Roberttotly
July 3, 2023 at 2:59 AM
Indulge in the ultimate best VELO Freeze experience with our premium collection of flavors!
Kelleyvof
July 3, 2023 at 3:01 AM
http://5200.adminka.cc/
Brandydon
July 3, 2023 at 3:11 AM
http://altzodchestvo.ru
yuyevGew
July 3, 2023 at 3:15 AM
На сайте https://usinsk1.ru/ почитайте интересные, актуальные новости Усинска. На этом портале вы узнаете только новые, свежие данные, которые будут интересны всем жителям этого города. Есть колонка, в которой обсуждается материал на тему машин. Имеется рубрика «Интересные статьи», которые касаются туристической тематики, где оставляют свое мнение те, кто слетали в различные страны. На портале имеются и интересные, любопытные статьи на различную тему: еда, животные, разное, техника, имущество.
Kelleyvof
July 3, 2023 at 3:16 AM
http://5200.adminka.cc/
Brandydon
July 3, 2023 at 3:27 AM
http://altzodchestvo.ru
Bettyoperi
July 3, 2023 at 3:54 AM
http://6552.adminka.cc/
Bettyoperi
July 3, 2023 at 4:09 AM
http://6552.adminka.cc/
Claratek
July 3, 2023 at 4:12 AM
https://raki-rossii.ru/
Claratek
July 3, 2023 at 4:28 AM
https://raki-rossii.ru/
LindsayPhype
July 3, 2023 at 4:47 AM
http://5137.adminka.cc/
LindsayPhype
July 3, 2023 at 5:02 AM
http://5137.adminka.cc/
Cindyvet
July 3, 2023 at 5:14 AM
https://ticsp.ru/
Cindyvet
July 3, 2023 at 5:30 AM
https://ticsp.ru/
Venitamow
July 3, 2023 at 5:40 AM
http://9604.adminka.cc/
Venitamow
July 3, 2023 at 5:55 AM
http://9604.adminka.cc/
Amandapaync
July 3, 2023 at 6:16 AM
http://avtoklass-22.ru
ocharStise
July 3, 2023 at 6:25 AM
На сайте https://takerj.ru вы найдете огромное количество игр, развлечений на любой вкус. Вы сможете сыграть в различные игры, которыми богат сайт. Здесь есть: Плинко, Блэкджек, слоты, Dice, Mines. Вы сможете заработать на своем увлечении и больше ни в чем не нуждаться. Ежедневно вы будете получать бонусы до 100 рублей. Вы сможете заработать до 15% от депозитов. В таблице указано наименование игры, а также логин, ставка и сумма выигрыша, а потому вы узнаете то, сколько выиграл пользователь.
Amandapaync
July 3, 2023 at 6:32 AM
http://avtoklass-22.ru
Vickycoulk
July 3, 2023 at 6:34 AM
http://2790.adminka.cc/
Vickycoulk
July 3, 2023 at 6:49 AM
http://2790.adminka.cc/
SuzannVocHe
July 3, 2023 at 7:19 AM
https://sweetbabyswim.ru/
BarbaraTog
July 3, 2023 at 7:27 AM
http://5773.adminka.cc/
John#thompson[Riopiscrusystasea,2,5]
July 3, 2023 at 7:32 AM
Discover the remarkable pleasure of the finest Velo nicotine pouch selection we have to offer!
SuzannVocHe
July 3, 2023 at 7:35 AM
https://sweetbabyswim.ru/
BarbaraTog
July 3, 2023 at 7:42 AM
http://5773.adminka.cc/
JamesErard
July 3, 2023 at 7:52 AM
Join the sensation of velo snus lyft and feel the refreshing burst of flavor in every pouch!
rtemnfat
July 3, 2023 at 8:02 AM
На сайте https://play.google.com/store/apps/details?id=com.rectangular.rain сделайте свои ставки в популярной БК «Олимпбет», которая заполучила огромное количество положительных отзывов, постоянных клиентов. Она работает с 2012 года и с того времени предоставляет безупречный уровень сервиса, круглосуточную техническую поддержку. Все положенные средства выплачиваются сразу же и в необходимом объеме. Только что зарегистрированные пользователи смогут рассчитывать на депозит и различные привилегии. БК предлагает огромный выбор развлечений, включая киберспорт, а также различные события.
AngelaLic
July 3, 2023 at 8:20 AM
http://4787.adminka.cc/
Daliaspume
July 3, 2023 at 8:21 AM
https://privlekai777.ru/
AngelaLic
July 3, 2023 at 8:36 AM
http://4787.adminka.cc/
Daliaspume
July 3, 2023 at 8:38 AM
https://privlekai777.ru/
Iraq manufacturer
July 3, 2023 at 9:07 AM
Elitepipe Plastic Factory’s fittings are designed to be user-friendly, facilitating easy installation and ensuring hassle-free maintenance throughout their lifespan. Elitepipe Plastic Factory
CarlaFaple
July 3, 2023 at 9:17 AM
http://2641.adminka.cc/
BaileyTom
July 3, 2023 at 9:24 AM
http://mikstudio.ru
CarlaFaple
July 3, 2023 at 9:32 AM
http://2641.adminka.cc/
BaileyTom
July 3, 2023 at 9:41 AM
http://mikstudio.ru
MistyWreta
July 3, 2023 at 10:10 AM
http://3967.adminka.cc/
MistyWreta
July 3, 2023 at 10:25 AM
http://3967.adminka.cc/
WillisMet
July 3, 2023 at 10:25 AM
https://teletype.in/@lauralopez1961/YALYbWV7ByM
Adellped
July 3, 2023 at 10:28 AM
http://traftip.ru
chanoBioke
July 3, 2023 at 10:37 AM
На сайті https://taxi24.kiev.ua/ ви зможете ознайомитись з послугами, тарифами та вакансіями Таксі24, компанією, яка має власний автопарк та різні тарифи для комфортної поїздки. Також ви зможете замовити кур’єрську доставку та послуги евакуатора.
Adellped
July 3, 2023 at 10:44 AM
http://traftip.ru
Theresamep
July 3, 2023 at 11:03 AM
http://7677.adminka.cc/
Theresamep
July 3, 2023 at 11:18 AM
http://7677.adminka.cc/
JamesRoole
July 3, 2023 at 11:26 AM
Uncover a refreshing new world with VELO Mint Mini – the pocket-sized revolution in nicotine pouches.
TarynFer
July 3, 2023 at 11:31 AM
http://bristol-pub.ru
TarynFer
July 3, 2023 at 11:48 AM
http://bristol-pub.ru
Bessiemum
July 3, 2023 at 11:56 AM
http://2755.adminka.cc/
ndryuDeask
July 3, 2023 at 12:07 PM
На сайте https://pro-parketi.ru/parket-works/vosstanovlenie-remont-parketa/ciklevka-parketa/ заполните форму для того, чтобы воспользоваться такой важной услугой, как циклевка паркета «под ключ». На выполнение всех работ потребуется не более одного дня. На них предоставляются гарантии – 3 года. Услуга оказывается без пыли, мусора, мебель выносится за вас. В работе применяются экологически безопасные материалы, которые не имеют запаха. Каждый клиент сможет рассчитывать на безупречный результат, высококлассный уровень обслуживания.
Adamziz
July 3, 2023 at 12:07 PM
Experience the refreshing and energizing sensation of snus velo mint that is crafted with perfection for your ultimate pleasure!
Bessiemum
July 3, 2023 at 12:11 PM
http://2755.adminka.cc/
James#RandGen[Oalofevibujantewu,2,5]
July 3, 2023 at 12:30 PM
Experience the unmatched refreshing sensation with Get Velo. Embrace the thrilling flavors that give you the ultimate nicotine pouch experience!
StellaWrego
July 3, 2023 at 12:33 PM
http://oko777.ru
ebochwaw
July 3, 2023 at 12:41 PM
На сайте https://sibvitr.ru/ закажите замер мебели для того, чтобы приобрести торговое оборудование, мебель в офис и многое другое для успешного ведения бизнеса. Особенностью компании является то, что замеры, а также дизайн-проект составляются абсолютно бесплатно. На изготовление уходит не более 7 дней, независимо от сложности. На все товары предоставляются гарантии. Мебель производится из качественных, надежных, высокотехнологичных материалов, что позволяет не потерять внешнего вида.
Goldiefer
July 3, 2023 at 12:48 PM
http://8613.adminka.cc/
StellaWrego
July 3, 2023 at 12:49 PM
http://oko777.ru
Goldiefer
July 3, 2023 at 1:02 PM
http://8613.adminka.cc/
SandyprucH
July 3, 2023 at 1:35 PM
http://freeartnsk.ru
RuthieMoics
July 3, 2023 at 1:39 PM
http://3390.adminka.cc/
SandyprucH
July 3, 2023 at 1:51 PM
http://freeartnsk.ru
RuthieMoics
July 3, 2023 at 1:53 PM
http://3390.adminka.cc/
Ameliaorarp
July 3, 2023 at 2:31 PM
http://6562.adminka.cc/
LillianLek
July 3, 2023 at 2:37 PM
http://dneprovsk.ru
Ameliaorarp
July 3, 2023 at 2:45 PM
http://6562.adminka.cc/
LillianLek
July 3, 2023 at 2:52 PM
http://dneprovsk.ru
Stevezix
July 3, 2023 at 2:56 PM
накрутка seo
Susanjex
July 3, 2023 at 3:23 PM
http://2709.adminka.cc/
Susanjex
July 3, 2023 at 3:37 PM
http://2709.adminka.cc/
WandaKap
July 3, 2023 at 3:38 PM
http://elita-int.ru
ezhenDab
July 3, 2023 at 3:45 PM
Школа иностранных языков Центр UP в городе Королёв, это обучение для любого уровня и большое количество различных программ. Есть программы для самых маленьких от трех лет. На сайте https://upcentre.ru/ вы узнаете цены, программы обучения. Возможность заниматься онлайн, различные скидки и акции позволят успешно учить иностранный язык и детям и взрослым.
WandaKap
July 3, 2023 at 3:54 PM
http://elita-int.ru
Joanneexpok
July 3, 2023 at 4:15 PM
http://6794.adminka.cc/
Joanneexpok
July 3, 2023 at 4:29 PM
http://6794.adminka.cc/
Mariekix
July 3, 2023 at 4:39 PM
http://kuzov-kaluga.ru
Mariekix
July 3, 2023 at 4:55 PM
http://kuzov-kaluga.ru
Erikaneamn
July 3, 2023 at 5:06 PM
http://5380.adminka.cc/
udryaJen
July 3, 2023 at 5:12 PM
На сайте https://takert.ru поиграйте в интересные, увлекательные игры, которые точно вам понравятся своей динамичностью и тем, что они быстро принесут победу. Портал предоставляет возможность вывести средства либо пополнить баланс. Он играет на прозрачных условиях, а все выигрыши начисляет честно, что позволяет потратить средства тогда, когда необходимо. Перед вами огромное количество слотов и других игр, которые будут интересны и вам. Заходите сюда почаще, чтобы получить больше приятных эмоций и разнообразить досуг в выходной день.
Erikaneamn
July 3, 2023 at 5:20 PM
http://5380.adminka.cc/
Lorettasoary
July 3, 2023 at 5:40 PM
http://www.allnhatrang.ru/
Lorettasoary
July 3, 2023 at 5:56 PM
http://www.allnhatrang.ru/
EsterNom
July 3, 2023 at 5:57 PM
http://7211.adminka.cc/
EsterNom
July 3, 2023 at 6:11 PM
http://7211.adminka.cc/
Bettyriz
July 3, 2023 at 6:42 PM
http://paralaxnsk.ru
DixieAdvib
July 3, 2023 at 6:50 PM
http://1648.adminka.cc/
Bettyriz
July 3, 2023 at 6:57 PM
http://paralaxnsk.ru
gorovVah
July 3, 2023 at 7:04 PM
На сайте https://play.google.com/store/apps/details?id=com.gameofsort1ng.citychamps вы сможете воспользоваться услугами БК «Liga Stavok». Эта контора существует с 2008 года, работает абсолютно легально, имеет все необходимые сертификаты, документы на осуществление своей деятельности. Отсутствуют какие-либо ограничения. Букмекер обладает отличной репутацией, а потому ему доверяют многие и делают ставки, не опасаясь за свои денежные средства. Большинство отзывов говорит о том, что контора является честной, предлагает прозрачные условия сотрудничества.
DixieAdvib
July 3, 2023 at 7:04 PM
http://1648.adminka.cc/
MelanieCrofs
July 3, 2023 at 7:43 PM
http://3898.adminka.cc/
Helenswest
July 3, 2023 at 7:44 PM
http://ssmp-novoros.ru
MelanieCrofs
July 3, 2023 at 7:57 PM
http://3898.adminka.cc/
Helenswest
July 3, 2023 at 8:00 PM
http://ssmp-novoros.ru
zlobigus
July 3, 2023 at 8:18 PM
Мы предлагаем услугу профессиональной прочистки труб канализации. Наша команда https://xn—-7sbavg6aiesis.xn--p1ai/ состоит из опытных специалистов, которые используют самое современное оборудование и эффективные методики для удаления засоров и устранения проблем. Мы ценим своих клиентов и всегда стремимся предложить оптимальное соотношение цены и качества. Обращайтесь к нам, чтобы получить быстрое и профессиональное решение проблемы с канализацией в Краснодаре!
DeannObesk
July 3, 2023 at 8:36 PM
http://9763.adminka.cc/
AudreyBog
July 3, 2023 at 8:46 PM
http://referent-zar.ru
DeannObesk
July 3, 2023 at 8:50 PM
http://9763.adminka.cc/
hokhlenuch
July 3, 2023 at 9:00 PM
На сайте https://play.google.com/store/apps/details?id=com.rectangular.rain вы сможете сделать ставки, развлечься в БК «Олимпбет», которая предлагает высокий коэффициент на соревнования по таким видам спорта, как: хоккей, футбол, теннис. Кроме того, за регистрацию предлагается бездепозитный фрибет. Вы сможете воспользоваться самыми разными спортивными состязаниями. Все положенные средства выплачиваются моментально. Воспользоваться технической поддержкой можно в любое время, потому как она работает в круглосуточном режиме.
AudreyBog
July 3, 2023 at 9:03 PM
http://referent-zar.ru
Chanaetect
July 3, 2023 at 9:30 PM
http://3379.adminka.cc/
Chanaetect
July 3, 2023 at 9:44 PM
http://3379.adminka.cc/
Suzannewar
July 3, 2023 at 9:50 PM
http://sfygroup.ru
Suzannewar
July 3, 2023 at 10:05 PM
http://sfygroup.ru
RachelBoibe
July 3, 2023 at 10:23 PM
http://5865.adminka.cc/
RachelBoibe
July 3, 2023 at 10:38 PM
http://5865.adminka.cc/
CindyPlerm
July 3, 2023 at 10:52 PM
http://zhiznugra.ru
CindyPlerm
July 3, 2023 at 11:08 PM
http://zhiznugra.ru
PamelaFUM
July 3, 2023 at 11:17 PM
http://9978.adminka.cc/
PamelaFUM
July 3, 2023 at 11:31 PM
http://9978.adminka.cc/
Melissaexcet
July 3, 2023 at 11:55 PM
https://glow-agens.ru/
Melissaexcet
July 4, 2023 at 12:11 AM
https://glow-agens.ru/
DelorisGlure
July 4, 2023 at 12:12 AM
http://9922.adminka.cc/
DelorisGlure
July 4, 2023 at 12:26 AM
http://9922.adminka.cc/
Juliacen
July 4, 2023 at 12:58 AM
http://fs-vozduh.ru
alakhEnaks
July 4, 2023 at 12:59 AM
Если вам интересна тема – Строительство и ремонт дома своими руками, то вам просто необходимо посетить сайт https://stroyka-gid.ru на котором Вы прочтете много познавательных статей о строительных материалах, ремонте, перепланировке, покраске, клейке, укладке и конечно же утеплении.
Susannazoogs
July 4, 2023 at 1:05 AM
http://9752.adminka.cc/
Juliacen
July 4, 2023 at 1:14 AM
http://fs-vozduh.ru
Susannazoogs
July 4, 2023 at 1:20 AM
http://9752.adminka.cc/
Paulinealada
July 4, 2023 at 2:00 AM
http://9163.adminka.cc/
Cynthiapaf
July 4, 2023 at 2:02 AM
http://hd-clip.ru
Paulinealada
July 4, 2023 at 2:15 AM
http://9163.adminka.cc/
Cynthiapaf
July 4, 2023 at 2:18 AM
http://hd-clip.ru
Walterhew
July 4, 2023 at 2:24 AM
Learn more about ice skates for beginners in our comprehensive guide.
Bettyvup
July 4, 2023 at 2:56 AM
http://8815.adminka.cc/
Alicefuh
July 4, 2023 at 3:06 AM
http://lastochkasad.ru
Bettyvup
July 4, 2023 at 3:10 AM
http://8815.adminka.cc/
Alicefuh
July 4, 2023 at 3:22 AM
http://lastochkasad.ru
Kelliquage
July 4, 2023 at 3:51 AM
http://8335.adminka.cc/
panovdew
July 4, 2023 at 4:04 AM
На сайте https://takern.ru представлено огромное количество развлечений на самый притязательный вкус. Можно сыграть в слоты, Dice, Mines, Wheel и многое другое. И самое важное, что вы очень быстро научитесь играть, получите от этого положительные эмоции. Каждый пользователь сможет рассчитывать на ежедневные бонусы, особые привилегии. Ознакомьтесь с таблицей, в которой указан вид игры, сумма выигрыша. Все эти игры представлены и в социальных сетях. Выводите деньги и пополняйте баланс тогда, когда вам удобно.
Kelliquage
July 4, 2023 at 4:05 AM
http://8335.adminka.cc/
RebeccaJam
July 4, 2023 at 4:09 AM
http://faynburg-perm.ru
RebeccaJam
July 4, 2023 at 4:25 AM
http://faynburg-perm.ru
sashuRom
July 4, 2023 at 4:33 AM
Студия растяжки и фитнеса Fresh Stretching в Москве https://freshstretching.ru/ это большое количество направлений, которые подойдут для всех – больше 20 направлений физической активности, которые подойдут людям разной подготовленности и навыков. Уникальные условия посещения – вы можете ходить на тренировки по премиум-абонементу в любой из наших залов, на любые направления. Действуют различные акции и скидки!
Meagantaf
July 4, 2023 at 4:45 AM
http://7735.adminka.cc/
RobertInink
July 4, 2023 at 4:51 AM
Кровля в СПБ http://krovlya-nedorogo.ru
Meagantaf
July 4, 2023 at 5:00 AM
http://7735.adminka.cc/
Pattyhal
July 4, 2023 at 5:12 AM
https://www.lawyer-nsk.ru/
Pattyhal
July 4, 2023 at 5:29 AM
https://www.lawyer-nsk.ru/
AnnieFoems
July 4, 2023 at 5:38 AM
http://7212.adminka.cc/
RobertInink
July 4, 2023 at 5:50 AM
Все о ремноте http://chestnyj-remont.ru
AnnieFoems
July 4, 2023 at 5:53 AM
http://7212.adminka.cc/
ikitkaken
July 4, 2023 at 5:55 AM
На сайте https://play.google.com/store/apps/details?id=com.gameofsort1ng.citychamps вы сможете сделать ставки в БК «Лига Ставок», где предлагается огромный выбор самых разных развлечений на любой вкус. Для того чтобы заинтересовать гемблера, используется приветственный бонус, а также эксклюзивные пари, огромная линия. Вы сможете выбрать большое количество способов оплаты. Все положенные средства выплачиваются сразу, без задержек. Эта БК является одной из самых популярных, а потому в надежности не приходится сомневаться.
evgenNor
July 4, 2023 at 6:11 AM
Мы поможем стать независимыми в финансовом плане. Познакомим на сайте https://pro100boss.ru/ с основами, приемами и уроками, которые сделали успешных людей – успешными. Вы найдете статьи по разным видам заработка, электронные книги, написанные известными авторами, примеры бизнес – планов и полезную информацию, связанную с финансами. Мы гарантируем, что сайт не предлагает участия в пирамидных схемах или продажу платных курсов по успешному заработку. Мы предоставляем только проверенные источники информации о различных способах заработка, которые помогут достичь финансовой независимости. Материалы основаны на реальном опыте успешных людей, а также на актуальных тенденциях рынка. Посетите сайт, чтобы получить доступ к качественной информации о заработке!
KellyJek
July 4, 2023 at 6:16 AM
http://3dxopen.ru
hdanoEmoda
July 4, 2023 at 6:20 AM
На сайте https://avtoskypka.com.ua/ оформите заявку для того, чтобы воспользоваться такой услугой, как автовыкуп. Причем рассматриваются автомобили различных моделей и года выпуска. Они выкупаются по рыночной стоимости и очень оперативно, что позволяет получить средства быстро, в полном объеме. Сделка заключается на прозрачных условиях, юридически грамотно и без обмана. К важным преимуществам компании относят то, что оплата поступает таким способом, как вам удобно. Оценка состояния автомобиля по фото в режиме онлайн.
HazelMus
July 4, 2023 at 6:31 AM
http://7113.adminka.cc/
KellyJek
July 4, 2023 at 6:31 AM
http://3dxopen.ru
HazelMus
July 4, 2023 at 6:46 AM
http://7113.adminka.cc/
RobertInink
July 4, 2023 at 6:54 AM
Колл-центр Картли http://cartli.ru
Nicholemenry
July 4, 2023 at 7:19 AM
http://www.vostok-amfiby.ru/
Connieastet
July 4, 2023 at 7:24 AM
http://6612.adminka.cc/
Nicholemenry
July 4, 2023 at 7:35 AM
http://www.vostok-amfiby.ru/
Connieastet
July 4, 2023 at 7:39 AM
http://6612.adminka.cc/
Jeffreybow
July 4, 2023 at 7:50 AM
отчет по производственной практике
Stevenmen
July 4, 2023 at 7:54 AM
Привет! Я недавно открыл для себя Cat Casino и не могу нарадоваться! Официальный сайт Cat Casino просто великолепен – он яркий, стильный и удобный для навигации. Регистрация Кэт Казино заняла всего несколько минут, и теперь я могу наслаждаться широким выбором игр и увлекательными бонусами. Я также использовал зеркало Cat Casino, чтобы быстро попасть на сайт. Вход в Cat Casino очень простой, и я уже с нетерпением жду новых приключений!
Stevenmen
July 4, 2023 at 8:00 AM
Если вы ищете надежное и безопасное онлайн-казино, я настоятельно рекомендую Cat Casino! Процесс регистрации в Cat Casino был простым и удобным. Я посетил официальный сайт Cat Casino и был приятно удивлен понятным интерфейсом и быстрой регистрацией Cat Casino. Теперь у меня есть доступ к захватывающим играм и щедрым бонусам. Присоединяйтесь к Кэт Казино и получите неповторимый игровой опыт!
LeslieViort
July 4, 2023 at 8:18 AM
http://6058.adminka.cc/
ElviaGap
July 4, 2023 at 8:23 AM
http://www.province-nn.ru/
LeslieViort
July 4, 2023 at 8:32 AM
http://6058.adminka.cc/
ElviaGap
July 4, 2023 at 8:38 AM
http://www.province-nn.ru/
Jeffreybow
July 4, 2023 at 8:48 AM
решение задач по теоретической механике
Jeffreybow
July 4, 2023 at 8:58 AM
работа репетитором онлайн вакансии
Stevenmen
July 4, 2023 at 8:58 AM
Cat Casino – это настоящая находка для любителей азартных игр! После регистрации в Cat Casino я получил доступ к невероятному выбору игр и возможности выиграть крупные джекпоты. Официальный сайт Cat Casino предлагает удобный вход в аккаунт и безопасные платежные методы. Я также оценил наличие зеркала Cat Casino, что позволяет мне легко и быстро получить доступ к играм. Cat Casino – это место, где я могу испытать настоящий азарт и наслаждаться безупречным игровым опытом.
Больше на сайте https://lin67.ru/
Alicesputs
July 4, 2023 at 9:11 AM
http://5608.adminka.cc/
Jeffreybow
July 4, 2023 at 9:19 AM
курсовая работа по физической культуре
Alicesputs
July 4, 2023 at 9:25 AM
http://5608.adminka.cc/
LauraOpino
July 4, 2023 at 9:26 AM
http://www.volga-remont.ru/
LauraOpino
July 4, 2023 at 9:42 AM
http://www.volga-remont.ru/
Pamelaboymn
July 4, 2023 at 10:05 AM
http://5464.adminka.cc/
Jeffreybow
July 4, 2023 at 10:10 AM
отчет по производственной практике в суде
Pamelaboymn
July 4, 2023 at 10:20 AM
http://5464.adminka.cc/
Jeffreybow
July 4, 2023 at 10:22 AM
эссе по экономике
LynneMulty
July 4, 2023 at 10:29 AM
http://ya-sportsmen.ru
WilliamGaist
July 4, 2023 at 10:44 AM
Revel in the breathtaking Velo Snus Lyft experience and let our wide array of flavors uplift your spirits!
LynneMulty
July 4, 2023 at 10:45 AM
http://ya-sportsmen.ru
CarlosKix
July 4, 2023 at 10:52 AM
seo оптимизация сайтов
CarlosKix
July 4, 2023 at 10:58 AM
сколько стоит продвижение сайта
Bettyflose
July 4, 2023 at 10:59 AM
http://5246.adminka.cc/
Jeffreybow
July 4, 2023 at 10:59 AM
купить статью
Bettyflose
July 4, 2023 at 11:13 AM
http://5246.adminka.cc/
Jeffreybow
July 4, 2023 at 11:27 AM
курсовая работа по экономике
Estherenvex
July 4, 2023 at 11:33 AM
http://www.alsidom.ru/
Estherenvex
July 4, 2023 at 11:48 AM
http://www.alsidom.ru/
AnitaMit
July 4, 2023 at 11:51 AM
http://4888.adminka.cc/
CarlosKix
July 4, 2023 at 11:58 AM
продвижение сайтов и раскрутка сайтов
AnitaMit
July 4, 2023 at 12:06 PM
http://4888.adminka.cc/
DellaObeno
July 4, 2023 at 12:36 PM
http://tour174.ru
CarlosKix
July 4, 2023 at 12:38 PM
вывод в топ 10
PhyllisZep
July 4, 2023 at 12:44 PM
http://4795.adminka.cc/
DellaObeno
July 4, 2023 at 12:51 PM
http://tour174.ru
PhyllisZep
July 4, 2023 at 12:58 PM
http://4795.adminka.cc/
oriskUrige
July 4, 2023 at 1:15 PM
На сайте https://oblok.ru ознакомьтесь с интересной, полезной информацией, которая посвящена дате выхода фильма, смартфона, аниме, сериала либо ожидаемых новостей. Имеются интересные данные, которые касаются высоких технологий. Вы узнаете много нового из этой сферы. Регулярно появляются сведения на разную тему, которые необходимо почитать и вам. Все статьи написаны компетентными специалистами, которые хорошо разбираются в данной теме. Вот почему не стоит сомневаться в достоверности сведений.
VerdieKnope
July 4, 2023 at 1:39 PM
http://4431.adminka.cc/
AndreaCepsy
July 4, 2023 at 1:42 PM
http://vopros-krasnoyarsk.ru
VerdieKnope
July 4, 2023 at 1:54 PM
http://4431.adminka.cc/
AndreaCepsy
July 4, 2023 at 1:58 PM
http://vopros-krasnoyarsk.ru
Nellyinfex
July 4, 2023 at 2:32 PM
http://4357.adminka.cc/
EleanorJal
July 4, 2023 at 2:44 PM
http://www.kdcmotoviliha.ru/
Nellyinfex
July 4, 2023 at 2:47 PM
http://4357.adminka.cc/
tkacheSeent
July 4, 2023 at 2:53 PM
На сайте https://takerh.ru представлено огромное количество интересных игр, слотов, в которые можно сыграть в любое время, в том числе, после работы, в перерыве между учебой. Это ваш реальный шанс заработать столько денег, сколько хочется. Сумма выигрыша ограничивается только вашим временем. Выводить деньги либо пополнять баланс можно даже ночью. Посмотрите на тех счастливчиков, которые уже выиграли немалую сумму. Теперь этот сайт есть и в социальных сетях. Получайте бонусы ежедневно до 100 рублей.
nikitVes
July 4, 2023 at 2:53 PM
На сайте https://kasla.ru/ вы сможете приобрести телефоны, смартфоны, различную электронику, функциональные гаджеты и многое другое. Кроме того, можно заказать бюджетный смартфон с большим количеством функций. Весь товар оригинальный, отличается надежностью, на него есть сопроводительная документация. У вас получится приобрести все, что необходимо и с оперативной доставкой. Перед вами огромный выбор вариантов гаджетов, включая тонкие, с креативным и привлекательным дизайном, с металлическим корпусом.
EleanorJal
July 4, 2023 at 2:59 PM
http://www.kdcmotoviliha.ru/
FarahFrure
July 4, 2023 at 3:25 PM
http://4229.adminka.cc/
FarahFrure
July 4, 2023 at 3:38 PM
http://4229.adminka.cc/
Teresaaftet
July 4, 2023 at 3:46 PM
http://semenovskij.ru
romocDap
July 4, 2023 at 3:56 PM
На сайте https://tcredit.kz/ вы сможете получить кредит под залог автомобиля, ознакомиться с требованиями для оформления микрокредита, а также воспользоваться калькулятором по расчету займа. От подачи заявки до выдачи денег всего 1 час – онлайн-одобрение заемщика, автомобиль остается у вас, а страхование будет включено в стоимость кредита.
Teresaaftet
July 4, 2023 at 4:02 PM
http://semenovskij.ru
SarahExcam
July 4, 2023 at 4:16 PM
http://4227.adminka.cc/
SarahExcam
July 4, 2023 at 4:30 PM
http://4227.adminka.cc/
Lindseypef
July 4, 2023 at 4:48 PM
http://a-shtoria.ru
Lindseypef
July 4, 2023 at 5:04 PM
http://a-shtoria.ru
tveyksed
July 4, 2023 at 5:05 PM
На сайте https://vpogode.com/ вы сможете узнать точный прогноз погоды в своем городе или регионе на сегодня, 3 дня и 7 дней. Карта данных погоды и погода по городам России. Быстрое обновление информации для точного прогноза, легкий поиск города, погода на курортах. Добавьте сайт в избранное для актуальной информации о погоде в вашем городе.
CarolynLiz
July 4, 2023 at 5:07 PM
http://4180.adminka.cc/
CarolynLiz
July 4, 2023 at 5:22 PM
http://4180.adminka.cc/
cherephisa
July 4, 2023 at 5:25 PM
На сайте https://avto-vykup.com.ua/ вы сможете оперативно рассчитать то, во сколько вам обойдется выкуп автомобиля. В этой компании самые быстрые выплаты, а деньги выдаются сразу же после совершения сделки, а потому вам не придется долго ждать. Каждому клиенту доступен срочный выкуп. Сотрудники компании быстро и профессионально проконсультируют, выкупят автомобиль по максимально выгодной для вас стоимости. Для того чтобы начать сотрудничество, необходимо просто оформить заявку на сайте.
Carolerolo
July 4, 2023 at 5:50 PM
http://primetender.ru
Janicewah
July 4, 2023 at 6:00 PM
http://3861.adminka.cc/
Carolerolo
July 4, 2023 at 6:06 PM
http://primetender.ru
Janicewah
July 4, 2023 at 6:14 PM
http://3861.adminka.cc/
Roxannearout
July 4, 2023 at 6:52 PM
http://3331.adminka.cc/
Emilywar
July 4, 2023 at 6:53 PM
http://istoricheskaya-spravedlivost-express.ru
Roxannearout
July 4, 2023 at 7:06 PM
http://3331.adminka.cc/
Emilywar
July 4, 2023 at 7:09 PM
http://istoricheskaya-spravedlivost-express.ru
TammyTub
July 4, 2023 at 7:44 PM
http://2880.adminka.cc/
Connieadete
July 4, 2023 at 7:56 PM
http://cdtpyt.ru
TammyTub
July 4, 2023 at 7:58 PM
http://2880.adminka.cc/
Connieadete
July 4, 2023 at 8:12 PM
http://cdtpyt.ru
DeannaPainy
July 4, 2023 at 8:35 PM
http://2235.adminka.cc/
DeannaPainy
July 4, 2023 at 8:50 PM
http://2235.adminka.cc/
NellieJes
July 4, 2023 at 8:59 PM
http://www.zmkk.ru/
NellieJes
July 4, 2023 at 9:14 PM
http://www.zmkk.ru/
Violaquorn
July 4, 2023 at 9:28 PM
http://2217.adminka.cc/
Violaquorn
July 4, 2023 at 9:43 PM
http://2217.adminka.cc/
Tamaracappy
July 4, 2023 at 10:02 PM
http://whatsupdog.ru
Jeffreybow
July 4, 2023 at 10:17 PM
решение прямой геодезической задачи
Tamaracappy
July 4, 2023 at 10:18 PM
http://whatsupdog.ru
LeslieWet
July 4, 2023 at 10:22 PM
http://2054.adminka.cc/
LeslieWet
July 4, 2023 at 10:36 PM
http://2054.adminka.cc/
BelindaMuh
July 4, 2023 at 11:06 PM
https://bydu.ru/
Jeffreybow
July 4, 2023 at 11:13 PM
решение генетических задач
Carolhig
July 4, 2023 at 11:14 PM
http://1624.adminka.cc/
BelindaMuh
July 4, 2023 at 11:22 PM
https://bydu.ru/
Jeffreybow
July 4, 2023 at 11:22 PM
курсовая работа
Carolhig
July 4, 2023 at 11:29 PM
http://1624.adminka.cc/
Jeffreybow
July 4, 2023 at 11:42 PM
решение задач на сплавы
LynetteQuoni
July 5, 2023 at 12:08 AM
http://1556.adminka.cc/
HeleneTon
July 5, 2023 at 12:09 AM
https://makarenkodom.ru/
LynetteQuoni
July 5, 2023 at 12:22 AM
http://1556.adminka.cc/
HeleneTon
July 5, 2023 at 12:25 AM
https://makarenkodom.ru/
Jeffreybow
July 5, 2023 at 12:32 AM
готовые дипломные работы
KishaRette
July 5, 2023 at 1:02 AM
http://1465.adminka.cc/
Donnasmoto
July 5, 2023 at 1:14 AM
http://makesrub.ru
KishaRette
July 5, 2023 at 1:16 AM
http://1465.adminka.cc/
vaviloHen
July 5, 2023 at 1:16 AM
По ссылке https://aovniis.ru/uchebnyj-centr-vniis/programmy-obucheniya/podgotovka-ehkspertov-po-sistemam-menedzhmenta-smk/ оформите заявку для того, чтобы подготовить специалистов в системе менеджмента. Это происходит в рамках программы дополнительного образования и применяется для повышения квалификации. Обучающий курс поможет получить необходимые знания, повысить осведомленность в этом вопросе. Все преподаватели – высококлассные специалисты, которые объяснят материал доступным языком.
ФСС личный кабинет через Госуслуги
July 5, 2023 at 1:30 AM
https://govinsurance.ru/ Больничный через ФСС личный кабинет.
Donnasmoto
July 5, 2023 at 1:31 AM
http://makesrub.ru
leonidop
July 5, 2023 at 1:36 AM
На сайте https://marketing-journal.ru/ вы сможете узнать что такое маркетинг, маркетинговые технологии, маркетинг в социальных сетях, мобильный маркетинг, В2В маркетинг, дизайн маркетинг и множество других видов. Почитать статьи экспертов, обзоры и аналитику.
odionLoamb
July 5, 2023 at 1:36 AM
На сайте https://takerd.ru вы сможете поиграть в интересные игры, сделать ставки и заработать до 15% от депозита рефералов. Ежедневно получайте бонусы до 100 рублей. Перед вами самый большой выбор развлечений на любой вкус. Здесь найдет для себя досуг как новичок, так и профессионал, который стремится получить большую прибыль. Имеется раздел с турнирами, бонусами. Обязательно попробуйте себя в топовых слотах и Live-играх. Ежедневно появляются новые пользователи, которые тоже хотят попытать свои силы.
Fatimacix
July 5, 2023 at 1:55 AM
http://1345.adminka.cc/
Fatimacix
July 5, 2023 at 2:10 AM
http://1345.adminka.cc/
Solangefum
July 5, 2023 at 2:18 AM
http://gascomlpg.ru
Solangefum
July 5, 2023 at 2:35 AM
http://gascomlpg.ru
MarilynHew
July 5, 2023 at 2:49 AM
http://1234.adminka.cc/
MarilynHew
July 5, 2023 at 3:04 AM
http://1234.adminka.cc/
CynthiaOrigh
July 5, 2023 at 3:22 AM
http://pitstop-cafe.ru
CynthiaOrigh
July 5, 2023 at 3:39 AM
http://pitstop-cafe.ru
Thelmatoido
July 5, 2023 at 3:43 AM
http://1151.adminka.cc/
Thelmatoido
July 5, 2023 at 3:57 AM
http://1151.adminka.cc/
Evelynher
July 5, 2023 at 4:26 AM
https://region43komplekt.ru/
ikitkasor
July 5, 2023 at 4:35 AM
На сайте https://practicalforex.ru/ вы сможете почитать интересную, актуальную информацию о лучших брокерах, есть содержательные и честные обзоры компаний, которые предоставляют качественные услуги на высоком уровне, не обманывают своих клиентов. Также имеются полезные и информативные статьи на заданную тематику. Вы узнаете о том, как вернуть средства у брокера, который оказался мошенником. Обязательно загляните в колонку с последними статьями. Они ответят на многочисленные вопросы.
Vanessalax
July 5, 2023 at 4:38 AM
http://1114.adminka.cc/
Evelynher
July 5, 2023 at 4:43 AM
https://region43komplekt.ru/
GregoryLaume
July 5, 2023 at 4:46 AM
чертежи в автокаде
Vanessalax
July 5, 2023 at 4:53 AM
http://1114.adminka.cc/
GregoryLaume
July 5, 2023 at 4:54 AM
презентация к курсовой работе
nadiyVes
July 5, 2023 at 5:21 AM
На сайте интернет магазин чая и кофе https://bolshecoffee.ru/ вы сможете купить оптом и в розницу, с доставкой по Санкт-Петербургу и всей России, отборные сорта кофе и чая, гаджеты для заваривания, посуду и мерч. Все товары в наличии. Можно ознакомиться с адресами кофеен, а также узнать о школе бариста и его образовательными программами с ценами на обучение.
Joycenot
July 5, 2023 at 5:31 AM
http://zoloto-turkestana.ru
Melanietam
July 5, 2023 at 5:33 AM
http://1047.adminka.cc/
Melanietam
July 5, 2023 at 5:47 AM
http://1047.adminka.cc/
Joycenot
July 5, 2023 at 5:47 AM
http://zoloto-turkestana.ru
GregoryLaume
July 5, 2023 at 6:17 AM
копирайтер без опыта вакансии
LynetteQuoni
July 5, 2023 at 6:27 AM
http://6946.adminka.cc/
LindaWes
July 5, 2023 at 6:35 AM
http://comply-foam.ru
LynetteQuoni
July 5, 2023 at 6:42 AM
http://6946.adminka.cc/
LindaWes
July 5, 2023 at 6:52 AM
http://comply-foam.ru
GregoryLaume
July 5, 2023 at 7:13 AM
реферат по философии
Juliamub
July 5, 2023 at 7:22 AM
порно фильмы с русским переводом
http://www.bylki.info
Juliamub
July 5, 2023 at 7:36 AM
порно куколд
http://www.bylki.info
Deloresfaf
July 5, 2023 at 7:40 AM
http://corpidealwives.ru
GregoryLaume
July 5, 2023 at 7:53 AM
рецензия на статью
Deloresfaf
July 5, 2023 at 7:57 AM
http://corpidealwives.ru
https://webref.ru/course/style-button
July 5, 2023 at 8:01 AM
Автор старается представить материал нейтрально, оставляя пространство для собственного рассмотрения и анализа.
Juliamub
July 5, 2023 at 8:16 AM
смотреть порно ролики
http://www.bylki.net
GregoryLaume
July 5, 2023 at 8:17 AM
решение задач по технической механике
Juliamub
July 5, 2023 at 8:30 AM
дав порно
http://www.bylki.net
RamonaLox
July 5, 2023 at 8:45 AM
https://www.uralstroyinvestperm.ru/
RamonaLox
July 5, 2023 at 9:02 AM
https://www.uralstroyinvestperm.ru/
Juliamub
July 5, 2023 at 9:08 AM
порно видео девушек
http://www.bylki.online
Juliamub
July 5, 2023 at 9:23 AM
порно пышки
KatrinaSmoli
July 5, 2023 at 9:51 AM
https://absolut-agency.ru/
GregoryLaume
July 5, 2023 at 9:53 AM
решение экономических задач
Juliamub
July 5, 2023 at 10:02 AM
порно время
http://www.bylki.org
KatrinaSmoli
July 5, 2023 at 10:08 AM
https://absolut-agency.ru/
Juliamub
July 5, 2023 at 10:16 AM
русские порно актрисы
http://www.bylki.org
Juliamub
July 5, 2023 at 10:54 AM
порно семейных пар парами
http://www.bylki.video
MarciaBit
July 5, 2023 at 10:56 AM
https://panda-robots.ru/
Juliamub
July 5, 2023 at 11:08 AM
русское порно скачать бесплатно
MarciaBit
July 5, 2023 at 11:13 AM
https://panda-robots.ru/
GregoryLaume
July 5, 2023 at 11:28 AM
создание презентаций на заказ
GregoryLaume
July 5, 2023 at 11:30 AM
переводить тексты за деньги
GregoryLaume
July 5, 2023 at 11:34 AM
доклад по экономике
Juliamub
July 5, 2023 at 11:47 AM
порно копилка
Crystalaledy
July 5, 2023 at 12:01 PM
https://sandmade.ru/
Juliamub
July 5, 2023 at 12:02 PM
порно онлайн бесплатно без
https://www.pornodrive.cc
Crystalaledy
July 5, 2023 at 12:18 PM
https://sandmade.ru/
nosovslend
July 5, 2023 at 12:18 PM
На сайте https://takerc.ru вы найдете развлечения на самый взыскательный вкус и с учетом предпочтений. Вы сможете получить бонусы, рассчитывать на особые условия по реферальной программе. Представлены топовые слоты от лучших провайдеров, что позволит моментально получить средства и вывести их. Портал работает честно, открыто, а потому предоставляет возможность заработать столько, сколько хочется. Получайте ежедневно бонусы до 100 рублей. Перед вами те игроки, которые сделали ставку и смогли выиграть приличную сумму.
Juliamub
July 5, 2023 at 12:40 PM
порно знаменитостей
https://www.pornodrive.org
Juliamub
July 5, 2023 at 12:54 PM
русские жены порно
https://www.pornodrive.org
CaroloNtor
July 5, 2023 at 1:06 PM
http://www.teplo67.ru/
https://artmoskovia.ru/
July 5, 2023 at 1:11 PM
Автор старается сохранить нейтральность и обеспечить читателей информацией для самостоятельного принятия решений.
yushaFloth
July 5, 2023 at 1:19 PM
На сайте https://otdykh-u-morya.ru/ бронируйте номер в гостевом доме, где всегда чисто, уютно и комфортно. Для каждого гостя предусмотрена чистая постель, имеются все необходимые принадлежности для качественного и полноценного отдыха. С балконов открывается роскошный вид на природу. На широкой двуместной кровати вы сможете полноценно отдохнуть и выспаться. Во дворе имеется обустроенная зона отдыха, а также мангал для приготовления мяса. Недалеко находятся пляжи, аптеки, салоны красоты, магазины.
CaroloNtor
July 5, 2023 at 1:22 PM
http://www.teplo67.ru/
Juliamub
July 5, 2023 at 1:34 PM
смотреть порно большей
Juliamub
July 5, 2023 at 1:48 PM
порно фото девушек
https://www.pornozavod.me
Bobbienot
July 5, 2023 at 2:10 PM
https://adresspro.ru/
Juliamub
July 5, 2023 at 2:26 PM
порно без регистрации
Bobbienot
July 5, 2023 at 2:27 PM
https://adresspro.ru/
Juliamub
July 5, 2023 at 2:41 PM
классное порно
NatalieHeelf
July 5, 2023 at 3:14 PM
http://otdreklama.ru
Juliamub
July 5, 2023 at 3:19 PM
порно член
https://www.yaeby.art
NatalieHeelf
July 5, 2023 at 3:31 PM
http://otdreklama.ru
Juliamub
July 5, 2023 at 3:33 PM
русское порно пикап
avitskSeesk
July 5, 2023 at 3:41 PM
На сайте https://takerb.ru вы сможете поиграть в любопытные и интересные игры, развлечься как следует и получить приятные, яркие эмоции на весь день, а заодно еще и заработать неплохие средства, чтобы потратить на свою мечту. У вас получится испытать удачу, протестировав топовые слоты от лучших провайдеров, которые поставляют качественное оборудование. Вас ожидает Блэкджек, Плинко и многое другое. Зарабатывайте до 15% депозита от рефералов. Ежедневно получайте до 100 рублей бонусами.
Juliamub
July 5, 2023 at 4:10 PM
русское порно дочь
https://www.yaeby.co
Candicetarty
July 5, 2023 at 4:18 PM
https://www.primovk.ru/
Juliamub
July 5, 2023 at 4:25 PM
русский порно кастинг
https://www.yaeby.co
Candicetarty
July 5, 2023 at 4:34 PM
https://www.primovk.ru/
Juliamub
July 5, 2023 at 5:03 PM
много порно
Juliamub
July 5, 2023 at 5:17 PM
порно руками
https://www.yaeby.mobi
RoxaneDreds
July 5, 2023 at 5:22 PM
http://www.hram-pmi.ru/
RoxaneDreds
July 5, 2023 at 5:38 PM
http://www.hram-pmi.ru/
iyanoHirty
July 5, 2023 at 5:40 PM
На сайте https://topgear-online.ru/ вы сможете смотреть онлайн бесплатно на русском все сезоны и серии, спецвыпуски сериала Топ Гир с самого первого сезона до последних новинок. Top Gear – британское телешоу об автомобилях, в котором рассказывается о новиках автомобильного мира, проводятся тест-драйвы, а также различные знаменитости делятся своим мнением на тему мира авто.
Juliamub
July 5, 2023 at 5:56 PM
порно высокие
https://www.yaeby.red
Juliamub
July 5, 2023 at 6:10 PM
порно фильмы с русским переводом
https://www.yaeby.red
Lindarax
July 5, 2023 at 6:26 PM
http://lmtwedding.ru
Lindarax
July 5, 2023 at 6:42 PM
http://lmtwedding.ru
Juliamub
July 5, 2023 at 6:50 PM
скачать русское порно
https://www.yaeby.vip
Juliamub
July 5, 2023 at 7:05 PM
секс порно скачать
Julieepick
July 5, 2023 at 7:30 PM
https://www.1awa.ru/
Terrydop
July 5, 2023 at 7:40 PM
сео раскрутка сайтов
LeslieWet
July 5, 2023 at 7:43 PM
http://20541.adminka.cc/
Julieepick
July 5, 2023 at 7:46 PM
https://www.1awa.ru/
LeslieWet
July 5, 2023 at 7:57 PM
http://20541.adminka.cc/
AmandaDuh
July 5, 2023 at 8:35 PM
http://aptekaiskitim.ru
LeslieWet
July 5, 2023 at 8:36 PM
http://205412.adminka.cc/
LeslieWet
July 5, 2023 at 8:50 PM
http://205412.adminka.cc/
AmandaDuh
July 5, 2023 at 8:51 PM
http://aptekaiskitim.ru
Terrydop
July 5, 2023 at 8:54 PM
seo оптимизация и продвижение сайтов
Terrydop
July 5, 2023 at 9:05 PM
контекстная реклама стоимость
Frankjab
July 5, 2023 at 9:28 PM
https://telegra.ph/nastolnye-igry-dlya-detej-6-10-let-07-06
LeslieWet
July 5, 2023 at 9:29 PM
http://1032.adminka.cc/
Terrydop
July 5, 2023 at 9:29 PM
сео продвижение сайтов
Frankjab
July 5, 2023 at 9:35 PM
https://telegra.ph/nastolnye-igry-na-anglijskom-dlya-detej-raspechatat-07-06
Marlenepinny
July 5, 2023 at 9:39 PM
http://www.stk-rb.ru/
LeslieWet
July 5, 2023 at 9:43 PM
http://1032.adminka.cc/
Marlenepinny
July 5, 2023 at 9:55 PM
http://www.stk-rb.ru/
LeslieWet
July 5, 2023 at 10:22 PM
http://6862.adminka.cc/
LeslieWet
July 5, 2023 at 10:37 PM
http://6862.adminka.cc/
PaigeTes
July 5, 2023 at 10:43 PM
http://svet-okna.ru/
Frankjab
July 5, 2023 at 10:52 PM
https://telegra.ph/nastolnye-igry-dlya-detej-5-7-let-rejting-07-06
PaigeTes
July 5, 2023 at 10:59 PM
http://svet-okna.ru/
LeslieWet
July 5, 2023 at 11:16 PM
http://1559.adminka.cc/
LeslieWet
July 5, 2023 at 11:30 PM
http://1559.adminka.cc/
Frankjab
July 5, 2023 at 11:44 PM
https://telegra.ph/magazin-nastolnyh-igr-v-tbilisi-07-06
NicoleIrral
July 5, 2023 at 11:48 PM
http://40kvadratov.ru
NicoleIrral
July 6, 2023 at 12:04 AM
http://40kvadratov.ru
LeslieWet
July 6, 2023 at 12:10 AM
http://9314.adminka.cc/
Frankjab
July 6, 2023 at 12:22 AM
https://telegra.ph/nastolnye-igry-dlya-detej-3-4-let-svoimi-rukami-07-06
LeslieWet
July 6, 2023 at 12:25 AM
http://9314.adminka.cc/
Frankjab
July 6, 2023 at 12:44 AM
https://telegra.ph/nastolnye-igry-dlya-detej-7-let-otzyvy-07-06
SuzanneIsozy
July 6, 2023 at 12:54 AM
http://pechat-na-vsem.ru
LeslieWet
July 6, 2023 at 1:07 AM
http://7484.adminka.cc/
SuzanneIsozy
July 6, 2023 at 1:10 AM
http://pechat-na-vsem.ru
LeslieWet
July 6, 2023 at 1:21 AM
http://7484.adminka.cc/
nechkflack
July 6, 2023 at 1:21 AM
На сайте http://pankasyno7.com вы сможете узнать больше информации о популярном онлайн-заведении «Мистер Казино», которое считается самым востребованным в Польше. Оно рекомендует ознакомиться с огромным количеством развлечений, которые обязательно вам понравятся и помогут разнообразить досуг, интересно провести время. Этот портал не перестает радовать клиентов регулярным пополнением игр, чтобы удовлетворить предпочтения каждого пользователя. Имеются игры, в которые можно сыграть абсолютно бесплатно.
JulieAmamp
July 6, 2023 at 1:59 AM
http://azsvorota.ru
LeslieWet
July 6, 2023 at 2:02 AM
http://8287.adminka.cc/
Frankjab
July 6, 2023 at 2:13 AM
https://telegra.ph/nastolnye-igry-v-tbilisi-07-06
JulieAmamp
July 6, 2023 at 2:15 AM
http://azsvorota.ru
LeslieWet
July 6, 2023 at 2:16 AM
http://8287.adminka.cc/
DannyHestE
July 6, 2023 at 2:17 AM
неразрушающий контроль тензометрические методы гост
LeslieWet
July 6, 2023 at 2:59 AM
http://4461.adminka.cc/
AgnesSoK
July 6, 2023 at 3:05 AM
https://ur-otdel.ru/
LeslieWet
July 6, 2023 at 3:14 AM
http://4461.adminka.cc/
AgnesSoK
July 6, 2023 at 3:21 AM
https://ur-otdel.ru/
DannyHestE
July 6, 2023 at 3:23 AM
какие параметры измеряются приборами неразрушающего контроля прочности
Frankjab
July 6, 2023 at 3:41 AM
https://telegra.ph/kupit-nastolnye-igry-internet-magazin-veeam-07-06
Frankjab
July 6, 2023 at 3:43 AM
https://telegra.ph/nastolnye-igry-onlajn-na-dvoih-po-seti-07-06
Frankjab
July 6, 2023 at 3:47 AM
https://telegra.ph/nastolnye-igry-dlya-dvoih-na-bumage-07-06
LeslieWet
July 6, 2023 at 3:55 AM
http://8045.adminka.cc/
LeslieWet
July 6, 2023 at 4:09 AM
http://8045.adminka.cc/
BarbaraWrend
July 6, 2023 at 4:10 AM
http://gostbur.ru/
BarbaraWrend
July 6, 2023 at 4:26 AM
http://gostbur.ru/
LeslieWet
July 6, 2023 at 4:50 AM
http://4064.adminka.cc/
LeslieWet
July 6, 2023 at 5:04 AM
http://4064.adminka.cc/
LaurenLen
July 6, 2023 at 5:15 AM
http://zlatalina.ru
LaurenLen
July 6, 2023 at 5:32 AM
http://zlatalina.ru
LeslieWet
July 6, 2023 at 5:46 AM
http://2753.adminka.cc/
LeslieWet
July 6, 2023 at 6:01 AM
http://2753.adminka.cc/
avlovsOrarm
July 6, 2023 at 6:02 AM
Сайт https://medbloginfo.ru/ это полезные статьи и советы о медицине. Вы узнаете все о специализации врачей, лекарствах и препаратах, частях тела человека. Актуальные и свежие новости, обзоры, экспертные мнения и много другой полезной информации о медицине.
Kathypusty
July 6, 2023 at 6:22 AM
http://sgtyre.ru
Kathypusty
July 6, 2023 at 6:38 AM
http://sgtyre.ru
LeslieWet
July 6, 2023 at 6:43 AM
http://12456.adminka.cc/
LeslieWet
July 6, 2023 at 6:57 AM
http://12456.adminka.cc/
Hilmatriap
July 6, 2023 at 7:28 AM
http://redaktor76.ru
LeslieWet
July 6, 2023 at 7:37 AM
http://5555.adminka.cc/
Hilmatriap
July 6, 2023 at 7:44 AM
http://redaktor76.ru
LeslieWet
July 6, 2023 at 7:51 AM
http://5555.adminka.cc/
LeslieWet
July 6, 2023 at 8:31 AM
http://6666.adminka.cc/
Teresaduete
July 6, 2023 at 8:34 AM
http://ps23.ru
LeslieWet
July 6, 2023 at 8:45 AM
http://6666.adminka.cc/
Teresaduete
July 6, 2023 at 8:50 AM
http://ps23.ru
LeslieWet
July 6, 2023 at 9:26 AM
http://7777.adminka.cc/
LucilleWaw
July 6, 2023 at 9:39 AM
http://matreshka6.ru
LeslieWet
July 6, 2023 at 9:40 AM
http://7777.adminka.cc/
LucilleWaw
July 6, 2023 at 9:55 AM
http://matreshka6.ru
LeslieWet
July 6, 2023 at 10:22 AM
http://12561.adminka.cc/
LeslieWet
July 6, 2023 at 10:35 AM
http://12561.adminka.cc/
CarlieTroum
July 6, 2023 at 10:44 AM
http://labota.ru
CarlieTroum
July 6, 2023 at 11:01 AM
http://labota.ru
LeslieWet
July 6, 2023 at 11:16 AM
http://2222.adminka.cc/
LeslieWet
July 6, 2023 at 11:30 AM
http://2222.adminka.cc/
CynthiaLex
July 6, 2023 at 11:49 AM
http://good-service24.ru
CynthiaLex
July 6, 2023 at 12:06 PM
http://good-service24.ru
LeslieWet
July 6, 2023 at 12:09 PM
http://22221.adminka.cc/
LeslieWet
July 6, 2023 at 12:23 PM
http://22221.adminka.cc/
moskvwaf
July 6, 2023 at 12:31 PM
На сайте https://wf-game.ru/ вы найдете все актуальные пин коды Wafrace, а также ссылки лутдог, есть и подарочные ссылки, Origin. Представлена рубрика с гарантиями, контактами, аккаунты, ключи. Зайдите в колонку «Популярное», а также «Последние» и «В тренде». Изучите все меню сайта, чтобы принять правильное решение. Жмите на баннер, чтобы получить халявные пин коды прямо сейчас. К каждой записи имеются комментарии, которые может оставлять любой пользователь. Также есть новости сайта, которые публикуются ежедневно.
atveyAnory
July 6, 2023 at 12:53 PM
Le site https://fr.ikea-club.org/ est un club d’amateurs d’ikea. Vous pouvez découvrir des nouvelles intéressantes, lire des critiques, découvrir à quel point il est intéressant de refaire des meubles d’ikea, ainsi que lire des critiques sur les produits de ce magasin.
ShielaCoasp
July 6, 2023 at 12:54 PM
http://2karapuza.ru
LeslieWet
July 6, 2023 at 1:02 PM
http://22222.adminka.cc/
ShielaCoasp
July 6, 2023 at 1:10 PM
http://2karapuza.ru
LeslieWet
July 6, 2023 at 1:16 PM
http://22222.adminka.cc/
anyusPAm
July 6, 2023 at 1:23 PM
На сайте https://www.rospromtest.ru/content.php?id=5 ознакомьтесь с информацией, посвященной тому, что такое сертификат ISO 9001, кому и когда выдается. Кроме того, узнаете, во сколько обойдется оформление такого важного документа. На сам процесс уйдет всего один день. Для каждого клиента действует курьерская доставка, которая предоставляется абсолютно бесплатно. Для того чтобы получить документ, необходимо предоставить заявку, копии ОГРН, ИНН. На сайте вы увидите образец сертификата соответствия.
JamesZooto
July 6, 2023 at 1:52 PM
Dive into the mesmerizing velo snus experience and let our rich array of flavors elevate your senses!
LeslieWet
July 6, 2023 at 1:56 PM
http://22223.adminka.cc/
Sandrahotly
July 6, 2023 at 1:58 PM
http://forum-rem.ru
Steventotly
July 6, 2023 at 1:58 PM
Step into the fascinating world of velo pouches and let our diverse range of flavors invigorate your senses!
Benjamintotly
July 6, 2023 at 2:04 PM
Immerse yourself in the refreshing velo mint mini journey. Let the cool, crisp flavor invigorate your taste buds!
kvortRhype
July 6, 2023 at 2:09 PM
На сайте https://vpiteredom.ru/ получится подобрать теплую, уютную квартиру прямо в центре города. Также есть раздел с популярными объектами, в которых желают жить многие. Ознакомьтесь с каждым объектом поближе, чтобы точно не ошибиться с выбором и приобрести квартиру своей мечты. Напротив каждого объекта указан и год сдачи. Кроме того, опубликованы свежие и интересные новости, которые помогут узнать много нового и интересного. Изучите контакты, чтобы позвонить и уточнить всю интересующую вас информацию.
LeslieWet
July 6, 2023 at 2:09 PM
http://22223.adminka.cc/
Личный кабинет МосОблЕИРЦ
July 6, 2023 at 2:13 PM
https://eirc-mo.ru/ личный кабинет ЖКХ МосОблЕИРЦ московской области. Особенности работы личного кабинета Мособлеирц.
Sandrahotly
July 6, 2023 at 2:14 PM
http://forum-rem.ru
LeslieWet
July 6, 2023 at 2:50 PM
http://xn--m1abbbg.cam/
Мастер Самоделкин
July 6, 2023 at 2:57 PM
Полезная информация для тех, кто стремится получить всестороннее представление.
Ameliaecoge
July 6, 2023 at 3:03 PM
https://seoconnect.ru/
LeslieWet
July 6, 2023 at 3:04 PM
http://xn--m1abbbg.cam/
Ameliaecoge
July 6, 2023 at 3:19 PM
https://seoconnect.ru/
LeslieWet
July 6, 2023 at 3:44 PM
http://xn--m1abbbg.top/
LeslieWet
July 6, 2023 at 3:58 PM
http://xn--m1abbbg.top/
JuanitaBeque
July 6, 2023 at 4:08 PM
http://shevron-dv.ru
JuanitaBeque
July 6, 2023 at 4:24 PM
http://shevron-dv.ru
LeslieWet
July 6, 2023 at 4:38 PM
http://xn--m1abbbg.vip/
LeslieWet
July 6, 2023 at 4:51 PM
http://xn--m1abbbg.vip/
DorisTruby
July 6, 2023 at 5:12 PM
http://film-repeticii.ru
DorisTruby
July 6, 2023 at 5:29 PM
http://film-repeticii.ru
LeslieWet
July 6, 2023 at 5:30 PM
http://www.komandor-marine.ru/
LeslieWet
July 6, 2023 at 5:44 PM
http://www.komandor-marine.ru/
RobinUteks
July 6, 2023 at 6:18 PM
http://sk-dejavu.ru
LeslieWet
July 6, 2023 at 6:25 PM
http://www.esoled.ru/
RobinUteks
July 6, 2023 at 6:34 PM
http://sk-dejavu.ru
LeslieWet
July 6, 2023 at 6:39 PM
http://www.esoled.ru/
LeslieWet
July 6, 2023 at 7:19 PM
http://techfaq.ru/
AnnieSuirl
July 6, 2023 at 7:23 PM
http://kashirka-m.ru
LeslieWet
July 6, 2023 at 7:33 PM
http://techfaq.ru/
AnnieSuirl
July 6, 2023 at 7:39 PM
http://kashirka-m.ru
LeslieWet
July 6, 2023 at 8:14 PM
http://industry-it.ru/
LeslieWet
July 6, 2023 at 8:28 PM
http://industry-it.ru/
CarolexasE
July 6, 2023 at 8:28 PM
http://siran.ru
CarolexasE
July 6, 2023 at 8:43 PM
http://siran.ru
LeslieWet
July 6, 2023 at 9:08 PM
http://nikolaevka-mo.ru/
arkeloCic
July 6, 2023 at 9:20 PM
Мы предлагаем диваны https://mebel-studia.ru/mjagkaja-mebel/divani/, изготовленные от производителей, которые отличаются высоким качеством и вниманием к деталям. Мы понимаем, что ваш диван должен прослужить долгие годы, поэтому мы тщательно подбираем модели, которые отвечают самым высоким стандартам.
LeslieWet
July 6, 2023 at 9:21 PM
http://nikolaevka-mo.ru/
SandraGaf
July 6, 2023 at 9:32 PM
http://zip64.ru
marovmog
July 6, 2023 at 9:34 PM
На сайте https://eurotoday.net/ вы сможете ознакомиться с последними экономическими, политическими новостями. Также есть материалы на бизнес тему. Представлены разделы с новостями Великобритании, Франции, Германии, Италии, Испании. Все они содержат только важную и актуальную информацию, события, которые произошли совсем недавно. Есть данные о первых лицах государств, их биография, любопытные факты, которые будет полезно узнать и вам. Все новости с картинками, чтобы их было интересно читать.
SandraGaf
July 6, 2023 at 9:48 PM
http://zip64.ru
LeslieWet
July 6, 2023 at 10:01 PM
http://www.pr-line.ru/
LeslieWet
July 6, 2023 at 10:15 PM
http://www.pr-line.ru/
alyushSip
July 6, 2023 at 10:23 PM
На сайте https://agsvv.ru/ вы сможете ознакомиться с каталогом медтехники от производителя ООО «Хронос». Завод основан в 2009 году и производит облучатели для лечения кожных заболеваний которые помогут в лечении кожных заболеваний, таких как псориаз, витилиго, атопический дерматит, себорейный дерматит, экзема, грибовидный микоз, отрубевидный лишай, нейродермит, очаговое выпадение волос, гнездовая алопеция, парапсориаз.
Evelynmap
July 6, 2023 at 10:38 PM
http://74-ok.ru
Evelynmap
July 6, 2023 at 10:54 PM
http://74-ok.ru
LeslieWet
July 6, 2023 at 10:56 PM
http://www.xn--2015-43dl0dg0aab9brh1e.xn--p1ai/
LeslieWet
July 6, 2023 at 11:10 PM
http://www.xn--2015-43dl0dg0aab9brh1e.xn--p1ai/
Jewelflulp
July 6, 2023 at 11:43 PM
http://17592.adminka.cc/
LeslieWet
July 6, 2023 at 11:49 PM
http://xn--e1aecfjdenbacbnzkf4s.xn--p1ai/
Jewelflulp
July 6, 2023 at 11:59 PM
http://17592.adminka.cc/
LeslieWet
July 7, 2023 at 12:03 AM
http://xn--e1aecfjdenbacbnzkf4s.xn--p1ai/
LeslieWet
July 7, 2023 at 12:43 AM
http://4vkusa.ru/
udakoclori
July 7, 2023 at 12:44 AM
На сайте https://vpiteredom.ru/ получится подобрать теплую, уютную квартиру прямо в центре города. Также есть раздел с популярными объектами, в которых желают жить многие. Ознакомьтесь с каждым объектом поближе, чтобы точно не ошибиться с выбором и приобрести квартиру своей мечты. Напротив каждого объекта указан и год сдачи. Кроме того, опубликованы свежие и интересные новости, которые помогут узнать много нового и интересного. Изучите контакты, чтобы позвонить и уточнить всю интересующую вас информацию.
LeslieWet
July 7, 2023 at 12:58 AM
http://4vkusa.ru/
sveshcerge
July 7, 2023 at 1:09 AM
На сайте https://takerp.ru вы найдете все для интересного, веселого времяпрепровождения. Огромное количество слотов, игр, которые зарядят позитивом и приятными эмоциями. И самое главное, что выигрыш выводится в минимальные сроки, быстро, что позволит потратить деньги в ближайшее время. Из огромного многообразия игр вы обязательно выберете то, что поднимет настроение. В эту минуту вы сможете пополнить счет либо вывести деньги. Имеется таблица с игроками и количеством выигрыша. Для того чтобы найти подходящую игру, необходимо воспользоваться специальным поиском.
anechGluri
July 7, 2023 at 1:21 AM
На сайте https://bloggery.io/ воспользуйтесь услугами блоггеров, которые разрекламируют ваш товар, повысят узнаваемость бренда и помогут получать больше денег. А для блоггеров эта площадка станет незаменимой для поиска рекламодателей. Это ваша возможность стать более популярным, раскрученным и даже попасть на телевидение, заработать больше денег и заключить контракты с одними из лучших марок. Рассчитайте стоимость размещения прямо сейчас. Несколько тысяч блоггеров сотрудничают с площадкой на ежедневной основе.
LeslieWet
July 7, 2023 at 1:39 AM
http://www.racu.ru/
новости Карачева
July 7, 2023 at 1:51 AM
Статья помогла мне получить новые знания и пересмотреть свое представление о проблеме.
LeslieWet
July 7, 2023 at 1:53 AM
http://www.racu.ru/
LeslieWet
July 7, 2023 at 2:35 AM
http://71234.adminka.cc
LeslieWet
July 7, 2023 at 2:49 AM
http://71234.adminka.cc
MaribelJam
July 7, 2023 at 3:32 AM
http://235156.adminka.cc/
MaribelJam
July 7, 2023 at 3:46 AM
http://235156.adminka.cc/
MaribelJam
July 7, 2023 at 4:28 AM
http://gallery-3.ru/
MaribelJam
July 7, 2023 at 4:43 AM
http://gallery-3.ru/
Stuartpes
July 7, 2023 at 5:22 AM
займы без отказа
MaribelJam
July 7, 2023 at 5:24 AM
http://kstatida.ru
MaribelJam
July 7, 2023 at 5:38 AM
http://kstatida.ru
ysotsGet
July 7, 2023 at 6:17 AM
На сайте https://usaemall.com/ изучите информацию, которая касается самых последних новостей мира. Также имеются свежие и правдивые данные на тему политики, экономики, здоровья, стиля жизни, окружающей среды, спорта, путешествий, высоких технологий. Имеется колонка с новостями за последний день или несколько часов. Их обсуждает весь мир, а потому они будут интересны и вам. Опубликован и курс биткоина, а также стоимость акций различных корпораций. Также есть информация на тему спорта. Все новости созданы экспертами, что позволит не сомневаться в достоверности фактов.
MaribelJam
July 7, 2023 at 6:19 AM
http://618351.ru/
MaribelJam
July 7, 2023 at 6:34 AM
http://618351.ru/
MaribelJam
July 7, 2023 at 7:15 AM
http://seo-toria.ru/
Eugenebruch
July 7, 2023 at 7:22 AM
Официальный сайт Кэт Казино
MaribelJam
July 7, 2023 at 7:29 AM
http://seo-toria.ru/
Eugenebruch
July 7, 2023 at 7:37 AM
кэт казино
lyanoTob
July 7, 2023 at 7:50 AM
https://bebetter-shop.com/ BeBetter Shop – #1 Worldwide Blockchain Marketing agency. Complete confidentiality & anonymity. Fast online reputation boosting! Get up to 1000 reviews and brand mentions within just one month! There is no need to spend your budget on PPC advertising with a very short-term effect. Get verified reviews that will pay off your advertising investment for years to come. Move up to the Top of the Blockchain category on popular resources and engage your target audience!
MaribelJam
July 7, 2023 at 8:10 AM
http://carrotstyle.ru/
MaribelJam
July 7, 2023 at 8:24 AM
http://carrotstyle.ru/
MaribelJam
July 7, 2023 at 9:05 AM
http://marchlab.ru/
MaribelJam
July 7, 2023 at 9:19 AM
http://marchlab.ru/
MaribelJam
July 7, 2023 at 9:58 AM
http://www.kongru.ru/
MaribelJam
July 7, 2023 at 10:13 AM
http://www.kongru.ru/
MaribelJam
July 7, 2023 at 10:53 AM
http://www.maratmazur.ru/
MaribelJam
July 7, 2023 at 11:07 AM
http://www.maratmazur.ru/